Desserts

Raw Vegan Fudge In A Jar

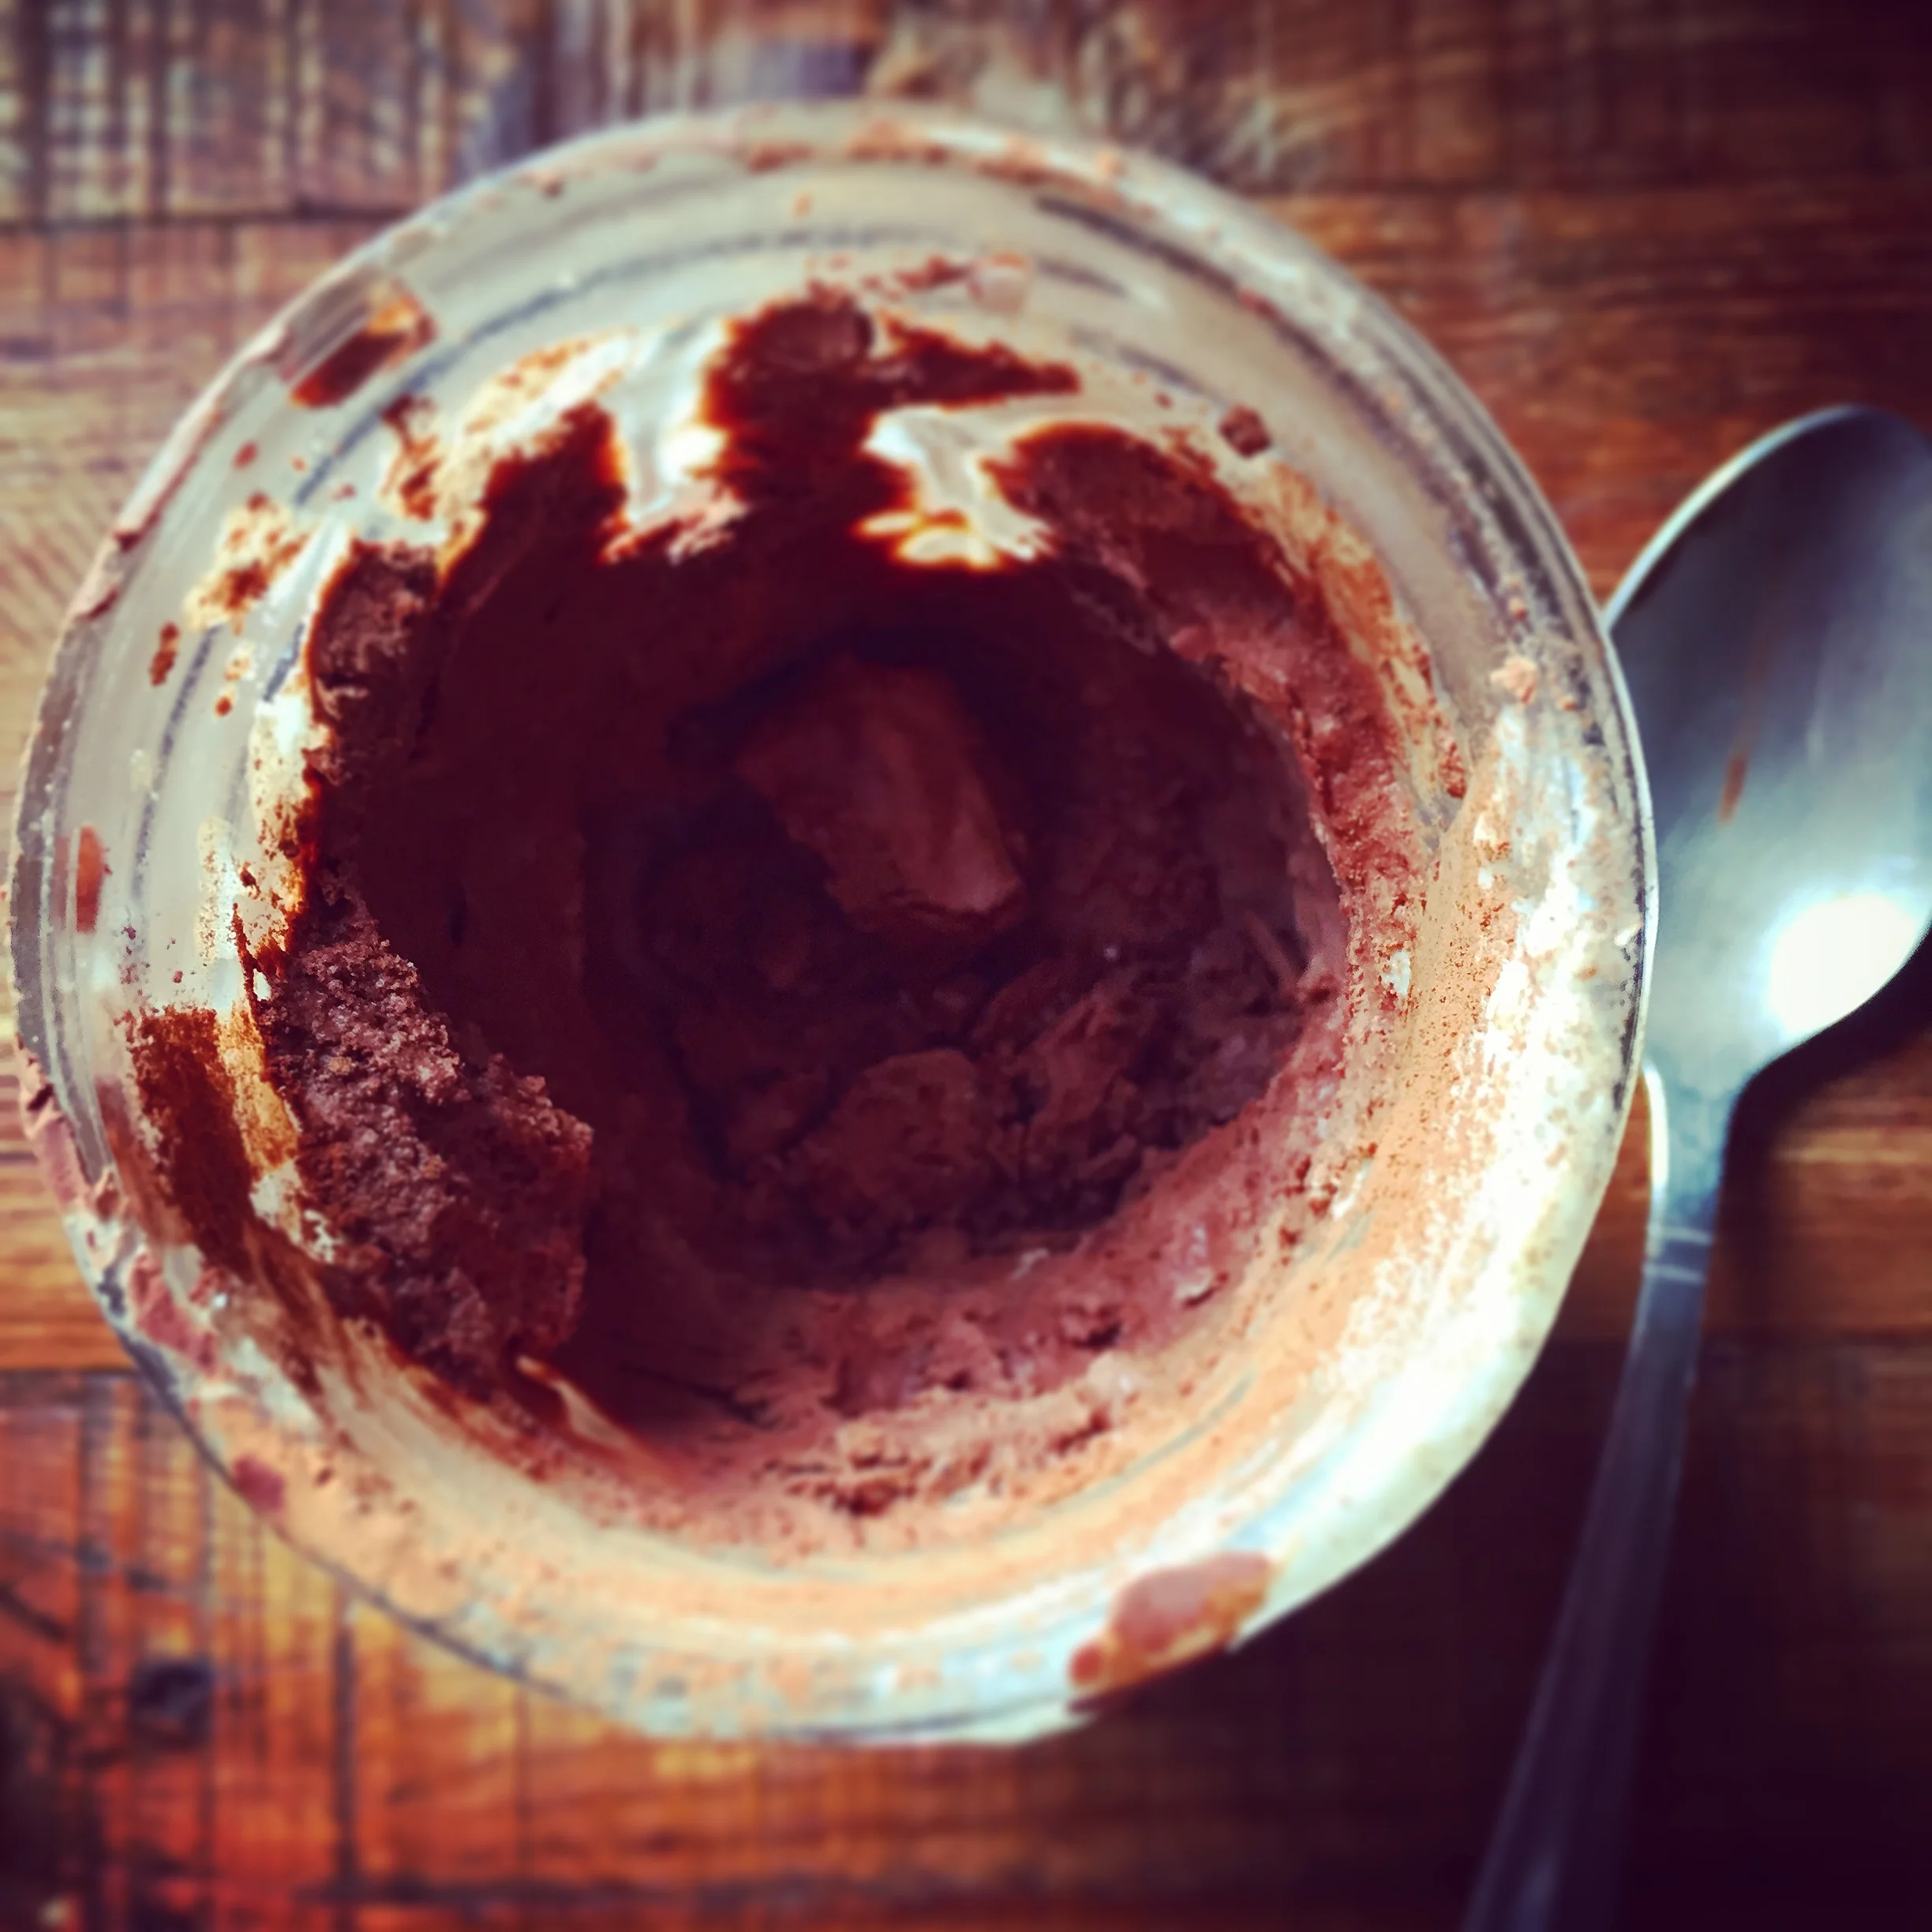
This was a vamp off a frosting recipe that inspired me, I tweaked and then refrigerated and then voila - it hardened into fudge. I went with it. Happy little accident, and Bob Ross would be proud. 

It couldn't be easier.  It's low-glycemic (I used stevia), loaded with healthy coconut fats, high in antioxidants from the cacao powder (or carob if you choose to use that), and just plain delicious. Depending on whether or not you actually like the flavor of coconut manna, you can opt for 1/2 coconut mana and maybe 1/2 melted cacao butter. More chocolate flavor, less coconut. Either way. Just make it, love it, and enjoy. Honestly, I have this covered in plastic in the fridge and eat about a tablespoon at a time with some fruit and it really hits the spot when I want some chocolate. It also keeps well for about 5 or 6 days, so it's perfect in that regard, that you don't really have to think about dessert: it's already waiting for you!

1/2 cup softened coconut manna/butter (do not use coconut oil though)

       (You can also do 1/2 and 1/2 with melted cacao butter)

1/2 cup hot water

1 dropper full hazelnut stevia

1 tsp hazelnut extract

2 tablespoons cacoa powder

1/2 tsp reishi, maca, maqui, or other medicinal powder (Optional but fun)

pinch sea salt

Blend ingredients in a mini personal blender, pour into a ball jar, cover and refrigerate. After a few hours, the coconut will harden and turn into a soft fudge: hard enough to spoon up and devour! You can also change this up and add in some cinnamon, nutmeg, go crazy...make it your own. Enjoy! 

Raw Hazelnut Mocha Cheesecake Bites

I often think we're at war - with desserts. First, we love them, we crave them, we make them, we share them, we delight and ooh and ah over them and then it happens (for me, at least, and I know for many others..)....it's the "wow, I'm sleepy" post-dessert coma. For me, it's even with say two bits of ice cream or a date-rich raw brownie. Yes, I said it. All those raw desserts that we think are good for us in fact may not be so good for SOME of us, and I'm part of that population. Now, for someone coming from a binge of eating Dairy Queen and Ho Ho's, yes, raw desserts are a step up since they actually contain good fats from nuts, seeds, and even the dried dates have minerals and fiber in them that we need. But for some of us, even those dried fruits are too sweet for us. 

So I've created a preverbal white flag that (1) gets us what we want (that sweet goodness) and (2) doesn't put us to sleep. GET OUT, you say! But no, I'm not kidding. It's that good and in fact, it's even safe for people like me who have insulin resistance. Give it a whirl and see what you think. The best part is that these are good for ANYONE, even for those of us who may not need a nap after dessert. Kudos to you, and you should be proud if that's you! But for many of us, that nap, heavy feeling after dessert is a feeling we know all-too well, and well, it jus doesn’t feel good at all.

Oh, and yes, these do take some finesse and time and babysitting and you might say "but I don't have the time SHE has to make these". Let me tell you something, you. I don't have the time either! In fact, I don't have the time NOT to make these, since with one fell swoop (maybe 1/2 hour) I have dessert for the rest of the week. These are filling and rich and you don't need that much, honestly, to make your head spin with delight. Cook once, enjoy for a looooooong time. Promise. 


Crust Ingredients:

1 cup walnuts/brazil nuts mixed (you can also do just walnuts)

2 dates (that’s it!)

two pinches sea salt

2 heaping tablespoons raw cacao powder

1 heaping tablespoon of dandy blend powder (herbal coffee)

2 dropperfulls (you can even do 1.5) of hazelnut liquid stevia

1 tablespoon vanilla and/or hazelnut extract

1 tablespoon water


Creamy filling:

1 cup cashews, soaked, drained and rinsed

2 tablespoons coconut oil, melted

1 tsp hazelnut extract (may substitute vanilla extract)

1 dropperfull of hazelnut-flavored liquid stevia


Crust: In a food processor, process crust ingredients until they start to stick together between fingers when pinched. Don’t over process, or it will get oily. You want it just enough so it looks fudgy, but nothing more.  Feel free to use another tablespoon water to get it there. Plop out the dough onto a teflex sheet, wax paper, even a silicone baking liner and press it out using your hands (you can also do this with another wax paper sheet on top and use a mini-rolling pin). You want a uniform thickness, with tight edges. I find that ½ inch is a bit thick but ¼ inch is too thin and it breaks, so aim for somewhere in between. The end product should look like a rectangle.  Pop it in the freezer for about 10 minutes. After that, you may store it in the fridge.

Creamy filling: Combine all ingredients in a vitamix or strong blender until smooth. Pour out into a bowl and refrigerate for at least 2 hours.

Cut the crust in two pieces (which will be the top and bottom layer of the cheesecake bites). Place the creamy filling onto one of the layers and spread to the edges. Carefully take the second crust and place it on top. Cut it into squares using a sharp knife. Keep refrigerated and enjoy.


Three Layer Spiced Apple Pie

Back in 2014, I had the crazy idea of signing up for the "Hot Raw Chef, 5 in 5 Video Recipe Contest", through Living Light Culinary Insitute. The thing is, I am so shy on camera, and went back and forth for days on whether or not I should do it. I wasn’t really handy with my camera, the lighting was behind me which made everything super bright in the kitchen, and I realized that to make this happen, I had to become ok with the discomfort of being seen on camera. Oh, and the time limit was 5 minutes - how do you create a gourmet recipe in 5 minutes?

I finally bit the bullet and created my video on the LAST day of submissions. I uploaded the video at 11:00 pm, an hour before the “gates would close”. The winner of the contest would receive a scholarship to the Living Light Culinary Institute in Fort Bragg, CA. First, I’ve never been to California, and Living Light was a dream school for me. So shyness aside, I went for it. And (a shock to me), I actually won!

The best gift, however, is actually spreading the word about plant-based foods, and more specifically, raw foods with all of you. I hope you enjoy the video and recipe as much as I do.

Check out the link HERE and give it a thumbs up! PS. you may want to subscribe as there wil be more videos coming your way!

Raw Figgy Orange Cheesecake

Screen Shot 2019-09-19 at 1.29.16 PM.png

Years ago, we were gifted a massive bag of fresh figs from our friend Frank ~ freely picked! This recipe is dedicated to his trees and generosity! We and our bellies thank you. 

Crust:

1 cup almonds

½ cup walnuts

½ cup pumpkin seeds

2 T coconut oil, melted

2 pinches salt

1 heaping tablespoons cacao

2 heaping teaspoons maca

1-3 figs, optional

Method: Combine the nuts and seeds in the food processor until it resembles rice.  Add in the oil, salt, cacao, maca and combine. If it's too dry (and doesn't stick together between your fingers when pinched), add in 1 fig, then 2, or all three until the mixture combines well together. Set aside. 

Cheesecake filling:

2 cups cashews

¾ cups fresh orange juce plus ¼ cup water

grated zest of 1 orange

pinch sea salt

tsp vanilla

¼ plus 1/8 cup coconut oil, melted

Method: Combine all the ingredients together until well blended in a high-speed blender. It should be super smooth. Set this aside.


Middle layer:

1 cup figs, pureed in a food processor


Extras:  I used about 28 halves of figs for the top, so 14 whole

Plus about 10 figs for the sides of the cake


Line a 7.5 inch removable bottom springform pan with plastic wrap, making sure there is excess that can drape over the sides. Fill in the crust on the bottom so that it’s even and in one smooth layer.  Pour in almost half of the cheesecake filling, covering the crust.  Add in the middle pureed fig layer and using a spatula, make sure it is even and smooth.  Now take the 10 figs for the side of the cake, cut them in half and having the middle of the fig facing out, layer only the SIDES of the pie mold – it will look like a wall of figs on the inside of the pie edge.  Then fill the rest of the pie with the cheesecake filling, using a spatula to smooth it over the figs as well.  Some of the figs might pop out of the cheesecake layer, but just push them back in, or don’t worry about it. We’ll cover it with figs anyway.

Freeze this overnight.

In the morning, cut the 28 figs in half and decorate the top.  Let it defrost just about 10-15 minute so it’s easy to cut but still semi-frozen to retain the shape well. To decorate, you can drizzle with honey, cacao nibs and coconut flakes. Enjoy!


Coconut Raspberry Ice Cream

Soon are the days when we get to go to the beach, enjoy the sunshine on our backs, make cooling drinks and refreshing desserts. It's a normal April day, at 77 degrees! Spring is still here but this past week has felt a lot like summer, so we've needed to try out some fun new dessert recipes to cool us down. Of course, it goes without saying, this is low-glycemic and diabetes friendly (although you should still check your blood sugar if you're sensitive). The only sugar here comes naturally from the raspberries, which happen to be the lowest sugar berry around (even topping the superstar blueberry!)

This ice cream has a medium firm body, tart raspberry flavor, and has a mellow sweetness from the stevia - the texture actually almost like a sorbet ice cream mixed together. Is there such a thing? Now there is. 

This is pretty heavy on the coconut, which I love, but the taste will change with whatever brand to use. You can also decide to use half coconut milk and half almond milk for something a little lighter, although it will alter the flavor. Feel free to play around with this template! 

Also, if you like this recipe, you may want to check out our low-glycemic dessert book, found here. 

One 12-ounce bag frozen organic raspberries

1 can of your favorite coconut milk (or switch 1/2 out with almond milk)

2 full droppers of liquid stevia (start with less and taste for preference)

Combine all ingredients together in a full-powered blender (like a vitamix) and use the tamper to push everything down together into the vortex. You might need a bit of elbow grease here, as it won't be easy. It should turn out to be the consistency of soft serve ice cream. If you'd like it a bit more firm, feel free to then transfer it to an ice cream maker and process according to manufacturer's instructions. 


Cinnamon & Pumpkin Seed Baked Pears

IMG_8826.JPG

It’s not uncommon to want sweet things during the colder weather ~ puddings, baked goods, breads, etc. But the flour/sugar equation isn’t always the best for us. I was hoping to remedy the sweet with something healthy, and for certain, these baked pears fit the bill. They’re a synch to make, and they’re beyond delicious and a great way to appease that sweet tooth without the flour (and dessert coma) afterwards. Plus I love that just with a few simple ingredients, these pears get transformed into a luxurious dessert you can even offer to guests, for a light post-meal sweetness.

Serves 2-4

Two pears (Bosc preferred but green are also fine)

1/2 small lemon, juiced

cinnamon

4 tsp pumpkin seeds

coconut nectar

Slice pears lengthwise in half. Cut a small slit on the round outside belly of the pears so they can sit flat in the casserole dish. Scoop out the seeds using a melon baller or a spoon. Place the pears in the casserole dish, and squeeze the lemon over them. Add 1 tsp pumpkin seeds to each middle of the pear, sprinkle with cinnamon, and bake uncovered at 350 degrees for 30 minutes. When they are done, drizzle a little coconut nectar on the top and serve. These go great with some vanilla coconut yoghurt, or your favorite dairy-free vanilla ice cream. Enjoy!

IMG_8827.JPG


Raw Carob Raspberry Brownies

Let's just be clear, there needs to be dessert in the house or I get cranky. Actually....scratch that. There needs to be CHOCOLATE in the house or I get cranky. But with insulin resistance (or on the mend from it!) there's not much dessert I can have....or so you'd think.

Lucky for you, I wrote a whole ebook (available here) on sweets that are low-glycemic with barely a drop of sugar in them (I can't say completely sugar free since I do use raspberries...but other than that, no dates, maple syrup, honey, sugar, raisins, none of that!) 

I've enjoyed raw brownies made with dates for a long time, topped with chocolate ganache (made with maple syrup) and raspberries...but I wanted to try something even better. Something you can eat without guilt!

Enter....The raw carob brownies...of your dreams. 

And yes, while carob doesn't necessarily make everyone's head turn or toes curl, this is actually a glorious marriage of dark beautiful chocolatey goodness. A blend you'd never suspect, but one that works perfectly.

Brownies:

3 cups walnuts

1/2 cup cacao powder

1 scoop sunwarrior protein powder, chocolate (optional)

pinch salt

1 tablespoon vanilla extract

2 dropper full of hazelnut or english toffee stevia

scant 1/4 cup water (or herbal coffee if you feel adventurous)

2 tablespoons unsweetened shredded coconut

Pour the coconut evenly on the bottom of an 8x8 brownie pan. Set aside.

Pulse walnuts in a food processor until they resemble rice. Add in the other ingredients and process until mixture starts to crumble into even smaller bits. As machine is running, start to pour in the water little by little (you may not need all of it) until mixture starts to stick when pressed together between your fingers. Taste for sweetness and adjust with stevia. Pour this mixture in the brownie pan and press down to form a smooth surface. 

Ganache: 

1/3 cup coconut oil, melted

1/4 cup cacao butter, melted

pinch salt

1/2 cup carob powder

2 dropper fulls hazelnut or english toffee stevia

Decorate: freeze dried raspberries and 1 tablespoon unsweetened shredded coconut 

Blend ingredients together in a high performance blender until smooth. You might add a few tablespoons of water if you need to get it running, but try not to if at all possible (it sort of separates)..... The ganache might look lumpy...that's ok. It's not going to be super smooth and that's actually a desired effect (more surface area means you get taste all of that ganache goodness!)

Pour ganache over brownies, and decorate with freeze dried raspberries and the remaining coconut. Refrigerate at least 2 hours. Cut one out and enjoy it...eventually you'll want to tear them out of the pan like an animal, which is ok too (see the photos I enclosed). 


Currant & Tangerine Popsicles

Original post written: 2014

Um, there are no words to describe…I can’t even.

I had the best time this past spring taking an Ayurvedic Cooking course at the Natural Epicurean, and I’ve been implementing what I’ve learned about spices and flavor profiles into my current raw “uncooking”. This is one of those recipes that is so flipping good, there are no words. It’s amazing what happens (whether cooked or uncooked) when you combine whole ingredients with aromatic Indian spices. Flavors bloom.

This blog is pretty short since, well, I’m sitting here eating this gorgeous popsicle trying to come close to what it tastes like (and I have to say, I'm rather distracted), but I think you have to try it to believe me. If you can imagine creamy tangerine sorbet with a hint of anise and cinnamon, then you’re close, but not quite there. A pinch of cardamom for floral and spicy aroma, and tropical coconut for sweetness and freshness. Combined into one, this was an experiment, but one that I know I will repeat many times this summer. 

This is currant season, if you haven’t seen them yet! They come in beautiful reds, blacks and whites, although I used the reds for this recipe. When currants come into season, you have to take full advantage, leap high into the ground with glee, and get as many as you can. They are delicious, eaten raw, like candy, but in this case, we decided to take them over the top. To boot, these are sugar free, low-glycemic, so if you are struggling with insulin resistance, feel free to make these and consider them a delicious treat without the worry.  

It depends on how big your popsicle molds are, but for us, this recipe made about 4. Sad, since I already want more.

About 2 cups currants, blended, strained to leave you about ¾ cup liquid (Discard pulp)

1 cup canned coconut milk (include as much of the solid fat as you can, then top the rest with the remaining coconut liquid)

¼ tsp each: anise, cinnamon, cardamom powders

2 droppers full of stevia

Pinch salt

3 drops Young-Living brand Tangerine Vitality essential oil** 


**This recipe uses only Young Living brand Tangerine Vitality essential oils. Please do not ingest any other oils.  If you don't have this oil, please reach out (I'm happy to answer any questions) or just use 1 tablespoon organic tangerine/orange zest. 


Combine all ingredients in a blender until smooth, and pour out into molds. Freeze over night. Enjoy!

Ground Cherry & Ginger Coconut Ice Cream

Farmers rule! And farmers markets rule even more because they bring everyone together. The best find last week at the Red Bank farmers market was this glorious mound of ground cherries. I had to make a wish, since I'd never ever had one and the taste was out of this world, indescribable, pretty delectable. 

IMG_6626.JPG

Quite easily, I could peck at them all day as I walk back and forth, and just eat them straight out of their wonderful papery wrappers, but I kept tasting a hint of ginger....or I should say, the two flavors would marry very well. Ground cherries, at least as I taste them, are a mixture of kiwi and some kind of citrus, delicate, sweet, and pretty addictive. I figured, let's do something with these sweet little magical fruits. 

All you really need is 4 ingredients. Why? Let's be real here. I'm a 4 ingredient kind of girl. Yes, I might make pretty complex gourmet raw and vegan foods, but when it comes to feeding myself, it needs to be simple, fast and delicious (and with ingredients I can remember). 

One note about this ice cream: make it when you need it. Meaning, it's not one of those "oh, I forgot it in the freezer" types of ice cream. It's almost like banana ice cream, which I've found best when ready made so as to avoid the chunks of ice cream you get when you let it defrost a bit. It just doesn't "scoop" as nice after it's been frozen. If you don't mind it more like soft serve, definitely freeze it and defrost as you need it, but it solidifies in the freezer pretty well and doesn't replicate what you can do with store-bought ice cream that you can just spoon in your bowl. Most likely due to the fact that there are no stabilizers, thickening agents, etc. in this one. 

That said, it would make a killer popsicle. 

Ingredients: 

1 can coconut milk, refrigerated overnight

1 inch piece ginger, grated (if you like it extra ginger, go for a 2-inch knob)

1.5 cups ground cherries, measured after you've peeled them

dropper full of liquid stevia

Make sure everything is cold when you start, and that your ice cream container has been in the freezer for at least overnight. Combine all ingredients in a blender until smooth and taste for sweetness. Remember, if it's a little sweet now, it will lessen in sweetness as it's frozen. 

Pop in the ice cream maker and process according to manufacturer's instructions. For mine, I kept it in for about 25 minutes and it was smooth and creamy. Enjoy!

The Most Chocolate-y Un-Chocolate Bar

If you read my last chicory coffee post, you saw that I’m taking a break from chocolate. Why would anyone in their right mind to that, you ask? Just as an experiment. I figure, I crave it, I eat the highest quality chocolate, but are there ways around it? Primarily, I’m trying to stay away from caffeine and the very little that I get in these beautiful little nibbles of chocolate here and there sometimes make my ticker, well, tick faster.

I mainly miss the aroma of chocolate. The taste is great, but really, it’s the scent of it. If I could have a chocolate candle burning in the house {without getting a headache from it}, I’d be in heaven. But for now, I must resort to stealth & experimental ninja moves in the kitchen to procure that which I desire most: the most chocolate-y un-chocolate bar.

What, what?  Yes, yes.

The best part? NO sugar. That’s right. It only uses stevia and two little raspberries that are completely optional by the way. It’s like a raw, paleo, low-glycemic, gluten free, cruelty-free, magical, good for you unchocolate bar. The other best part? It uses carob, which is a dreamy substitute that, when used the right way, can fool any palate. 

Carob powder

Carob powder

It’s summer, so lately I’m in the house less and outside of it more, tending to the voracious garden and getting some activities in. Because of this, most of my recipes are quick and no fuss.

I gathered some ingredients together and the first time, it was a FLOP. The chocolate was amazingly good, but 80 degrees in the house made it fall apart on contact. The second time, instead of using coconut oil, I used cacao butter and that fixed everything. Live and learn, and eat as you go, but this is as chocolatel-y an un-chocolate bar can get! 

Cacao butter wafers. 

Cacao butter wafers. 

So what are these secret incredients: 

Carob: it’s the winner when you want to have something chocolate-y.

Salt: in all desserts to bring out the flavors – a pinch of salt.

Cacao butter: keeps it stable, although I still recommend keeping it in the fridge.

Cacao nibs (if you have no issues with caffeine, put them in there as they add a crunch, otherwise don’t include)

Almond butter: keeps it raw and adds some protein.

Raspberries: take it over the top.

Method: 

4 tablespoons carob powder

pinch sea salt

1 tablespoon cacao nibs {optional}

4 tablespoons melted cacao butter {in dehydrator for truly raw, or stovetop in a double boiler}

2 tablespoons raw almond butter

1 dropper full hazelnut or original stevia

2 freeze dried raspberries, optional {I found mine at Trader Joe's}

Combine all ingredients except for raspberries together and smooth. Taste the "batter" and make sure it doesn't need more salt or stevia, per your palate. In a silicone mould {I used a chocolate bar mold but also little ones for surplus}, pinch the raspberries into a powder and sprinkle into the moulds. Pour the chocolate mixture in. Place in fridge for at least 3 hours. Un-mould and enjoy! This makes enough for one chocolate bar and about 5 little mini moulds for the surplus batter, roughly 1 tablespoon each.


Berry Dream Soft Serve Ice Cream

We've started summer a bit early. We've had a long winter, paid our dues through shoveling and although I love the snow and its magical solitude, I really long for dipping my toes in the surf, opening up all the windows in the house and wondering which t-shirt I should wear that day. Those days will come soon, but for now, we're enjoying a little splurge in the sweet tooth department...we all have it, and I personally am confessing to it. With the recent emphasis on low-glycemic foods, however, sweet and healthy don't always get along (until now).

Enter the berry dream soft serve ice cream....

My favorite is to allow a little crunch to it...add in some crushed walnuts or cacao nibs, coconut, what have you...but it's like soft serve with some naughty add ins, except without the belly ache after, no bloating, and all the satisfaction of hunkering down to a nice bowl of chilled goodness.

The BEST part is that it's made literally in under 5 minutes with staples we all have on hand: a can of coconut milk, some frozen berries, and your trusty bottle of stevia. So...your in-laws come over and you want to wow them? This will do the trick (without breaking a sweat).

1 can (chilled) organic coconut milk

1 bag frozen strawberries

1-2 dropper fulls of liquid stevia (non alcohol is best)

In a vitamix or strong blender, combine all ingredients together and blend with the tamper until smooth. Dish out, spoon in hand, and enjoy wholeheartedly.