The Seasonal Eating Cookbook is here! Available in Ebook, Coil and Hardcover formats.
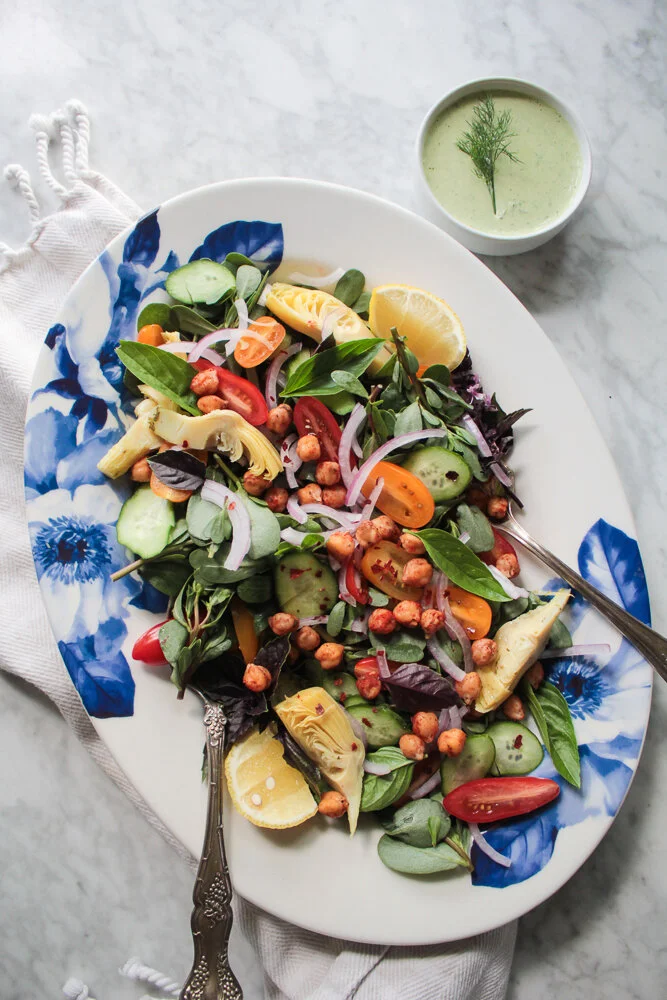
While some people view purslane as a pesky weed, I think of it as a nutritional powerhouse and a free edible you can grow just about anywhere. Purslane looks a little bit like a succulent, with its puffy, juicy leaves and strong stem. It grows willingly in any area that has been disturbed (think of pulling out weeds, and the dirt now becomes airy, puffy, and open to any seed that falls into it). It’s high in omega 3’s, which is an interesting fact for a green leafy plant. Plus, as is the case with any green, it’s a good source of chlorophyll, fiber and is simply delicious. It’s sort of a blank slate plus a crunchy texture, which means it goes well with any vegetable you pair it with. Sometimes, though, I think it has a hint of lemon and cucumber.
For this salad here, you’ll want to use the thin stems and leaves, not the thick inner stem.
If you’re lucky to grow it in your back yard (just be sure it’s not around an area where cars go by, and exhaust), then you’re lucky. Otherwise, you can find it at farmers markets that think outside the box and love this weed as much as I do!
Ingredients:
2 handfuls tender purslane leaves and thin stems (leave the thicker stems behind)
1 handful of artichoke hearts
1/2 English cucumber, sliced
handful of cherry tomatoes, sliced in half
torn basil leaves
1/4 red onion, sliced
One recipe tahini dressing (herbed or plain)
Half a recipe or so of smoky chickpeas
Combine the salad ingredients together, and serve with the chickpeas and tahini dressing. In total, this recipe serves about 2 people.
Recently, I was gifted the most beautiful sour cherries by my friend Carolyn, who is also a chef herself (check out her site here!). She mentioned she turned around for a minute, and her kids ended up harvesting 13 pounds in no time, which makes me the lucky one...since she ended up sharing with me.
Little did she know that sour cherries are very dear to my heart. They are very popular in Romania and I remember growing up eating them every summer...sometimes, picking them as a little girl, from my grandmother's cherry infused liquor (I ended up just fine, never got drunk, I promise), in glorious vanilla pound cakes, or straight from the tree (and everyone seemed to have one). But in all of these, I ended up isolating the cherries, dismissing anything that was around them, and just enjoying their pure taste.
I have to admit, I had to force myself to make something with them. My desire was two eat them straight out of the bag, but I had to come up with something more interesting than that. Also the whole low-glycemic thing came into play...if I made pound cake, well, there's not enough stevia to make pound cake palatable. But here's what eventually did happen:
1. I made a berry crumble for my boys, and they loved it (not pictured) with the crumble topping from Minimalist Baker found here. (I also cut the sugar in 1/2 and mixed cherries with peaches, gooseberries, blueberries and strawberries...a potentially weird combo, but it rocked!)
2. I froze some for my sister (since she has to taste them, but she's returning from a trip in July), and gave some to my mother (who was beside herself, since she obviously spent more time in Romania than I have and she remembers sour cherries fondly).
3. I made a yummy raw hazelnut vanilla torte with sour cherries and chickory flowers, which I'll be using in my wild edibles book (out whenever I get my act together...currently working on two others now).
4. And last but not least, this sour cherry berry breakfast bowl. In love with the last sweet tart tastes of these beauties, and breakfast is complete.
1/2 cup coconut yoghurt (plain or unsweetened vanilla)
1/2 cup almond milk, unsweetened
1/2 cup sour cherries, pitted
1/2 cup frozen strawberries
1 scoop chocolate classic protein powder (Sunwarrior, vegan, raw)
sprinkles of blueberries, unsweetened coconut flakes, cacao nibs, and chia
Blend yoghurt, milk, berries and powder until smooth. Pour into your favorite bowl and decorate with blueberries, coconut, cacao and chia. Enjoy!
Amazing trumpet mushrooms at the farmer’s market!
One of my favorite weekly places to visit is our local Farmers Market. It’s filled with scents and colors of the seasons ~ seedlings, garlic scales, romanesco cauliflower and escarole in June, to the beautiful squashes that come up late summer. Flowers everywhere, babies in carriages, cute puppies that follow along, kombucha on tap, intricate woven clothing from artisans, paintings of jazz musicians, the pickle stand, and one of my favorites, the mushroom people. I kindly call them that because only recently, did I learn their real name: Davidson Exotic Mushrooms. I love picking up a new variety weekly and making something simple but delicious with really quality ingredients.
You’ll find mushroom scallops on many gourmet blogs, and I have to say, they ARE all that. These are relatively simple (since I like to work with 2 ingredient lists), and yet they are meaty, flavorful, and exceedingly healthy (just read up on the benefits of mushrooms, and you’ll want to add them to your weekly meal plan too). Enjoy with some quinoa, rice, cauliflower rice, or serve with a stir fry. Here, I just paired them with some bok choy greens.
Large handful of trumpet mushrooms, sliced into medium-sized rounds (think scallops)
1-2 tsp oil of choice (coconut, sesame, etc.)
1/4 cup mirin
drizzle of tamari
Heat a skillet on high, and add in the oil. Let it pool in the middle away from the sides (a little test I do to make sure oil is heated through). Add in the mushroom scallops, turn heat to medium, and add some salt and pepper. Let sit, sizzling, and turn them over with tongs after a few minutes (checking that the underside is lightly browned and seared). Cook another 2 minutes or so. Take the pan over the sink (trust me), and add in the mirin and tamari (it may splash and bubble a bit, that’s ok). Cover, reduce heat to low, and cook another minute or so. Sprinkle a few chili flakes on top and serve with choice of sides.
Jackfruit isn’t new, but it IS delicious and I believe will be a timeless favorite for plant-based eaters. Who doesn’t love barbecue? Many recipes using Jackfruit describe imbibing it in glorious barbecue sauce, on a whole wheat bun with some creamy and crunchy cole slaw.... I wanted to take a stab at it, but there were so many recipes to use and I didn't want to be disappointed, so I went with one of the best online chefs around: Minimalist Baker. You can find her recipe here.
These are some reflections on making the pulled pork that I thought might be helpful....In essence, you pop open the can, rinse the jackfruit pieces, sprinkle them in spices Minimalist Baker recommends, sauté them in some oil to brown, add in the barbecue sauce and simmer for about 20 minutes. Pull the fibers apart with two forks and Voila...vegan barbecue pulled pork that not only tastes but looks like the real thing. Easy peasy.
Since I had bought 6 cans of jackfruit, I felt like I could experiment a little bit. When you first pull out the jackfruit from the brine, it looks almost like pineapple triangles, with a soft outside and a harder inner core. Minimalist Baker suggests that you cut that core out and only use the soft shred-like outside of the fruit. I did this the first time and certainly it was very easy to use a fork to separate all the fine fibers so it looked like legitimate pork, but I wasn't as keen on having to throw out all of those little hard triangles...I thought maybe there could be a better way?
Second time through the recipe, I cut the hard bits off, and added them to the pot (and they were hard to chew). So finally, I realized why she mentioned to throw them out ~ it required effort to chew!
Third time I made the pulled pork was perfect: I sliced off the hard bits but then sliced them super small so they were easier to chew. Nothing was discarded, and the pulled pork came out great. Highly recommend this version!
I really enjoyed having leftover pulled pork salads too (I like them even better on a roll)...super filling, with veggies, rice, and avocado.
Not quite sure how many weeks we’ve been in quarantine already, but more so, every day, I’m opting for simple and flavorful meals. You don’t have to be a kitchen wizard. You just have to be open to how ingredients play together, and play with them. And for this recipe, nothing plays better than creamy white beans, rustic greens and loads of garlic.
Ages ago, one of my best friend Alessandra gave me some tips on Italian cooking (her family is from Sicily). One of her signature dishes is escarole with beans and garlic, and I was in love from the first bite.. It’s a no-fuss, simple recipe but delivers exactly what I need these days when spring is a bit on the cold side.
All you need is 4 ingredients: escarole, white beans, olive oil and garlic.
That’s it. Of course, season with salt, but that’s a given.
Note: You’ll need to wash the escarole very well as it tends to get dirty close to the root. Rinse, and leave it in a colander for when you’re ready to use it. Any residual water left on the leaves will be used to create a lovely broth to the dish.
1 head escarole, washed well, and torn/cut into bite sized pieces
1.5 cups white beans (I used cannellini)
1-2 tablespoons good olive oil
3-4 garlic cloves, sliced
Heat a heavy bottomed skillet or pot (I use an enamel cast iron dutch oven) and add in the oil and garlic. Season with a little salt, and lower the heat to medium so it doesn’t burn.
As soon as it turns fragrant, add in the escarole. Mix well until it starts to wilt a bit, then add the beans and a pinch of salt..
Lower the heat to medium low, cover, and cook through, for about 5 minutes (don’t over cook, you want the escarole to be bright green). Check the seasoning.
Plate and sprinkle with a little crushed red pepper flakes.
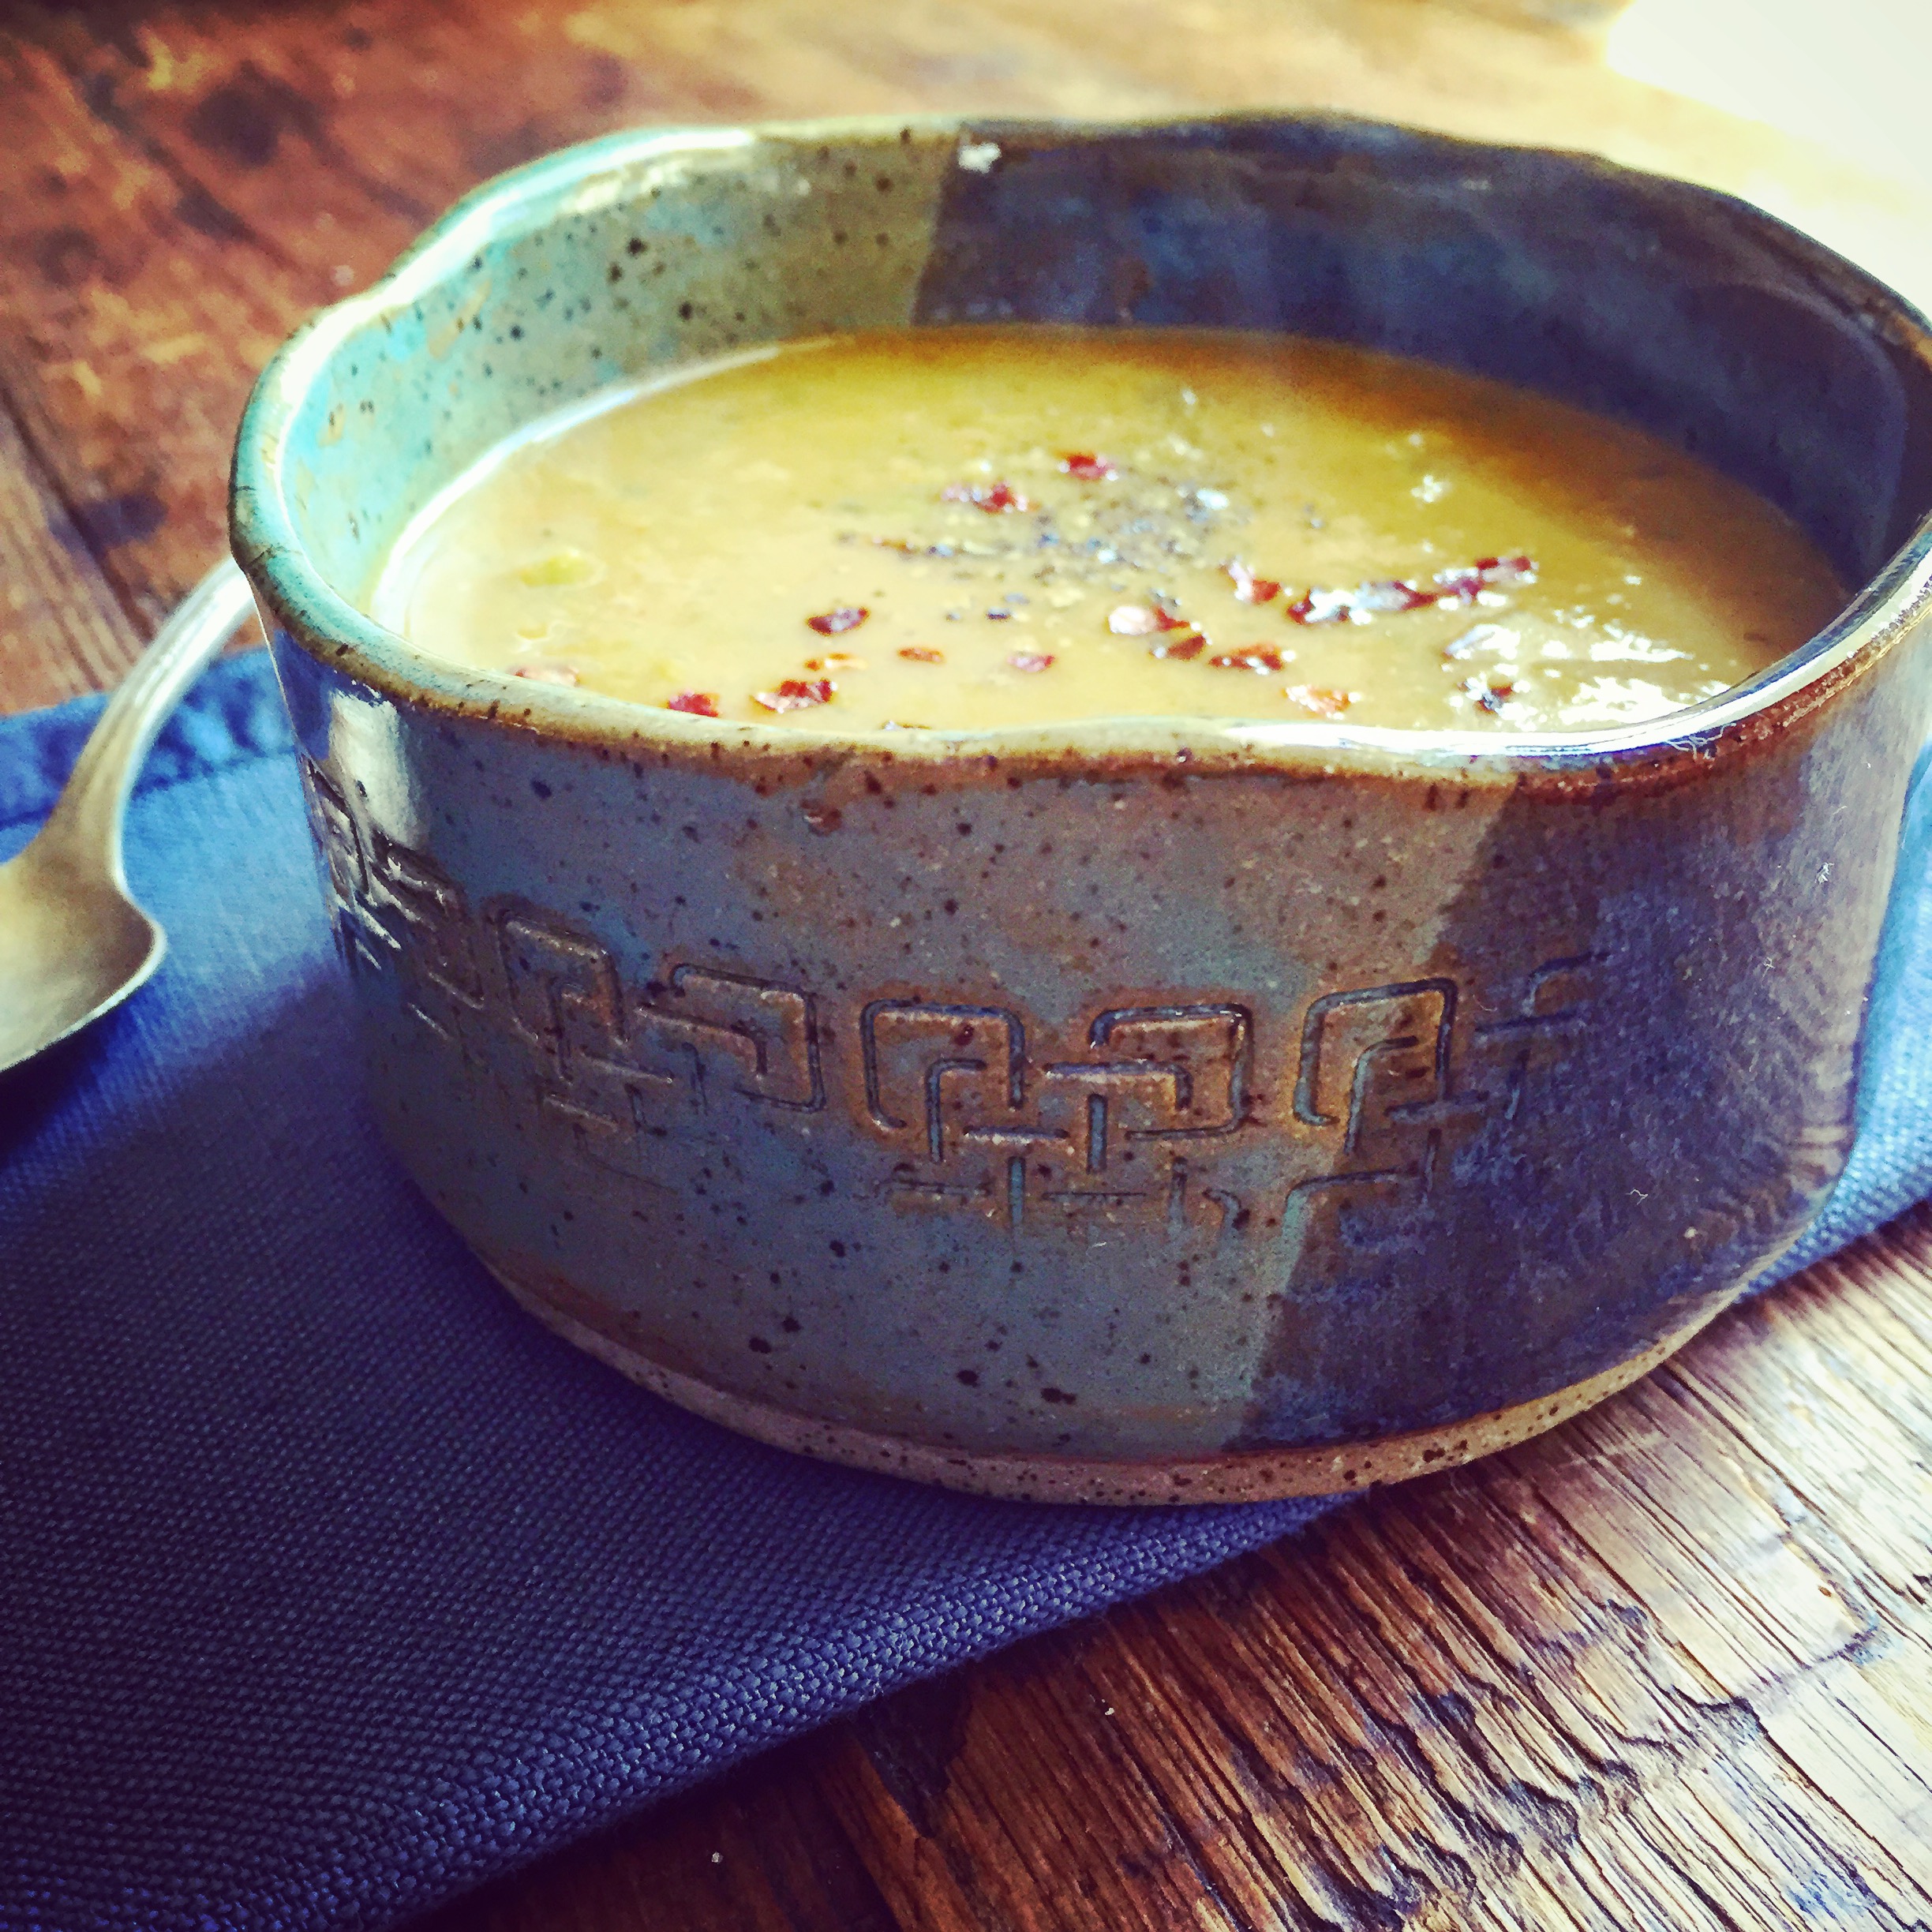
This past spring has been interesting...hot (as in 70 degrees) and then it’s a chilly morning, then hot again, cold again. I can't really keep up, except that it's been warm enough for me to get inspired over seeds, gardening and growing healthy green food. I'll take the warm weather speckled in the cold if it means I can get to gardening sooner.
Spring comes with its own bounty: sprouts, greens, and one of my favorites, asparagus. Buying asparagus in the spring (try growing it too!) is completely different than any other time of the year since it's at its peak, fresh, a little sweet and very flavorful.
I knew I wanted something light: loads of veggies in a coconut broth, but something all the while spicy and warming, so I paired the veggies with some red curry paste. This creamy, slightly spicy bisque is a balanced marriage of both light and warming that will soothe your bones on chilly spring evenings while giving you the best of the season's produce.
Ingredients:
1 tsp coconut oil
1 yellow or red onion, chopped
1 zucchini, chopped
1 bunch thin asparagus, chopped (be sure to discard the woody bottoms)
1/2 cup coconut cream (I prefer the thicker part of the Trader Joe's Coconut Milk)
1 heaping tablespoon Red Curry Paste (I like this one)
In a medium heavy bottomed stock pot, melt the coconut oil and sauté the onions on medium heat, until translucent. Add in the zucchini and asparagus, and cover with about 1 inch of water. Add in the coconut cream and bring to a boil, then let simmer half-covered about 25 minutes (until all the veggies soften). Add in the red curry paste, season with salt to taste, and then using an immersion blender, blend until semi-smooth (I like it a little bit chunky). Feel free to give it a finishing touch of red pepper flakes and crushed black pepper. Enjoy!
Right before a frost a few weeks ago, my husband and I were able to harvest bowls and bowls of spring mix, kale, parsley, cilantro and herbs. We lived off of those greens and I was happy that I had FREE salad for about 10 days (somehow it kept much better than the greens bought in a store! Probably since it wasn't shipped!).
I easily harvested about 5 cups of parsley and had to get to work, creating something with these amazing rich-green leaves. I found this recipe (which is for a dressing) and adapted it a bit to create an amazingly emerald green dipping sauce that I dunk practically everything into! I'd imagine you can do the same thing with cilantro leaves as well for an extra special dressing. If you find wild edibles such as chickweed or nettles, or a mixture...even better...
Be sure to not over-blend: herbs get bitter the more they're processed.
2 cups parsley leaves, tightly packed
1 generous clove of garlic
1/2 cup mixed oils (I used flax seed oil and unfiltered cold pressed olive oil)
juice from 1/2 lemon
1 tablespoon apple cider vinegar
sea salt and pepper (adjust to taste)
Blend all ingredients together in a high-speed blender. You can definitely use this as a dressing but I found it was pretty thick, like a dip....I served them with fresh spring rolls, which made the perfect lunch. I filled brown-rice wrappers with red peppers, spring mix (from our garden), and avocado, and dug right in! Hope you enjoy these as much as I did.
During this quarantine, we may be doing more home cleaning than before…and if you’re up to your elbows in your fridge, scrubbing and discovering items you’ve forgotten about, you may by chance stumble upon your frozen Acai packets. If that’s the case, you just SCORED! We’re making a lovely Acai bowl today.
You've probably seen the glorious photos of Acai Bowls everywhere...on instagram, Facebook, even in some healthy restaurants, made at home by those of us who want to eat healthy. Why do we need ONE more, you ask? Well, this one is loaded with good healthy fats (that keep you satisfied, help your hormones, etc.), and it's also low-glycemic ~ that's the important part! Many of our common Acai Bowls contain sweeteners and are loaded with sweet fruit. While this works for some people, I'd like to make the sugar down a bit and increase the healthy fats. You'll enjoy this delicious bowl of superfood goodness, giving you energy while keeping you away from the blood sugar rollercoaster!
Acai is a berry that's touted as a superfood, containing fiber, heart-healthy nutrients, Vitamin C, healthy fats, antioxidants and capacities to help us detox (Because the benefits are just SO HUGE and too long to list in this post, here are two super useful and fun articles to read to further your knowledge on Acai : HERE and HERE). But the bottom line is: Acai berries are delicious, and that's reason enough for us to eat them! Eat more of the good and less of the bad. This fiber-rich antioxidant bowl works really well as a morning breakfast or a mid-afternoon pick me up.

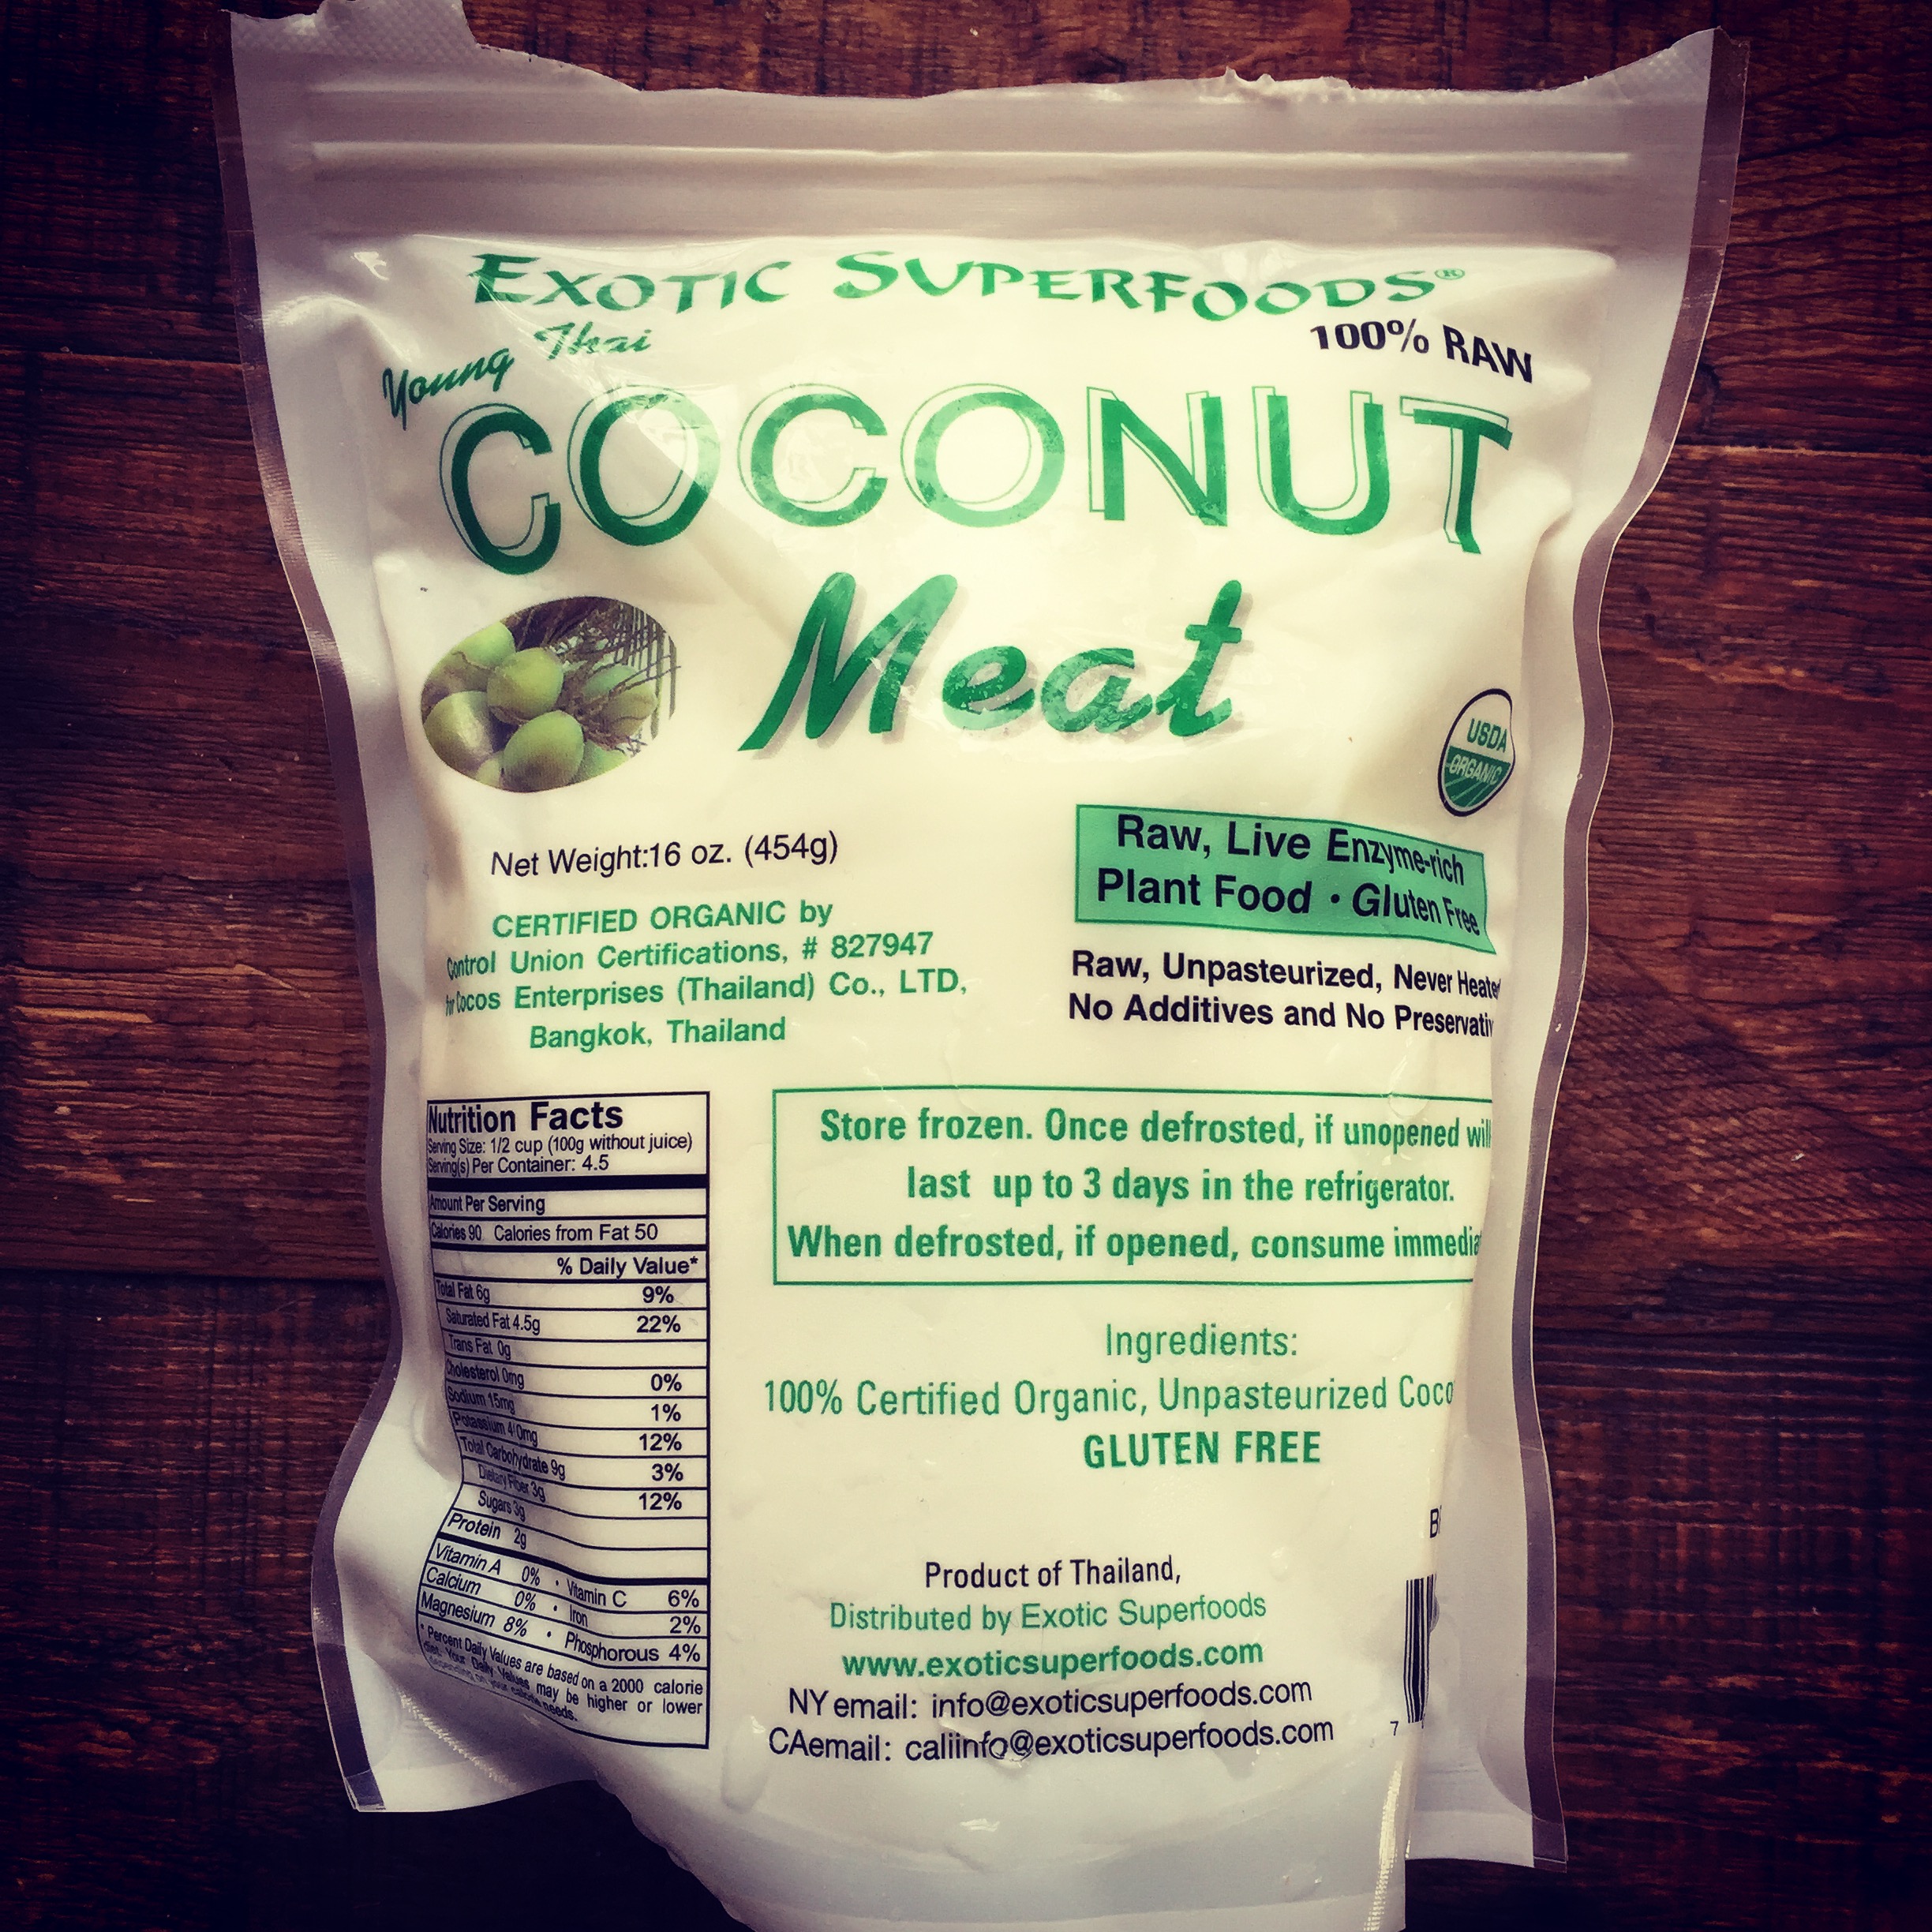
Also, I've recently ordered fresh frozen coconut meat from Exotic Superfoods in hopes of making low-sugar raw desserts, but I haven't even gotten to that part yet ~ I've just been eating it straight out of the bag and it's absolutely delicious! I did buy the case, which can get expensive, but cutting into regular young thai coconuts and not knowing if they're fresh or not, sprayed with formaldehyde to keep the outside white, or low-yielding, then you have to clean the meat....It's a lot of work! I figured this saves me time, hassle, it's all clean, and I can taste the purity.
Ingredients:
One packet of unsweetened Acai Berry Puree, defrosted (I like the Sambazon brand)
a few drops liquid stevia
slivered almonds
blueberries
1/2 cup fresh raw coconut meat, sliced
chia seeds
bee pollen
In a bowl, pour out the Acai puree and stir in a few drops of the stevia. Start with three and taste as you go, making it sweet enough for you. Add in the rest of the ingredients, and eat with a spoon :)
That’s it! Besides, this makes a really good superfood treat in-between fridge cleaning sessions. Hope you enjoy it! Now, back to work.
So we’re in the thick of the quarantine, where all across the country (and the world), we try to shop as little as possible and limit social interactions to people we live with. I’d like to remind everyone that the quarantine does not mean locking ourselves indoors. In fact, sunshine, walking and gardening have been my saving grace in this time.
One of these days, when our local supermarket ran out of greens (one day, all they had was iceberg lettuce), I realized that I have many in my garden that are popping up ~ I’ve either planted them or they’ve overwintered from last fall, or they’re perennials. I’m also reminded that this very simple act of growing your own food as a means of self-reliance started back during World War I with Victory Gardens. It’s inspiring to think that growing food in a difficult time can help lift our spirits as well as do something practical to help feed ourselves. It’s especially helped me get a variety of foods from the garden (kale, arugula, cilantro, sorrel, parsley) as an option vs. iceberg, which I can tolerate but isn’t my favorite for sure.
There’s nothing more amazing than picking radishes a few weeks after you’ve planted them, seeing spinach grow their second set of leaves, or seeing your relentless kale give and give and give. It’s a true blessing. So here, I hope to show you how easy it is to simply create a back up system, where you an start growing your own food. Not only is it a fun hobby, it’s easy, and it’s something that you may continue to do, after the quarantine is lifted.
How To Get Started
You can use a pre-established garden if you have one, or dig up some sod, add in some compost, and get to work. Buckets with holes drilled underneath and other containers are just fine also. Just purchase compost and organic dirt that is meant for growing veggies, give them sun, water, and you’re good to go.
Here’s a quick summary of this article:
Free pop ups: dandelions and violets
Overwintered plants: kale, cilantro, parsley
Quick to grow now: spinach, radishes, lettuce, arugula
More advanced crops: kohlrabi and carrots
Perennials: all herbs, asparagus, herbs, berries
My favorite crop: peas
A crop for late spring: beans
SO here we go. Here’s what’s growing in our garden:
The plants that pop up just because
Beautiful violets and dandelions pop up on their own and are free food! Violet flowers (below are two colors) are edible and delicious, provided they’re not growing somewhere where there is loads of traffic and exhaust to pollute them. Same goes for dandelions. Dandelion flower and leaves are edible, and I love adding the flowers to salads or just munching (have you seen the youtube videos of bunnies eating dandelions?)
The plants that overwintered:
The kale overwintered nicely from last fall. In fact, it loves cooler months and even weathers a snow or two. The flowers are also edible and make great garnishes, or just simply throw them in salads. The flowers eventually become seeds, so I cut them off to help the plant produce more leaves instead. Here’s a bouquet of the flowers.
Cilantro (first below) also overwintered well, and is delicious in guacamole, salsa, baked beans, tacos, anything you can think of. Parsley (second below) is a biannual which means it comes back a second year, but not past that point. Both are loaded with vitamins and add SO much flavor. I have little parsley bunches all over the garden, about 10 of them, and I just pick the big stems first and allow the smaller ones to grow. For the cilantro, I pick about 3/4 of it, and then the rest of it I leave to become flowers and seeds so I can grow it again in the fall.
Quick and easy things to grow:
Radishes, spinach and lettuce are great things to grow quickly. Radishes are probably in my two two favorite crops to grow. I personally sow about 3 in a bundle, every inch. Spinach, you can grow in rows and allow maybe 2 seeds per inch. I’m not terribly mathematical about it, honestly. I just put a bunch of seeds in my hand and spinkle as I go. Always label your rows if you can, since you may forget what you sow and where. I’ve done it before, where I sowed cilantro and broccoli rabe in the same spot! Not a biggie, but I could have been a bit more organized.
Radishes
The beginnings of spinach
I personally sow arugula densely, but you can decide to sow it in rows. These aren’t as fast growing as radishes or spinach, but they will be harvested hopefully before summer hits. In the summer, it typically bolts into flowers (which are also edible), which then become seed pods. Save those seeds for the fall, when you can plant them again.
Arugula
A more advanced crop:
If you’re feeling adventurous, kohlrabi takes a little more work but is a fun crop. They typically like to be about 5 inches apart, so when these seedlings grow a bit more, I’ll separate them. The greens and bulb at the bottom are both edible. Kohlrabi is one of my favorite veggies! I love to peel and cube them and make them into a hearty soup. You can also eat them raw!
Kohlrabi
I recently learned that carrots are a spring crop - I’ve always failed to grow them since I seed them too late, but this time I seeded in March, and I hope to get a good spring harvest. This is one carrot that was left in the ground last fall, and due to the mild winter, it’s now growing nicely.
Carrots
Don’t forget perennials! Most of my herbs are perennials, including chives, garlic chives, sage, oregano, thyme, lemon balm, echinacea, and mint. Strawberries are also some of my favorites, and they do the work on their own! Asparagus is delicious, as are currants, blueberries, walking onions, there are so many that come back every year as long as I take good care of them. We’ve consolidated our berries to one bed and we cover it with bird netting, as the birds are a bit selfish about these beauties. And I guess, with the netting, so are we.
Strawberry plants
My favorite crop:
I’m going to end with probably my FAVORITE thing to plant (after radishes). Peas! I love to eat the leaves, the pods, and the peas inside ~ it’s pretty much all edible. I typically soak the peas overnight in water so they plump up, and then I plant them (sometime usually around St. Patrick’s Day, March 17th). They need something to climb on so put them closer to a fence or a trellis. They’re mighty and will give you loads of food too, loaded with protein and sweet from the spring sun.
A crop for late spring:
There’s also a crop you can plant about 2 weeks after your last frost date (check the Farmers Almanac online for that): Beans! Here’s a fun video you can watch to help get you started. You can help them grow the classical way using the three sisters method: squash, corn and beans. Corn grows upright, which makes a great trellis for the beans to grow upward, and the squash below helps shade the ground to keep it moist.
That’s it for now! Hope you enjoy these adventures in planting, and let me know if you give it a try!
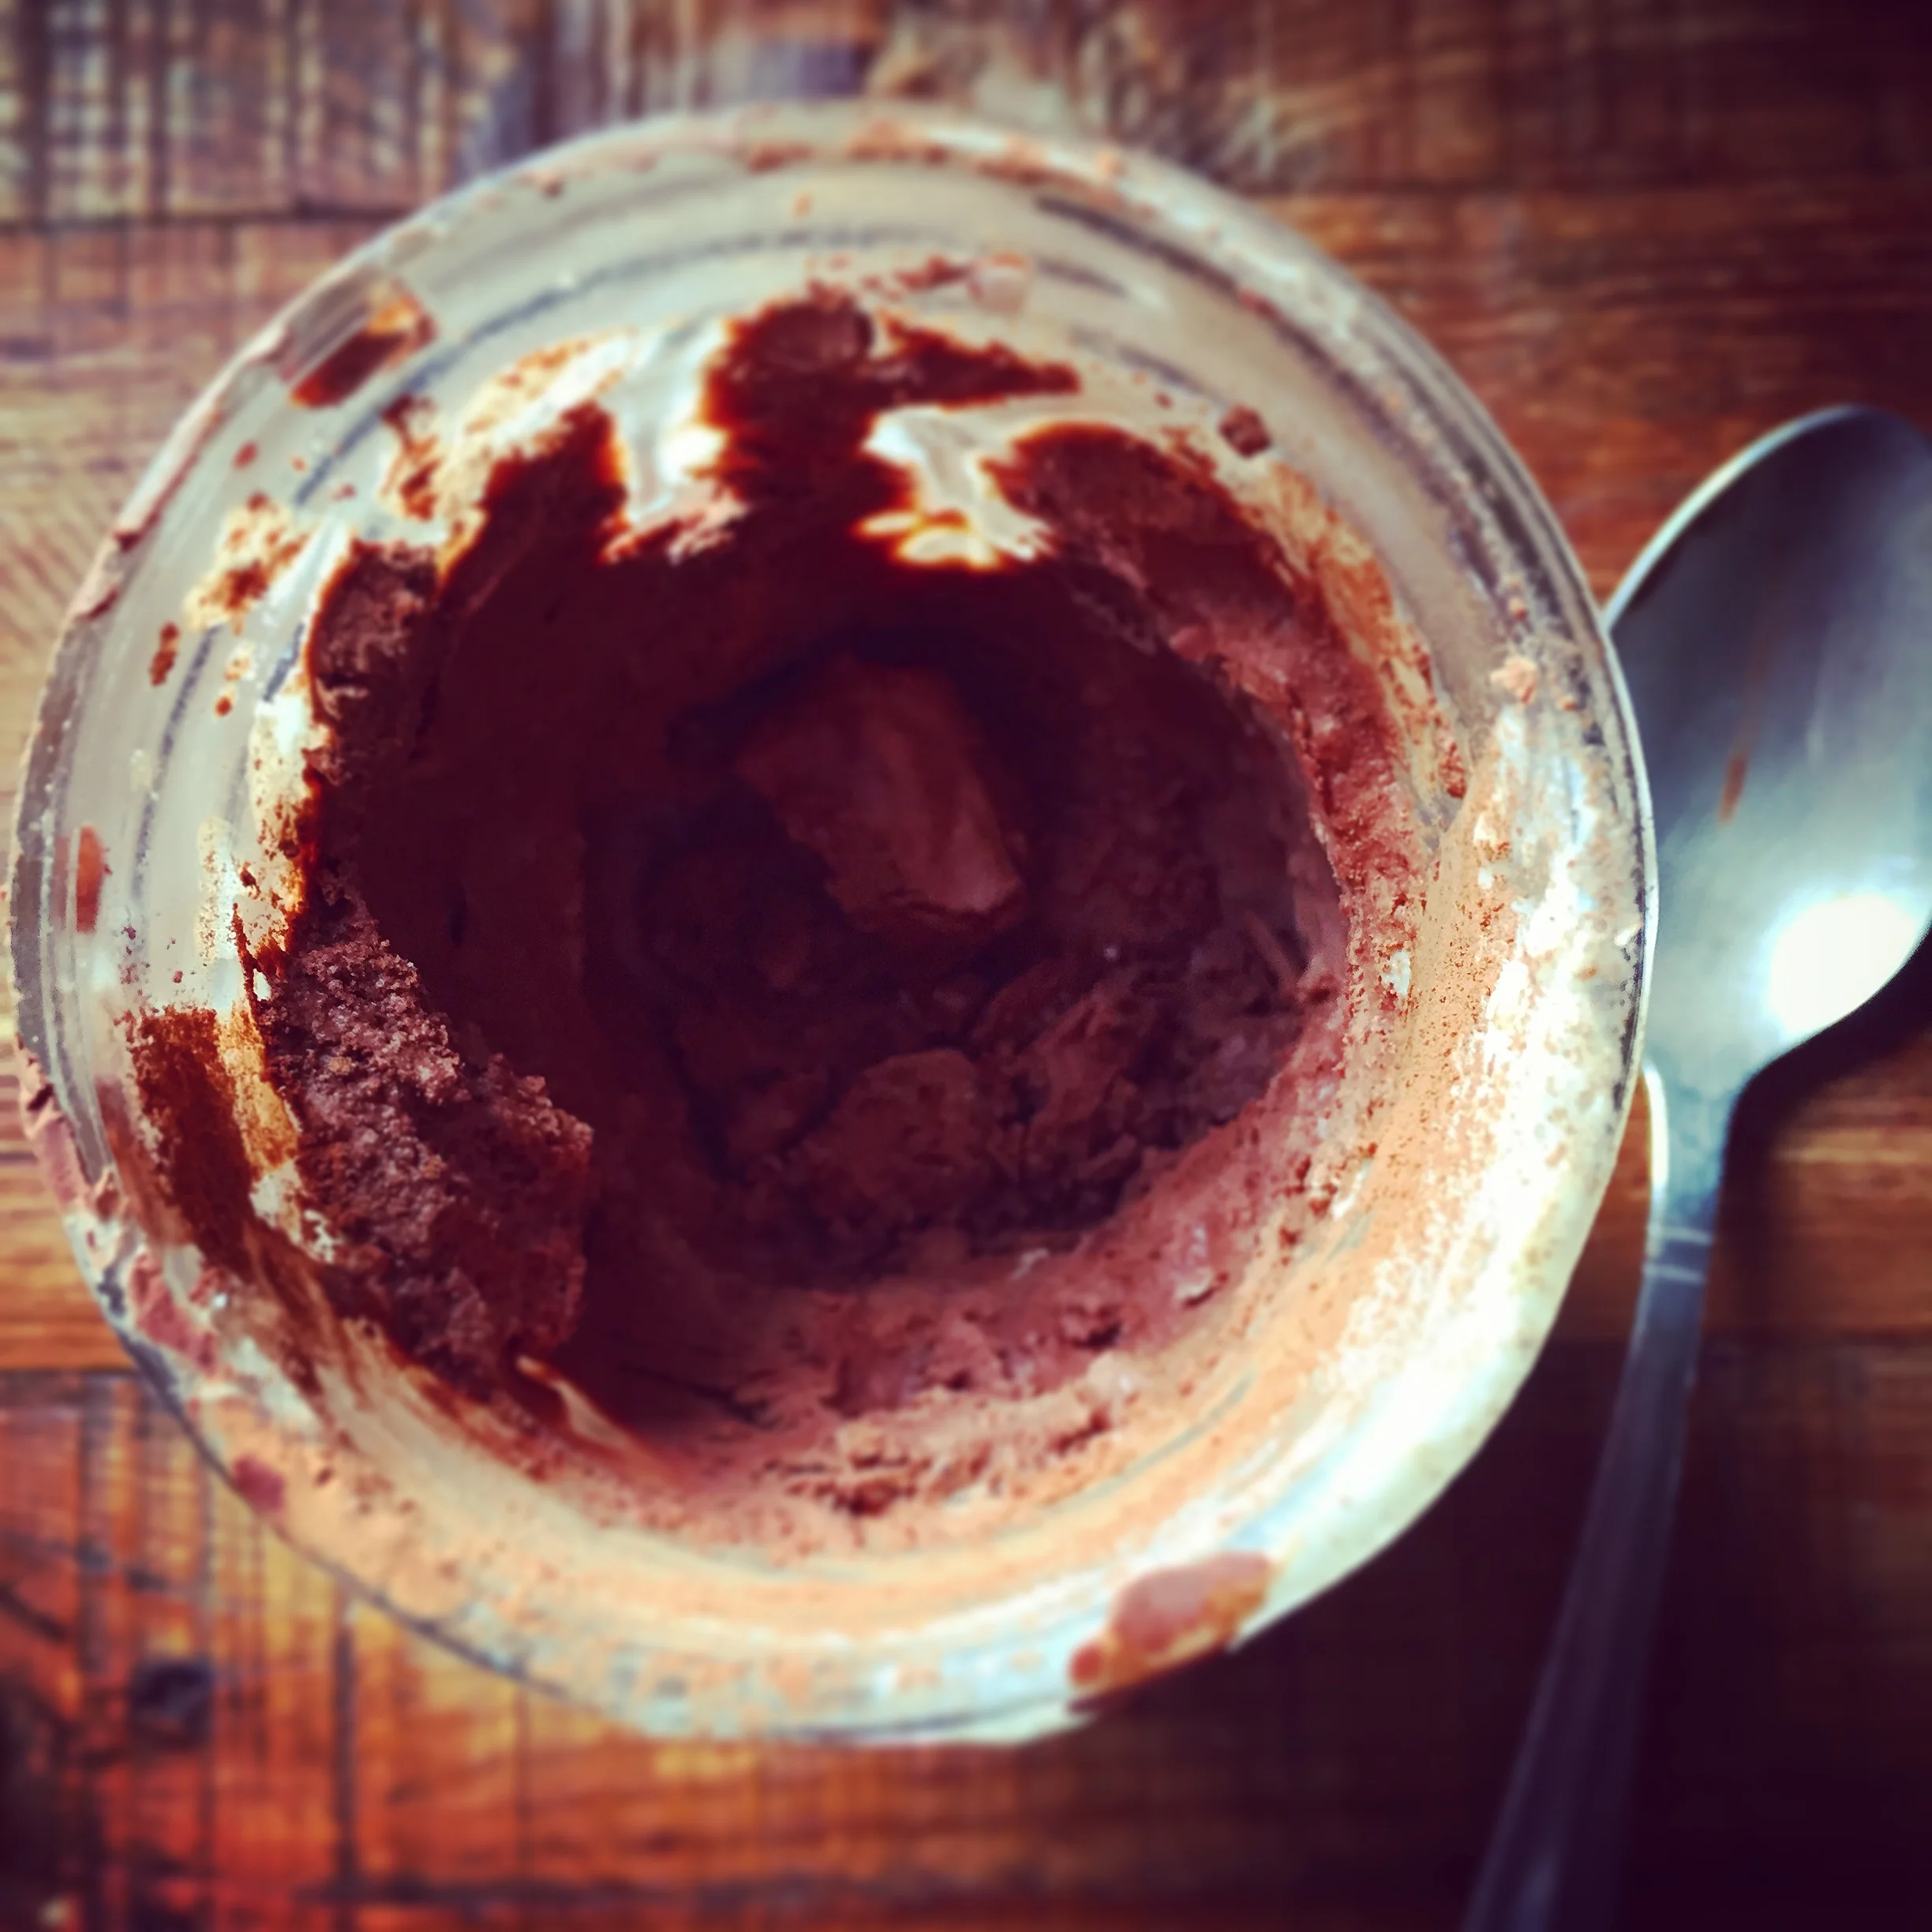
This was a vamp off a frosting recipe that inspired me, I tweaked and then refrigerated and then voila - it hardened into fudge. I went with it. Happy little accident, and Bob Ross would be proud.
It couldn't be easier. It's low-glycemic (I used stevia), loaded with healthy coconut fats, high in antioxidants from the cacao powder (or carob if you choose to use that), and just plain delicious. Depending on whether or not you actually like the flavor of coconut manna, you can opt for 1/2 coconut mana and maybe 1/2 melted cacao butter. More chocolate flavor, less coconut. Either way. Just make it, love it, and enjoy. Honestly, I have this covered in plastic in the fridge and eat about a tablespoon at a time with some fruit and it really hits the spot when I want some chocolate. It also keeps well for about 5 or 6 days, so it's perfect in that regard, that you don't really have to think about dessert: it's already waiting for you!
1/2 cup softened coconut manna/butter (do not use coconut oil though)
(You can also do 1/2 and 1/2 with melted cacao butter)
1/2 cup hot water
1 dropper full hazelnut stevia
1 tsp hazelnut extract
2 tablespoons cacoa powder
1/2 tsp reishi, maca, maqui, or other medicinal powder (Optional but fun)
pinch sea salt
Blend ingredients in a mini personal blender, pour into a ball jar, cover and refrigerate. After a few hours, the coconut will harden and turn into a soft fudge: hard enough to spoon up and devour! You can also change this up and add in some cinnamon, nutmeg, go crazy...make it your own. Enjoy!
I absolutely love growing my own sprouts. They're very cost effective, easy (they grow on their own with little supervision), they give you an indoor gardening when you don't have the outside space, and they provide unparalleled nutrition. They are the epitome of nutrition, in fact, loaded with fiber, antioxidants, chlorophyll, protein, and abilities to support the body through detoxification. In many instances, they are exponentially more nutritious than their grown counterparts (for example, broccoli sprouts contain more nutrition than broccoli itself!)
Some sprouts are grow in ball jars, need to be rinsed, and then they develop tails in about 3 days. More on those later, article coming.
These particular sprouts, along with wheatgrass, grow in dirt. The benefit of these is that there's very little chance of mold, at least in my experience. And they require minimal babysitting.
1/2 cup sunflower seeds, organic, soaked overnight
2 cafeteria trays
enough organic soil to fill one cafeteria tray
something heavy, like a 1 pound weight or a plate
a sprayer with water, and extra water
First, take one of the trays, and pour the dirt inside. Brush it to the edges, leaving 1 inch of space before you hit the edge (this helps water pool). Sprinkle the sunflower seeds on top. Then using a slow stream of water, drizzle some water over top of the sunflower seeds in long lines. Turn the tray once and do it again (creating a criss cross pattern). If there's extra water in the 1 inch edge, then pour that out. Cover with the second cafeteria tray, and put a weight on top. Leave it away from sunlight, but indirect sunlight is ok. Wait about 3-4 days until the sprouts themselves push up the tray (and they will!) Next, spray the emerging sprouts with water daily until they reach about 3 inches, trim, and enjoy!
Most people hit the ground running in the New Year, aiming high towards their resolutions, adding on a new gym membership, excited about projects ahead, and the idea that we’re going to declutter the whole house in one fell swoop in 5 days. We’d like to believe we are superheroes, and we can somehow do it all. But then we are met with the mid-month slump where we realize we bit off way more than we could chew. Have you been there before?
It’s not to say that all of those things I mentioned above aren’t worth pursuing. They absolutely are. But January may not be the best month to do it. Here’s why.
In my estimation, December is the busiest time of the year (and as darling as it is to say “it’s the most wonderful time of the year”, which it is, the latter is also exceedingly true). Parties, get-togethers, holidays, shopping, vacationing. It’s a lot to take in. The truth is that a lot of us experience needing a vacation from our vacations. A break after a break.
For me, January is not the best time to start a mega project. January is quiet. A break from the December break. It’s a time of reflection, planning, sipping way too much tea, reading, and internalizing what just took place (not only in December, but the whole past year). I’d recommend allowing yourself a break. Your future self will benefit from having a clear, rested, organized mind. And you can always start tackling the house in February/March when you had a month to recoup.
I’ve found that decluttering in our seasonal transitions is much more logical and actually easier overall. Changing seasons forces us in a period of change and flux anyway, so why not take advantage of that? So consider the following:
Session 1: Late Feb - April
Session 2: Sept - October.
Clothes: An end-of-season decluttering session (such as end of winter/beginning of spring or end of summer/beginning of autumn) are the best times to declutter clothing, for instance. We get to look over the past 3 months and make an educated decision based on reflecting on our habits. For instance, I have many cute sweaters, but only wear a handful of them. All of them are beautiful, they spark joy, they’re pretty to look at and functional and keep me warm. But for some reason, I never reach for them. Maybe there’s a mini fraction of discomfort, or I need to have a white cotton undershirt for some of them, which. may be in the wash. Whatever the reason, I don’t gravitate towards them and keeping them for beauty sake isn’t enough. My habits don’t lie, they’re black and white, and they’re your best source of data. And if I haven’t worn them this winter, it’s highly unlikely I’ll wear them next winter. You can’t really argue with that.
Decorations: How often do seasons come and go and we forget to put out various decorations? In our case, I happen to love our house minimal and the most decor I’ll use is plants ~ and yes, the plants do change seasonally. Mums in the fall, bright flowers in spring, that sort of thing. When they take a turn for the worse, which they often do, I either plant them outside with the roots, or if they’re cut flowers, I just refresh with new ones. For those of you whose decor is much more elaborate (think pumpkins, paintings with quotes, pillows, throws), then use this time to really reflect on your habits once again. Did you forget to put those pillows out? Why? Do you love them? Did you miss them? If not, feel free to release them. Again, I can’t say this enough - but your habits and actions are the best data you have. Use the opportunity we get when we transition from season to season to look back and release anything you haven’t used.
Cosmetics: Not sure if I’m the only one, but I don’t use the same cosmetics for fall/winter as I do for spring/summer. For instance, my summer skin needs a light moisturizer and zero foundation. My winter skin needs a richer moisturizer, and I need a little foundation. My hair is also a little different between the seasons, and so my products change. Transitions into the next season makes me use up what I have, and helps me transition to the next products I’ll be using. But while I’m at it, I also look over any make up, products, anything else I haven’t used. I use that data to realize that I may not be in love with some of them, or some of them have expired. It’s the perfect time to do a cosmetic inventory and purge expired or unloved cosmetics.
Pantry/Kitchen: Fall and winter is a time for grains, beans, and deeply comforting hot food. Spring and Summer are times when I move from those types of foods and include more fresh fruits and vegetables. Spring and Fall are great times to take inventory of your pantry and fridge, use up what you’ve not used yet, and then plan going forward. For grains especially, you’ll want to go through them and not store them as they can attract little critters (for us, it’s moths ~ although my hypothesis has been confirmed that they come from the store like that, embedded in the grain). Late winter, I start making a plan for all of our heartier grains so we can use them up and make new for a revived, fresh pantry.
Floors: Spring and Fall are a great time to move furniture aside completely and conquer what’s under the bed, what’s under the couch, and give the floors a good cleaning. We have a Japanese style bed which is low to the ground so I physically have to undo the whole thing to vacuum underneath. It’s a project, but it’s important to schedule those things. Also, did you know that dust collects vertically? I never knew it was a thing until I looked under our piano, and I saw it collected under the the vertical board of our upright. Crazy! One of my friends in college used to “spring clean” and take out ALL of her dorm room furniture, put it in the hallway, and give her room a good scrub down. Back then I thought I’d never do that. Now, I highly respect that and admire it. Fan, walls, baseboards, floors - work from top to bottom. Open up windows, diffuse some lemon oil, and look back on all of your work and congratulate yourself!
Schedule sessions: I’d do all for these also on a continuous basis, year after year - every spring, look over grains. Every late winter, look over clothes and release. Every January, indulge in tea. These items are actually in my calendar, since I don't want to use up valuable brain space to remember! We declutter mid-season, we may have a harder time parting with items because we’re still using those items. But if you add a decluttering session in March for some of those items, it might prove to be a more advantageous time to declutter. Keep an eye out for when seasons change, and schedule a weekend at that time for some massive decluttering. Anyway, would you rather be doing this in 90 degree summer heat, or the beauty of spring days when the air is warm and comfortable? Point taken.
Comment below if this has been helpful, and let me know what your seasonal practices are!
As many of you may have guessed, my two loves are food and oils. And of COURSE, it seems about right that I'd combine them, all in due time. Actually, I've been pairing them for years, and only now decided to finally do something about it and write these recipes down.
So, as a little treat for upcoming Valentine's, the only sensible thing to do is to make something decadent and ALL about chocolate. And you know what goes well with chocolate? Orange.
I only use the Young Living Vitality oils (the ones with the white label) since they have FDA GRAS status (generally regarded as safe) and are safe to ingest. In fact, Young Living made it super easy for you to know how to use them and even included directions in the label: add a drop or two to a capsule and ingest. For most of them, I just prefer to use them in foods since they're oh so delicious. Like tangerine in my Dandy Blend with coconut creamer, lime in my water, peppermint in my raw brownies. And this one, right here:
I'm writing this recipe in anticipation of a Valentine's Desserts class I'm hosting at Jus Organic in Atlantic Highlands. Be sure to check them out and definitely join us for the class this Saturday - it's going to be a winner. Details here if you are local.
So without further ado...here we go....
Macaroon base:
3 cups shredded unsweetened coconut
4 tablespoons Coconut Nectar (may replace with maple syrup)
Pinch salt
13 drops Young Living Orange Vitality Essential Oil
Chocolate Coating:
½ cup Coconut Nectar (may replace with maple syrup)
¾ cup cacao powder
⅔ cup melted coconut oil
Pinch salt
7 drops Young Living Orange Vitality Essential Oil
Combine the macaroon ingredients in a food processor until the mixture resembles couscous and stays pinched between fingers. Using a spoon or a mini scoop, create 1 tablespoon-full macaroon “balls”. Refrigerate for about an hour.
After they are well chilled, combine the chocolate coating ingredients in a high speed blender. The longer this sits, the more it wants to thicken, so work fast. Coat each macaroon with the chocolate coating, and set them aside. Refrigerate another hour so they solidify even more. Serve cold, with some orange shavings on top. I bet you can’t eat just one! The bowl is fun to clean too :)
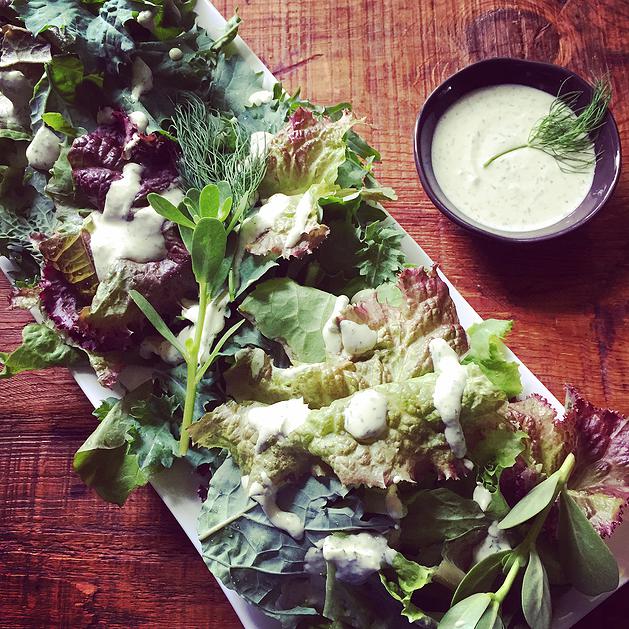
When I first started eating vegan (as with many people, you'll find) the hardest thing to give up was anything creamy, ooey gooey, cheesy, buttery, anything from the dairy department. Especially in the summer, when you don't necessarily want a hot grilled cheese (actually, anything hot for that matter), but rather, a cooling salad with something extra special on top: like ranch dressing. Is there anything more perfect than cool ranch with a hint of onion or garlic over, well, anything: greens, veggies, cardboard? It can make anything taste out of this world.
While there are so many vegan ranch dressings out there (some use macadamia nuts, some pine nuts, some a mixture of sorts, add onion, don't add onion, add basil, don't add basil, salt, no salt, sheesh...), the variety and options can give you a headache, for real.
So I wanted a recipe I can easily remember (since, as some of you know, I never duplicate the same recipe twice and in fact, my husband asks if I can make "that one thing you made the other day" and I frown since, well, I just can't remember what I put in it, so I make another batch and it comes out completely different). I'm that girl. The one who perpetually reinvents her recipes.
Fret no more! This one is the only cashew ranch recipe you'll ever need, and the one you'll remember since: (1) it's life changing and (2) its' all about 1 ~ 1 ~ 1 ~ 1. That's easy.
The "one of everything" idea actually came from my romanian mother and grandmothers, who, when I was a child told me many times: don't follow a recipe. Just do one handful of this, one handful of that. It caught on.
So...one of everything:
1 cup cashews, soaked (measured before you soak them) and drained
1 cup water
1 tsp salt
1 tsp onion powder
1 tsp garlic powder
1 handful dill (yes, hand sizes are different, but it's about 1/2 cup loose dill)
Combine cashews, water, salt and powders in a vitamix and blend until really creamy. Chop the dill loosely, add to the mix, and just PULSE to incorporate. Enjoy.
This is literlaly, life changing. I've had it all week, it gets better as it sits, and is just a dreamy, creamy, loveliness you can't help...but....remmeber :)
Peace and love, y'all!
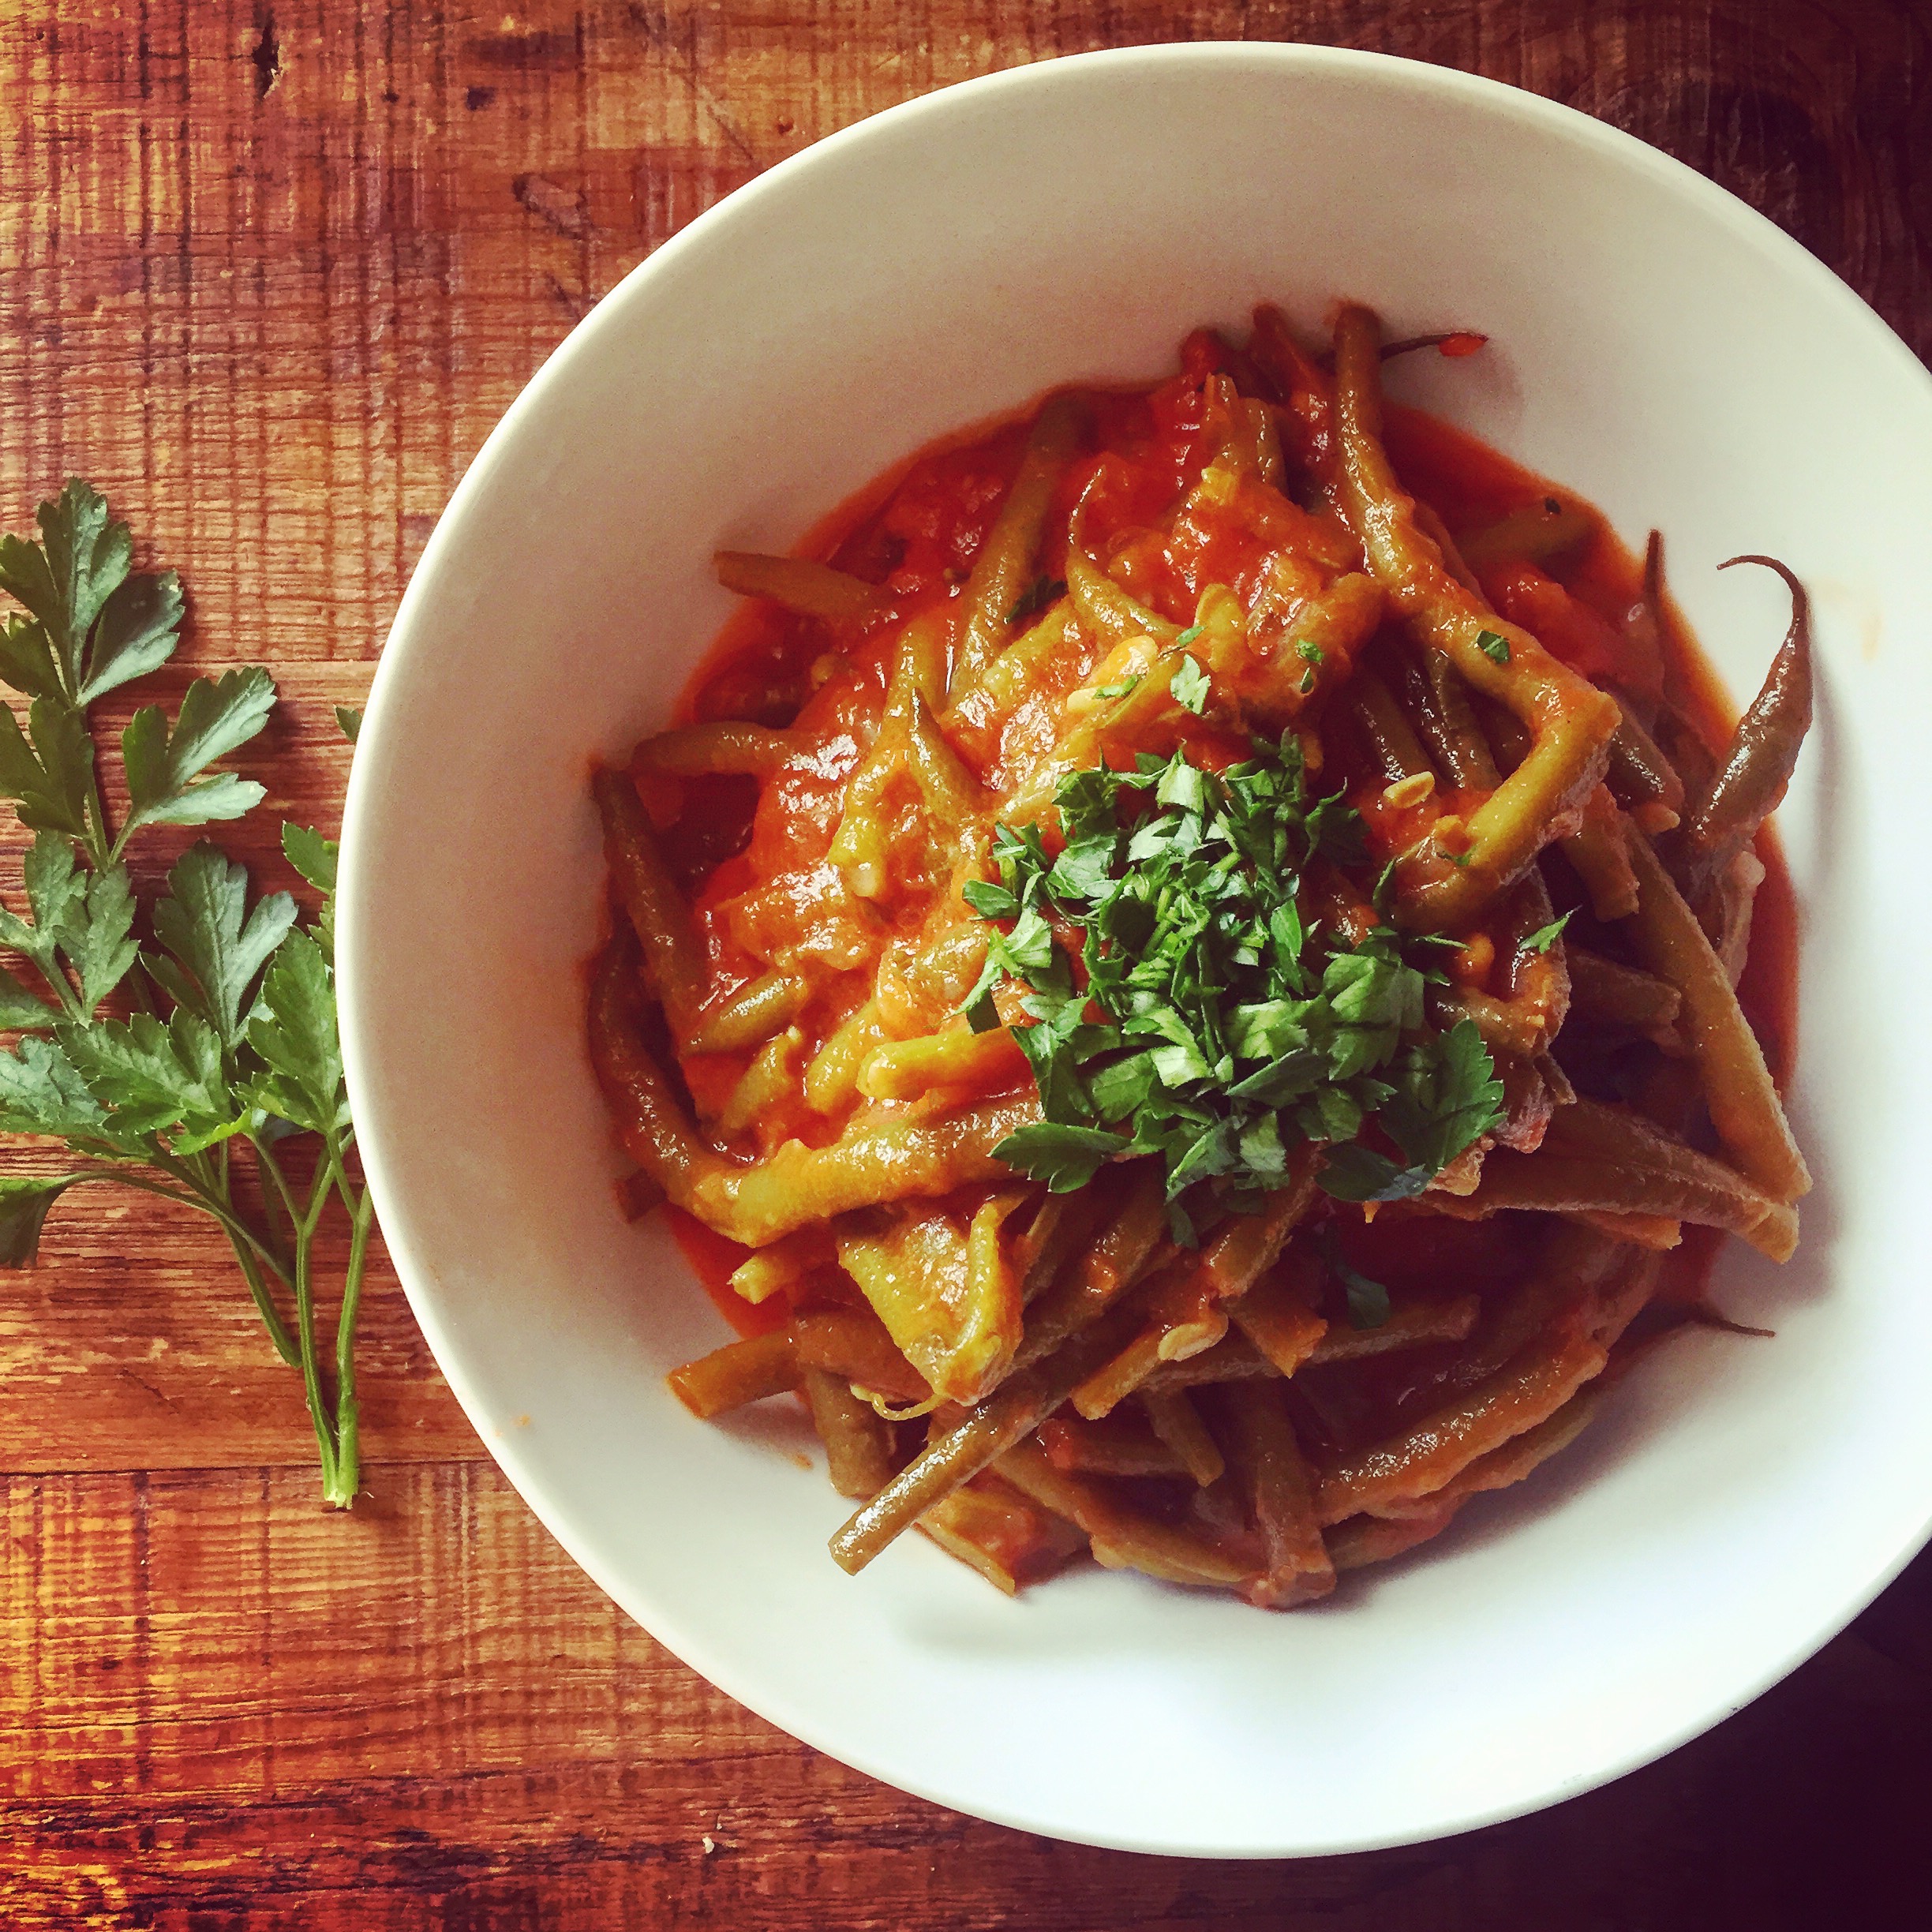
We all know that mama knows best, but honestly, I think MY mama knows best...she's offered wholesome, clean eating and recipes from the time I was a little tot, and I attribute my health journey to my upbringing. These green beans are her own recipe, and are a favorite in our household. No matter how often I make it, I swear hers still tastes the best.
Best part is that these are hearty, low-glycemic, full of fiber, and super easy to make. Also, how sweet is this? She gave me the following recipe, and at the end, she wrote "...and love is a must". Of course it is. That's why hers are the best.
3 large handfuls of green beans, cleaned (just the stem end), washed, broken in 2
1 yellow onion, chopped fine
1 tablespoon coconut oil
1/2 tsp sea salt (or per your palate)
One 8oz organic tomato sauce (mom likes the thin kind but you can use crushed, about 1 cup)
1/2 cup water
2 tablespoons chopped parsley
Heat a heavy pot (preferably cast iron) over low heat. Add the oil, onion and salt and stir. Cover and let the mixture soften, about 5 minutes or so. Add in the beans and water. Add a little black pepper, and cover. Cook on medium until done (bite one and test it). Then add in the tomato sauce. At the end, finish with the parsley.....And love is a must.
We're getting all DIY over here for so many reasons, including that it's fun, cheaper than the alternative and a GREAT way to get creative with your hands and mind. I'm all for all of the above.
This lip balm is also super easy to make and makes a LOT to share with friends and family, so I tend to make them around the holidays and birthdays....
Of course you know this, but when you're using and making products for your body and skin, please only use the very best. And know that not all essential oils are created equal. Especially if you're trying to go chemical free, you may not know that store-bought essential oils are not always reliable and in fact contain chemicals themselves. Well, that's a conundrum. If you ever have any questions on where you can get your oils, do reach out and I'll give you the inside scoop!
So without further ado...
Recipe:
2 Tablespoons Coconut oil
2 Tablespoons Beeswax
2 Tablespoons Sweet Almond Oil
Melt the above in a double boiler, then set aside and add:
3 drops Young Living Lavender Essential Oil
3 drops Young Living Peppermint Essential Oil
Pour into lip balm tubes (I love to use tubes that come with a holder ~ like this one ~ since they sit up straight and cause less mess). Let sit at least 30 minutes to harden.
Just a couple of notes:
1. You can easily double or half this recipe, as needed.
2. I bought some cute labels such as these, on Amazon, but I'm sure you can find loads of other ones too.
Enjoy and pucker up!
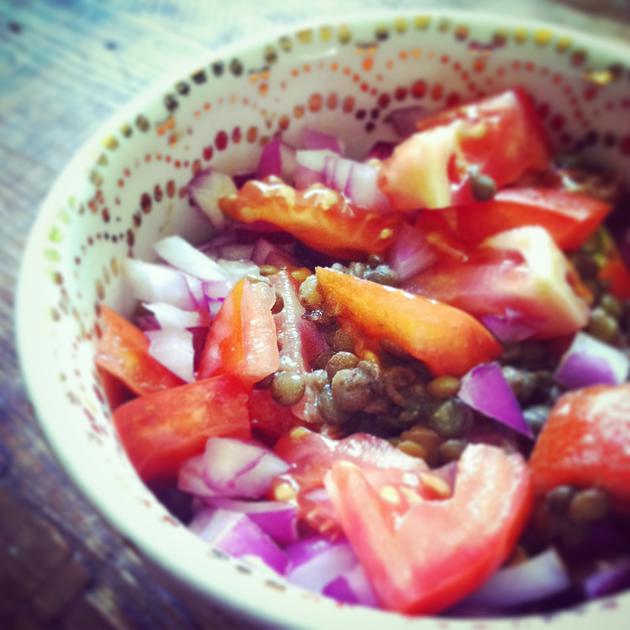
When you’re looking for lean & mean plant-based protein, lentil is one of the top winners in my book. It’s so versatile! You can make a stew, a soup, a “mash”, burgers, and today, even a cold salad to satisfy your craving palate! I’m all about “easy cooking” these days, especially that the weather has warmed up, I want to be in the kitchen less and less and more out in the garden, harvesting herbs, veggies, and eating easily assembled meals. More time playing, less time working, I say!
These lentils take about 25 minutes to cook, and you have an easy addition to your meals for about 5 days ~ how easy is that?
You can use green or red lentils, but they’ll turn soupy, so my “go to” for this dish are either French/puy lentils or black lentils. Both retain their shape really well, and are a delicious chewy texture you’ll love. Use it with any veggies that are in season, herbs of your choice, and you’ve got a meal you can make in minutes!
Ingredients:
1 cup black or puy lentils, rinsed, looked over, and boiled with plenty of water until done (about 25 minutes or so). Drain, set aside and cool.
1 chopped tomato
¼ cup chopped onion
Dressing:
1 tsp your favorite mustard
1 tablespoon raw apple cider vinegar
Pinch sea salt
As much black pepper as you can tolerate
In a bowl, combine dressing ingredients and mix up with a fork. Add in about ½ cup of your cooked lentils and stir well. Taste for seasonings and adjust as needed. Add in the tomato and onion, mix slightly, and enjoy.
Tip: This salad is also very good, by the way, with ready made hot lentils also.
I have fond memories of me and my sweetheart eating creamy roasted red pepper soup, many many moons ago, when we first met. Often, with crackers and hummus with basil on top. YUM. I’ve wanted to recreate it for a long time, and finally got to work. And like many of my recipes, this has three ingredients in it (because I can’t be bothered with any more). Easy, simple, and so absolutely delicious, you’ll want it on a regular basis like I do.
I’m all about simple recipes, but if you want to doctor this up with sautéed onions, garlic, basil, go to town! I find that it’s SO delicious and quick as is, I don’t need it changed in any way.
3 or 4 medium sized red peppers
One 28 oz can of whole, cubed, or crushed tomatoes (my favorite is fire roasted)
One 13.5 oz light coconut milk
Salt, to your taste
White beans, optional
First, you’ll want to roast the red peppers: wash them thoroughly and place on a cookie sheet. Place in the oven and roast at 400 degrees for about 40 minutes, turning the red peppers with tongs about halfway through the cooking time. Take them out and place them in a bowl, with another bowl on top ~ this loosens the skins for easier peeling. Let them steam this way for about 20 minutes, and longer is also fine. Peel the peppers, de-seed them, and put them all in a dutch oven or other heavy-bottomed soup pot.
To the pot, you’ll also want to add your can of tomatoes, salt, and the can of coconut milk. Bring to a simmer and cook on low, about 10 minutes or so. Using an immersion blender, blend the whole mixture until it’s a desired thickness. I like to serve the soup with crushed red pepper and white beans to make a whole meal.
For BLE food plan:
It’s tricky to measure this out, since it involves different sizes of peppers and also taking into account that food shrinks when cooked. To keep it simple, I typically just weight my portion of soup (say 10 ounces) and take into matter that that portion also contains my fat portion (from the coconut milk). Easy peasy. I can add in 6 ounces of white beans, and that’s a great meal! Enjoy.
Almond ricotta is often seen at our holiday table - mixed in with a variety of things, it’s super simple to make, flavorful, and comes in handy when you need a main meal item such as:
Lasagna (you can use your favorite pasta or try lentil pasta, or my favorite which is thin, wide zucchini noodles ~ yum! And no food coma after!)
Stuffed Shells
A dollop on top of soup
Smeared on lentil bread (check out the recipe here)
A dip with crudités
Stuffed in peppers and baked
OK, so I have been known to eat it with a spoon. You might enjoy this too :)
Note: For Bright Line Eating, since it’s mostly almonds, count .5 oz as a fat portion or 2 oz as a protein portion ~ I would do this before you add in the spinach, and count your spinach as a veggie.
On top of being easy to make, it’s also very and economical, compared to the variety of plant-based products in the stores that are expensive and filled with sometimes not the best ingredients.
The hardest task is the skinning of the almonds. Give yourself about 20 minutes for this. It’s worth it, and leaves you with a creamy white ricotta in the end, so don’t skip this step!
Here we go:
2 cups raw almonds, soaked in boiling water for at least an hour, skinned
1 cup cold water
2 garlic cloves
1 tsp salt
1/2 tsp black pepper, ground
1/2 lemon, juiced
1 Tablespoon nutritional yeast, optional
Combine almonds, water, garlic, salt, pepper, lemon, and nutritional yeast (if using) in a high speed blender. Blend on high, using a tamper if possible (this pushes the mixture into the blades, and make the process super quick), so that the mixture ends up being very fine with no almond bits. If you don't have a tamper for your blender, then you may have to stop the blender and scrape, blend, scrape, blend.
In a bowl, combine the ricotta and spinach together. Cook as you would normally would in your favorite recipes, and enjoy! This can be made ahead of time and used a day later, but do make sure container is airtight as the almond mixture can discolor when exposed to air for a period of time.