Warming Coffee Hand Scrub

IMG_9140.JPG

There’s something about winter time, getting cozy, making and creating beautiful things for the body, the home, the family, friends, gifting….I’ve seen coffee scrubs all around but have yet to find a recipe that speaks to me in very #hygge, cozy, perfect-for-winter ways, until this one.

I’ve always been one of those people who love the smell of coffee more than the taste. Don’t get me wrong ~ there’s nothing like really good, organic, (decaf for me) coffee….but depending on where you get it, it doesn’t fulfill me quite as much as simply smelling it (and perhaps I’ve been jaded by bad coffee!). I love that this scrub brings that amazing aroma to my senses. It’s sort of perfect.

It’s quick to make, and completely delicious to smell. I primarily use it for the hands, but you can easily use it for elbows, feet, legs, etc. Just make sure you rinse well as it may stain your hands a little, (but don’t wash with soap since it will wash away the oils that are meant to make your hands soft). It’s a bit abrasive, so I wouldn’t use it on the face.

The cinnamon and nutmeg are very wintery aromas, and warming too…makes you feel like you’re drinking a cozy cup of cinnamon & nutmeg coffee.

IMG_9139.JPG

Here we go:

1/2 cup ground organic coffee (since this is going on the skin, you’ll want to use organic)

any liquid carrier oil of your choice (almond, grapeseed, fractionated coconut, olive, etc.)

3 drops nutmeg essential oil

1 tsp ground cinnamon (or 1 drop cinnamon essential oil) ~ watch it with this oil, as it can be very hot. Only add in one drop.

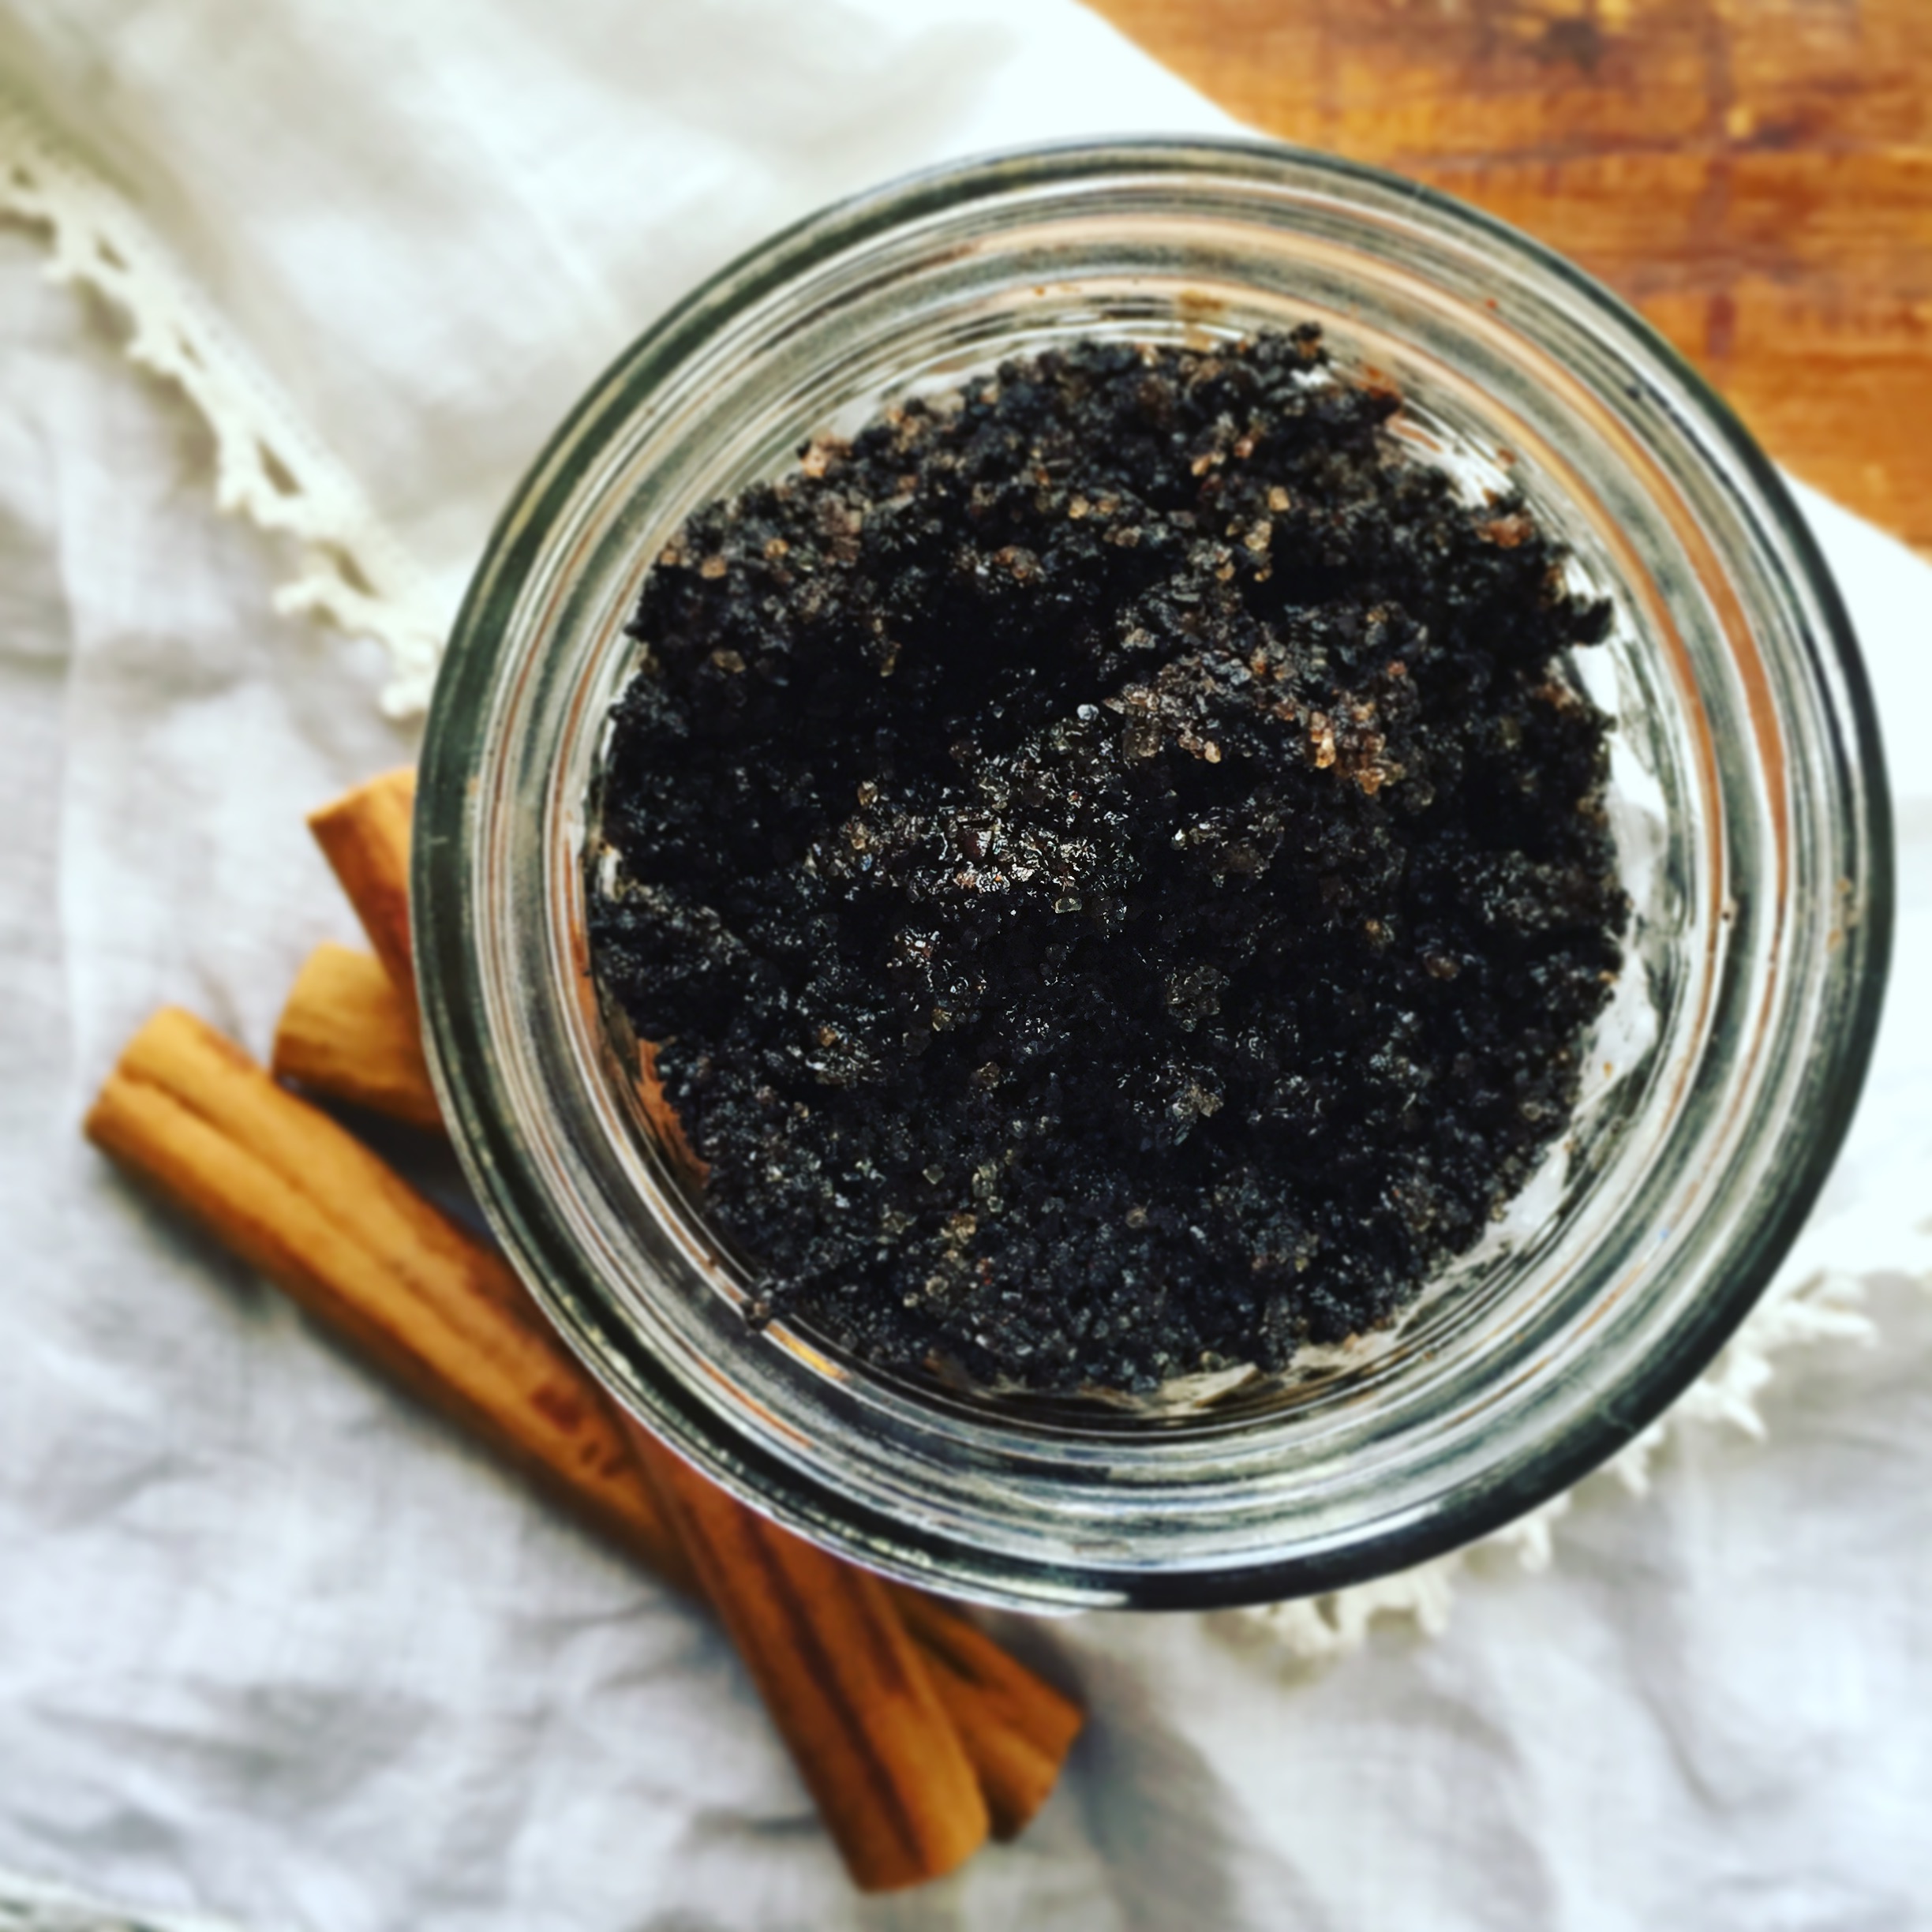
Combine ingredients in a small glass jar and mix well. The mixture will want to look like wet sand, but you can add as little or as much oil as you’d like (I typically 1:1 ratio, but I never measure).

Enjoy and use within 3 months (but it never lasts that long). Take about 1 tsp, massage into hands, then gently rinse off with warm water. Pat dry. Your hands should feel super soft and smell amazing!

IMG_9141.JPG

Did I mention it also makes great gifts for the coffee-aficionado?

IMG_9414.JPG

Black Bean Pasta Puttanesca

I remember the first time I had puttanesca. I was lucky enough to grow up with an Italian best friend named Alessandra.  She was and still is one of the best cooks I know, and her family was practically my second family growing up. One day, a long time ago, she made me the fastest pasta I've ever had and nearly dropped to my knees, it was so good. She explained it as Puttanesca, and it described a quick sauce that the prostitutes would make when they were short on time. Probably the funniest thing I've ever hear, but a sauce I'd remember forever.

These days, there's not much pasta in my house, but if there is, it's usually black bean pasta, gluten free and low glycemic. I especially love this brand because it only contains black beans and water. Simple! You can also substitute zucchini noodles for a light meal. I had some olives, garlic, fresh tomatoes, basil, chili flakes, good olive oil, (and some kale for a boost) and I got to work. 

1 cup black bean pasta, cooked per package directions. 

1 tablespoon olive oil

2 garlic cloves, crushed and chopped

few pinches sea salt

2 fresh tomatoes, chopped

1/4 cup olives, chopped

chili flakes

1 handful kale, torn

Black pepper, to taste

In a skillet, heat the olive oil over medium and sauté the garlic with a bit of salt. Watch it closely so it doesn't burn. Add in the tomatoes, olives, and chili flakes. Cover and simmer a few minutes, until they get juicy and they soften a bit. Throw in the kale to wilt, then add in the pasta. Cover again and bring to a simmer, just to heat through. When done, season with black pepper, to taste and enjoy. 

Home-Made Ezekiel Bread (an experiment!)

IMG_0339.jpg

For a long time, my family has enjoyed Ezikiel bread, and I wanted to try to make it on my own. I devoted a lot of time researching recipes, as there are many, as well as equipment that was needed (grain mills, dry grain vitamix containers, etc.). I had a great deal of fun, and felt pretty proud to create a truly healthy loaf (or two) of bread for my family. I also learned some lessons along the way, I thought I’d share.

First, there are so many recipes online for home-made Ezikiel bread. One isn’t necessarily better than the other. But if the main goal is to create a sprouted bread, then we have to devote time to first sprout the beans/grains and then dehydrate them for grinding. This is the part of the recipe that takes the longest time, but it’s worth it. Otherwise, we would just be making regular bread, right? The whole point is to sprout. For instance, I found an easy recipe online , however it doesn’t sprout the grains so I decided to skip on this one.

For sprouted bread, you have to factor in the few days that are required for the grains and beans to grow tails (sprout) which is about 3 days total. You then have to allow another day or two to dehydrate them (they can only be ground into a flour when dry). The good news is that after sprouting and dehydrating, the bread comes together pretty quickly.

Additionally, it’s best if you have a grain mill OR as I did, get a dry grain vitamix container (different than the regular container ~ feel free to search on the vitamix site here ~ note this is an affiliate link), which will pulverize dry beans and grains needed for the recipe very quickly. Yes, you can buy already sprouted flour but you lose a lot of the vital nutrients as the flour is stored in a bag on a shelf for some time, and the oils in the grain are prone to oxidize. Best bet is to allow some time, do the process (sprout and grind) yourself, and you will get the most nutrition from the grains and beans.

IMG_0313.JPG

After looking and looking for recipes, ultimately, I found this one and I was happy with it. I did make some edits, however:

  1. Again, I sprouted the grains/beans first

  2. I didn’t include a dough enhancer

  3. I didn’t include an egg, but used a flax egg instead

  4. I didn’t add the last two ingredients (nuts/seeds/fruit)

  5. I also tried the original recipe with 1 cup honey, then 1/2 cup honey, then 1/4 honey. The 1 cup honey recipe was a bit sweet, but the second version was more crumbly but had a better sweetness, and the last version was the most crumbly but was the best tasting. When I make it again, I personally would still go with the 1/4 cup honey, and find a way to bind it better.

  6. One note: I found out the hard way that if you measure 1 cup of spelt, then soak, sprout, dehydrate, you will not be left with 1 cup of spelt. You will be left with more, because the grain was soaked in water and grew a bit. Basically, just use what the recipe calls for, and store any you have left over for a future recipe. This was fine for me, since I made another batch soon after this one, and all the grains/beans were used.

  7. It’s a very loose batter when you put it in the pans - that’s ok. Just test the middle when it comes out and make sure it’s completely done. The bread itself is VERY soft, almost the texture of banana bread, not dense like regular bread.

The bread loaves came out beautifully! The bread cuts best when cooled, and you could also cut and freeze to use for toast at a later date, since it does make two loaves.

IMG_0340.JPG

Winter Hands Lavender Vanilla Sugar Scrub

IMG_4488.JPG

I'll confess - I have dry hands in the winter. Um, who doesn't? And if you're a normal human being, you probably do too. It might be the gardener in me, the pianist who just plays and plays and plays (they get a beating!), or it may be that I dislike using gloves when I wash dishes (I know, I know, don't judge). But for so many reasons, when the heat comes on in the fall and winter, my hands shrivel up and it's so so important to take good care of them ~ meaning, when we age, we mostly show it on our face and our hands. So it's important to take good care of them, just as much as they take good care of us and others. It's a good idea to use humidifiers in the winter months to hydrate the air around you, too. But overall, I dislike general moisturizers since my skin is sensitive, and I do very well by these two recipes.

I'm sure there are 1000 sugar scrub recipes out there, all of which are worth of a post, but these two are just my own personal favorites. You can certainly use these as templates and add in your own favorite oil combos, change up the oil (sweet almond and jojoba are great oils also), add in dried lavender leaves, poppy seeds for extra exfoliant properties ~ most of all, have fun, and play around with them. But these two recipes, I've found, are quick, easy, and just luxurious for the hands. Enjoy! And if you do end up making them, let me know how they turn out and hashtag #littlebitesofjoy!

Recipe:

3/4 cups raw sugar

Enough unrefined pure olive oil for desired consistency (think 1/2 - 3/4 cup or so)

10 drops Young Living Lavender Essential Oil

1 Tablespoon vanilla extract

Mix well and bottle it up in your favorite glass container. I love keeping this by the sink and in the bathroom for after washing the hands. Take about one teaspoon and massage your hands well (but not too hard), and give them some love. Rinse under warm water, and dry well. You'll find that our hands are silky smooth and well nourished! 

IMG_4454.JPG

Alternate recipe: 

Instead of the vanilla extract, try adding in 10 drops Young Living Lemon essential oil. The result is a gorgeous lavender/lemon sugar scrub. 

If you are interested in where I get my oils, please check out my Essential Oils For Bliss site here.  See you on the other side! 

IMG_4489.JPG

Hot Maca Tonic

Maca is one of my most favorite superfoods. It’s an adaptogen, which helps lower stress & makes us more resilient.  In addition, it’s known to help regulate hormones, increase semen production & help with fertility issues. There is such a thing called the “maca baby” phenomenon. Consider yourselves warned.

That said, it tastes amazing, so even if you don’t drink it or use it for these purposes, you’ll find that you’ll quickly learn to love this caramel-like taste. As with anything that’s potent and medicinal, it’s helpful to start out small and also it’s a good idea to take a break from it once in a while (as with Echinacea, etc.)

 Note: to achieve a creamy consistency, you might consider combining all of the ingredients together in a blender first, and then heating to desired temperature.

  • 1-cup water, coconut milk, almond milk, herbal brew of your choice, etc.

  • 1 tsp maca powder

  • 1 tsp sweetener of choice, optional (a drop of stevia is sufficient, or honey, coconut nectar, etc. I find that I like it on its own though)

  • Add ins: you can add in a bit of cacao powder, chai spices (cardamom, cinnamon, clove, etc.), ginger powder, or if you’d like a restful sleep, add in some nutmeg. I also love a bit of vanilla powder on top.

Combine ingredients together in a small pot and heat to warm. Enjoy!

Raw Hazelnut Mocha Cheesecake Bites

I often think we're at war - with desserts. First, we love them, we crave them, we make them, we share them, we delight and ooh and ah over them and then it happens (for me, at least, and I know for many others..)....it's the "wow, I'm sleepy" post-dessert coma. For me, it's even with say two bits of ice cream or a date-rich raw brownie. Yes, I said it. All those raw desserts that we think are good for us in fact may not be so good for SOME of us, and I'm part of that population. Now, for someone coming from a binge of eating Dairy Queen and Ho Ho's, yes, raw desserts are a step up since they actually contain good fats from nuts, seeds, and even the dried dates have minerals and fiber in them that we need. But for some of us, even those dried fruits are too sweet for us. 

So I've created a preverbal white flag that (1) gets us what we want (that sweet goodness) and (2) doesn't put us to sleep. GET OUT, you say! But no, I'm not kidding. It's that good and in fact, it's even safe for people like me who have insulin resistance. Give it a whirl and see what you think. The best part is that these are good for ANYONE, even for those of us who may not need a nap after dessert. Kudos to you, and you should be proud if that's you! But for many of us, that nap, heavy feeling after dessert is a feeling we know all-too well, and well, it jus doesn’t feel good at all.

Oh, and yes, these do take some finesse and time and babysitting and you might say "but I don't have the time SHE has to make these". Let me tell you something, you. I don't have the time either! In fact, I don't have the time NOT to make these, since with one fell swoop (maybe 1/2 hour) I have dessert for the rest of the week. These are filling and rich and you don't need that much, honestly, to make your head spin with delight. Cook once, enjoy for a looooooong time. Promise. 


Crust Ingredients:

1 cup walnuts/brazil nuts mixed (you can also do just walnuts)

2 dates (that’s it!)

two pinches sea salt

2 heaping tablespoons raw cacao powder

1 heaping tablespoon of dandy blend powder (herbal coffee)

2 dropperfulls (you can even do 1.5) of hazelnut liquid stevia

1 tablespoon vanilla and/or hazelnut extract

1 tablespoon water


Creamy filling:

1 cup cashews, soaked, drained and rinsed

2 tablespoons coconut oil, melted

1 tsp hazelnut extract (may substitute vanilla extract)

1 dropperfull of hazelnut-flavored liquid stevia


Crust: In a food processor, process crust ingredients until they start to stick together between fingers when pinched. Don’t over process, or it will get oily. You want it just enough so it looks fudgy, but nothing more.  Feel free to use another tablespoon water to get it there. Plop out the dough onto a teflex sheet, wax paper, even a silicone baking liner and press it out using your hands (you can also do this with another wax paper sheet on top and use a mini-rolling pin). You want a uniform thickness, with tight edges. I find that ½ inch is a bit thick but ¼ inch is too thin and it breaks, so aim for somewhere in between. The end product should look like a rectangle.  Pop it in the freezer for about 10 minutes. After that, you may store it in the fridge.

Creamy filling: Combine all ingredients in a vitamix or strong blender until smooth. Pour out into a bowl and refrigerate for at least 2 hours.

Cut the crust in two pieces (which will be the top and bottom layer of the cheesecake bites). Place the creamy filling onto one of the layers and spread to the edges. Carefully take the second crust and place it on top. Cut it into squares using a sharp knife. Keep refrigerated and enjoy.


Batch Cooking: Chipotle Pumpkin Hummus & Spicy Chickpea Tabouilleh

I'm finding that as a mama, a chef, a teacher, I'm always looking for ease....and for many of us that literally means "open can, pour in pot, heat, eat". What we forget is that it takes time to drive out to the store, get the can, bring it home...and many times it's actually just easier to make a huge pot of something, freeze leftovers, and have your "higher self" remember to defrost it in the morning to eat for supper. That saves you a trip to the store and only takes the 15 seconds it takes for you to get said frozen item out on the counter before you leave for work. 

So, enter hummus. For many years, I used to buy it. And then I'd get frustrated when we ran out since we had to do without, and then again, drive to the store on the prescribed shopping day, buy the hummus, bring it home, and sometimes, (ugh) sometimes it wasn't even GOOD...it had foreign ingredients and an air pocket which would lead to spoiling of the entire batch. Then, you'd have to drive BACK to the store, give them the container, get your refund, and then drive back. What a waste of time, and moreover, what a lack of inspiration and trust in your own abilities to make the best lip-smaking humus you've ever had! That's right, I said it - you're a hummus goddess in the making, and you didn't even know it.

But hold your horses - before we even go there, you must understand batch cooking since it will save your life.

Batch cooking....Here goes:

1. Make something

2. Divide it in two

3. Make two recipes

4. Freeze leftovers

5. Hug yourself since you just saved some serious $$$

6. And have your family hug you for the culinary goddess you are.


So for this particular case, we batch cooked chickpeas (or garbanzos) and the steps are as follows:

1. Take 3-4 cups of dried chickpeas, and cover with 2 inches of water, let sit overnight.

2. In the morning drain and rinse. 

3. Place in pressure cooker, cover with fresh water 2 inches above beans and add in 3 inch piece of kombu seaweed

4. Place cover on top, secure in place, and raise pressure until the knob lifts (although this depends on your machine).

5. Lower flame to medium-low and cook for 29 minutes.

6. Turn off the stove and walk away, letting the pressure lower naturally.

Enter in two amazing recipes with the batch you just made. Make sure once the chickpeas cool, you drain them but retain the cooking water for later. You can discard the Kombu.

Chipotle Pumpkin Hummus:

2 cups cooked chickpeas

1 inch cubed jalapeño pepper

1 lemon, juiced

1/3 cup tahini

1 tsp cumin

3 shakes chipotle pepper powder

1 heaping tsp sea salt

3 cloves crushed and chopped garlic

Combine all ingredients together in a food processor and process well, adding just a little bit of chickpea water to smooth out into your desired consistency. Taste for seasonings and texture, and then pour into an airtight container and refrigerate. Serve with pumpkin seed oil (optional), pumpkin seeds and crudités.

Spicy Chickpea Tabouilleh:

3 cups cooked chickpeas

1 tsp each: cumin, pizza flavoring, chipotle powder, garlic powder, black pepper, poultry seasoning, and oregano

Combine all ingredients in an 8x8 baking vessel and stir well, making sure all beans are coated in the seasoning mixture, and bake at 350 degrees for roughly 35 minutes. 

Once cool, throw in 1 cup chopped fresh parsley, and serve.

Vegan Cream of Mushroom Soup

This is probably one of my favorite go-to soups. In addition to eating high-raw in teh winter time, I really do enjoy a hot bowl of broth or soup to warm me up, and in some instances, really delicious creamy comfort food. This is one of the creamiest silkiest soups you'll find without all of the added guilt of cream, milk or butter! And it couldn't be simpler.

1/2 onion, fine dice

1 box mini bella mushrooms, sliced

1 box shitakes, sliced

1 small zucchini (optional), diced

cashew milk made with: 1/2 cup raw cashews blended with 4 cups water (do not strain)

You can make this an oil-free dish by simply sauteeing the onion, zucchini and mushrooms in a bit of broth or water until soft (or you can use a little bit of olive oil). Cook on low, covered, until the mushrooms release all of their juices and they're tender. Add in the cashew milk, and bring to a simmer to heat through. That's it - you're done! 


Chaga Reishi Cacao Tonic

I've been obsessed with tonics lately. Here's the thing: I need chocolate. Unapologetically. Just a little, every day. And it has to be dark, rich, and full of good stuff. So this tonic covers all the bases for me, and this chocolate delivery system cannot get any more healthy and pure. You can throw in any herbs you'd like, but take the time to read up on why they're good for you, learn from them, get to know them. This particular one contains coconut oil, sea salt, my favorite nettle tea (great for allergies in the spring!), cacao, and two medicinal mushrooms: chaga and reishi. It also contains maca for a little hormonal and adrenal support. Have fun exploring with your favorite flavors, and enjoy!

1 cup brewed nettle tea (or your favorite herbal tea)

1 tsp coconut oil

2 small pinches sea salt

1 tablespoon raw cacao powder

1/2 tsp each chaga and reishi powders

1 tsp maca

a few drops english toffee (or original) stevia, for your taste

Blend all ingredients together until smooth. Taste for sweetness and add in more stevia if you need it, and pour in your favorite mug. Did I mention this actually makes a great drink for the morning? Get your tonic in! Or it also fits in nicely when you need a little boost around 3:00 pm. Enjoy! 

Coconut Cream of Butternut Soup

Many days I sit and try to think of unique combinations of foods that together would spark something new and unique, and then real life sets in...the life where we all have appointments, and to do lists, and we're just plain hungry. It would be nice to say I have all the time in the world to experiment in the kitchen, but I venture to guess that I'm someone very much like you: a working person, mom, wife, someone who tries to make time to exercise, clean the house and just get stuff done on a day-by-day basis. Showering would be nice. A bath would be even better. But just "get things done and enjoy life" mode....Enter simplicity. I simply can't make things complicated any more, and I'm not apologizing for it. Especially when there's THIS soup to be had.

I made this soup by accident, having found coconut cream (thick and solid) rather than coconut milk (I just didn't read the can well enough) at Trader Joe's. I opened up the can and inside was this glorious white coconut cream just screaming back at me with love and delight, saying, "hello best friend, nice to find you here". Little did I know that the cream over the milk would make this soup incredible. 

If you can find whole butternut squash, that would be best. Simply cut the knobby end, cut in half width-wise and peel. Scoop out the seeds, chop into 1 inch cubes and you're ready to go. Sometimes we can find ready-cut butternut, but for some reason, I really do enjoy cutting through these squashes...it releases tension and helps me unite the the food (something I don't get when I just tear open a package and add it to the pot). Additionally, whole squashes tend to be more fresh then packaged ones. 

1 large yellow onion, chopped

1 tablespoon coconut oil

1 butternut squash, cubed (or about 4-5 cups)

1/2 can coconut cream (I use the Trader Joe's brand)

water (or you can substitute broth) 

Sea salt and pepper, to taste

Sauté the onion in coconut oil with a few shakes of salt on medium heat. If you cover it, it will sweat better and start to release its own juices. Add in the squash and cover with water/broth about an inch over the squash. Bring to a boil, lower heat, simmer covered about 25 minutes or until done (when pierced with a fork). Add in 1/2 can of coconut cream and stir to warm through. Using an immersion blender, blend MOST of the soup (a few chunks are actually a really nice texture). Serve with some red pepper flakes, a LOT of crushed black pepper, and a nice salad. 


My Favorite Kale Salad

One of my favorite places to eat here in town is Seed To Sprout. They have this addictive massaged kale salad that I can't get enough of! I've asked the chefs what they use to make it, and they graciously told me, but I'm not lying.... theirs is still the BEST! 

Still, when it's 9:00 pm and you want this kale salad, here's as close as you're gonna get. If you do have a chance to stop in for lunch, you want to go to the masters!

4 big leaves kale, torn into bite-sized pieces (about 3 cups)

drizzle of olive oil

squeeze of lemon juice

few pinches salt

1-2 tablespoons really high quality nutritional yeast

Combine kale, olive oil, lemon juice and salt in a big bowl. Using your hands, massage the kale well until it starts to soften. The oil makes it soft, and the lemon juice and salt will start to break down the cell wall. Lastly, sprinkle with some nutritional yeast and use a fork to fluff up (if you massage it with the nutritional yeast, most of it will remain on your hands). Enjoy! 

Parsley Arugula Pesto (over anything)

Who doesn't love pesto? Everyone loves pesto. It's so fun to say, even. A Seinfeld episode even began touting the wonders of just saying "pesto.....pesto.....pesto". Exquisite in every way, it can be used as a dip, a spread, a smear on a piece of bread, in a sandwich, over noodles....I wanted to kick it up a notch and use the bounty from our garden.

While most of you will think pesto is a summer food, it’s ALSO one of the best fall foods. Specifically because (1) you must harvest the basil in one big lump sum if the weather turns chili and (2) arugula is healthier than ever this year, since it loves the cooler weather. The parsley is also vibrant green and strongest it’s been since I seeded it. So we get to work! Using mostly whole fats such as pine nuts, not as much olive oil, but loaded with lemon and garlic, this pesto is sure to please everyone. No need for cheese of any kind, since it's loaded with flavor! 

I don’t need to tell you, you can easily serve this over regular pasta, but if you happen to get a mid-october heat spell and want something lighter, go for the spiraled zucchini.

2 big handfuls of parsley

one big handful of arugula

1/2 cup basil

juice from 1/2 lemon

2 cloves garlic, crushed

1/3 cup raw pine nuts

a few pinches of sea salt

Several turns of fresh ground black pepper

olive oil, to thin

In a food processor, process the herbs and lemon juice until everything is roughly chopped. Add in the pine nuts, salt & pepper, and garlic and pulse briefly (garlic turns bitter if processed too much).  Drizzle a little olive oil, just enough to thin, and process again briefly. Taste for seasonings. Dress your favorite noodles (mine are raw zucchini noodles, spiralized, using this or this tool). Enjoy! 

Marinated Collard Greens Salad

What do you do with overwintered collard greens in the spring? Use them up and love them dearly. The collards and kale we planted late summer to last us through the fall are still happy as can be, and we're enjoying their come back. This is why I love gardening so much, you never know what you're going to get, and you learn the natural season for things. Coming into summer, these collards won't last since it's not their season ~ their immune systems weaken and they often get white flies. Spring is one of the best times to use them up (you can also freeze them to use whenever), but this refreshing, slimming salad fits the bill right about now. It also comes with a story....

Years ago, before this house, we lived next to our wonderful neighbor, Mr. Jackson. He was in his late 80's, loved collard greens and daffodils, and told me stories about what the neighborhood was really like in the "olden days". He worked as a bartender for select private parties, and everyone knew and loved him. I'd bring him daffodils when they were in bloom, and I'd share collard greens from the garden and we would talk and enjoy simple moments together. One day, he took me by the arm and said almost in a whisper, "I love my food raw!" He didn't know I was a chef, and he didn't know I loved raw food either...how was this possible? I knew we had a special connection. 

Mr. Jackson passed away in his early 90's. I became very close to him and my whole family loved him dearly. Most especially, our young son was also close to him...when he was 7 or 8, he'd sit on Mr. Jackson's couch next to hime,  watching TV together....decades between them, and happy as clams. I'll never forget the picture that makes in my mind, and I'm eternally grateful for the kindness and care he showed us. 

This is actually his recipe, and I write it here in memory of him, and of that phrase he whispered which melted my heart. He told me he likes to slice the collards very thin (showing me how through hand gestures), and adds in garlic, and olive oil, and tomatoes and just lets them marinade until they're ready. I'm telling you...it's my favorite way to eat collards now. Thank you Mr. Jackson for your good taste in food and for your deep heart. 

Ingredients:

4 large collard leaves, de-stemmed and made into chiffonnade ribbons like this:

1 tomato, chopped

1 clove garlic, microplaned

drizzle of olive oil

salt and black pepper to taste

Combine ingredients in a bowl and allow to marinade at room temperature for about 30 minutes. Enjoy! 

Zucchini Minestrone Soup

I absolutely love soups...especially when it's a one pot meal, I can make it as I'm checking the news or wiring a blog post (like this one). You have two options: add in the potato and orzo (my boys love these!), or keep it low glycemic if you're sensitive to the sugars, and omit them both (like for me). Either way, the soup is sure to please everyone, whichever way you make it! So simple, quick, and delicious.

This is a veggie-rich, non-pasta minestrone. Is that even possible? Yes. You'd be surprised if you match the flavors (tomato, Italian seasonings and veggies), how close you get to the real thing without adding much starch and noodles. Give it a try! If you're missing a bit of bite, feel free to throw in some white beans for some extra protein and flavor. I've never made this recipe the same way twice, always using what I have on hand, and encourage you to do the same. 

I've also been playing around with making sourdough bread. I've read and heard some research that mentions that sourdough making is the original way of making bread. Making and culturing sourdough ferments the grain and grows beneficial bacteria which helps the gut, lowers the sugar content of the bread, makes it more digestible and low glycemic. I think as far as bread goes, that's a win in all departments! The tricky part is that the sourdough needs to culture for at least a week, so it's a process. But my boys gobbled it up and were very happy. If you're OK with sugars, you may want to try it as an alternative to regular bread and you may be happily surprised. 

1 teaspoon coconut oil

1 yellow onion, chopped

1 tsp sea salt

1 large zucchini, chopped

1 large stalk celery, chopped

1 carrot, chopped

2 garlic cloves, chopped

one 28-oz can chopped tomatoes

1 medium yellow potato (optional), chopped

2 tablespoons whole grain orzo (optional)

1/2 tablespoon Italian seasonings

In a large soup pot, heat up the oil and onions. Sprinkle a little with some salt, and let the onions sweat, covered, over medium heat, about 3 minutes. Add in the zucchini, carrot, celery, garlic, and tomatoes. If you're using the potato, add it now, but feel free to omit - you may not even notice its' gone! Cover with water, about 1 inch above the veggies. Cover and set to medium and bring to a boil. Once it boils, add in the orzo if you're using, and simmer, covered about 20 minutes or until the potato is done. Add in the Italian seasonings and taste again for seasonings. Enjoy!

Home-Made Chicory Herbal Coffee

I’ve got to say this has been one of the coolest projects I’ve done in a long time. I’ve always loved herbalism and delving into creative DYI projects {like when we decided to paint the outside of our house ourselves, build a fence, take out the wall to wall carpeting}, and inside the kitchen {like raw chocolate, making our own bouillon, nut milks}. This one tops all of them, mainly due to the amount of time it takes, but if you have the courage, I highly recommend it.

I stand by my "Dandy Blend" herbal coffee, tall and proud, and call it my daily necessity {I’m on a chocolate break and somehow, this herbal coffee helps satisfy that craving}. But what if I could make my own herbal coffee?

Chicory is this glorious beautiful plant {definitely look it up before using it!} with edible blue flowers, and you can often find it on the side of the highway {although I don’t recommend eating it, since it probably picks up toxins so close to exhaust and what not}. I did order some seeds about 2 years ago and let the plant do their thing, and this year it multiplied and topped to about 6 feet. We did amend the soil with horse poo, leaves and compost, but I never thought it would grow so tall; maybe it’s time to harvest.

The roots are what I’m after, which we’ll wash, dehydrate, roast and grind, all in that order. Pulling on the plants gently, the roots came out happily, although I think some remained in the ground. It’s good for me, since I’d like to have them come back next year.

1.     Wash & chop: The hardest and most consuming time is actually washing. You want to get these very clean, so I used a potato brush and brushed and brushed and brushed. I pulled out quite a few roots, but you can do this to however many you like. Cut these roots into same-sized pieces, about ½ inch is fine.

2.     Dehydrate & Roast: I dehydrated them overnight at 110 degrees to dry them out {some circles don’t do this}, and then popped them into the oven at around 300 degrees for about 45 minutes to 1 hour. You sort of have to baby sit them to make sure they don’t burn. You can even do a lower temperature for a longer time, like 250 for 90 minutes also. This is the best part, since your house smells amazing while this is happening!

.     Grind: once cooled, grind these in a coffee grinder as fine as possible. There will be some bits that just don’t break down, and that’s ok. Use about 1 heaping teaspoon per cup of boiling water, brew, strain, enjoy. I added stevia to mine. Store in an airtight container.

Yes, it’s a process and a project, but I do hope you get to make it. The taste is very much like burnt caramel, earthy, rooty, dark and rich, and tastes delicious. Well worth the adventure & my coffee cup thanks me. 

Cabbage Carrot Slaw & Tempeh Love Bowl

I like to keep things simple, as simple as possible. If you know my recipes, most of them include 3-5 ingredients at most, mostly relying on the colors, textures, tastes and nutritive values of whole, organic beautiful produce. I don't think recipes should be complicated to be beautiful and nutritious, and this one is a perfect example. 

I grew up with cabbage slaw, the way my mother made it in romania: shredded cabbage, oil, vinegar and salt. It's not as much a slaw as it is a salad, and I was known (much to my parents' surprise) to take the bowl and drink the remaining dressing when all the slaw was gone. I remember it clearly: 6 or 7 years old, dinner table, I take the big bowl and sip. I knew back then what I know now: this salad is lean, mean, crunchy, satisfying, colorful, and simply the bomb. I've only changed it a bit by using oils and vinegars we find here in the US, and throwing in some shredded carrots.

The tempeh is a regular household staple. I keep a container of if in the fridge and use it to chomp on between teaching, writing articles, before a hike, you name it. It's salty, has a fun umami taste, is nourishing, high in protein, and it keeps well.

The tempeh and slaw together are also low-glycemic, which is ALL I ever think about these days, working with clients on insulin resistance and working to heal my own. It's a winner, I promise. 

Salad Ingredients:

2 cups super thinly shredded cabbage, any color

1/2 cup shredded carrots

drizzle of olive or flax oil, about 1 tablespoon

drizzle of raw apple cider vinegar, about 1 tablespoon

two to three pinches of salt

Combine the ingredients together and toss. Let sit at room temperature for about 5 minutes to let the flavors marry and so that the cabbage softens a bit. 

Tempeh ingredients:

1 package flax tempeh, cubed (preferably gluten free)

1 package original tempeh, cubed (preferably gluten free)

1/2 bottle of coconut secret garlic sauce (this brand)

Heat a skillet or heavy bottomed sauce pan, and add in the sauce. Add in the cubed tempeh, stir to mix, cover and turn heat to medium. Watch it closely so it doesn't burn, but heat through until the tempeh has absorbed most of the liquid, about 5-8 minutes. 

In a bowl, combine the cabbage slaw with the tempeh, and enjoy! 

Three Layer Spiced Apple Pie

Back in 2014, I had the crazy idea of signing up for the "Hot Raw Chef, 5 in 5 Video Recipe Contest", through Living Light Culinary Insitute. The thing is, I am so shy on camera, and went back and forth for days on whether or not I should do it. I wasn’t really handy with my camera, the lighting was behind me which made everything super bright in the kitchen, and I realized that to make this happen, I had to become ok with the discomfort of being seen on camera. Oh, and the time limit was 5 minutes - how do you create a gourmet recipe in 5 minutes?

I finally bit the bullet and created my video on the LAST day of submissions. I uploaded the video at 11:00 pm, an hour before the “gates would close”. The winner of the contest would receive a scholarship to the Living Light Culinary Institute in Fort Bragg, CA. First, I’ve never been to California, and Living Light was a dream school for me. So shyness aside, I went for it. And (a shock to me), I actually won!

The best gift, however, is actually spreading the word about plant-based foods, and more specifically, raw foods with all of you. I hope you enjoy the video and recipe as much as I do.

Check out the link HERE and give it a thumbs up! PS. you may want to subscribe as there wil be more videos coming your way!

Raw Figgy Orange Cheesecake

Screen Shot 2019-09-19 at 1.29.16 PM.png

Years ago, we were gifted a massive bag of fresh figs from our friend Frank ~ freely picked! This recipe is dedicated to his trees and generosity! We and our bellies thank you. 

Crust:

1 cup almonds

½ cup walnuts

½ cup pumpkin seeds

2 T coconut oil, melted

2 pinches salt

1 heaping tablespoons cacao

2 heaping teaspoons maca

1-3 figs, optional

Method: Combine the nuts and seeds in the food processor until it resembles rice.  Add in the oil, salt, cacao, maca and combine. If it's too dry (and doesn't stick together between your fingers when pinched), add in 1 fig, then 2, or all three until the mixture combines well together. Set aside. 

Cheesecake filling:

2 cups cashews

¾ cups fresh orange juce plus ¼ cup water

grated zest of 1 orange

pinch sea salt

tsp vanilla

¼ plus 1/8 cup coconut oil, melted

Method: Combine all the ingredients together until well blended in a high-speed blender. It should be super smooth. Set this aside.


Middle layer:

1 cup figs, pureed in a food processor


Extras:  I used about 28 halves of figs for the top, so 14 whole

Plus about 10 figs for the sides of the cake


Line a 7.5 inch removable bottom springform pan with plastic wrap, making sure there is excess that can drape over the sides. Fill in the crust on the bottom so that it’s even and in one smooth layer.  Pour in almost half of the cheesecake filling, covering the crust.  Add in the middle pureed fig layer and using a spatula, make sure it is even and smooth.  Now take the 10 figs for the side of the cake, cut them in half and having the middle of the fig facing out, layer only the SIDES of the pie mold – it will look like a wall of figs on the inside of the pie edge.  Then fill the rest of the pie with the cheesecake filling, using a spatula to smooth it over the figs as well.  Some of the figs might pop out of the cheesecake layer, but just push them back in, or don’t worry about it. We’ll cover it with figs anyway.

Freeze this overnight.

In the morning, cut the 28 figs in half and decorate the top.  Let it defrost just about 10-15 minute so it’s easy to cut but still semi-frozen to retain the shape well. To decorate, you can drizzle with honey, cacao nibs and coconut flakes. Enjoy!


Lentil Flatbread for BLE

IMG_3292.JPG

Recently I saw a recipe for lentil tortillas, and got very excited! For 7 months on Bright Line Eating, I haven’t had any bread, so the idea of being able to wrap up a little sandwich with hummus and veggies ~ imagine, finger food! ~ was truly a welcomed one. The original recipe was pretty good, but I personally wanted to make some changes and make it even better.

  1. Don’t blend with the soaking water. It tastes gross. Rinse them and use new water.

  2. DO keep the container of soaking lentils in the fridge. If you keep it on the counter, it will ferment and smell pretty awful.

  3. Baking them takes much less time, creates super fluffy bread, AND you can do other things rather than hanging out at the stove for a while.

  4. Adding “Everything But The Bagel Seasoning” brings the recipe to a new level!

  5. You can get creative - add in some caramelized onions or herbs!

Here we go:

1 cup uncooked (hard) red lentils

water

Everything But The Bagel Seasoning

Soak the lentils in water overnight. The next day, rinse well, and add to a blender. Add in about 1/2 cup to 3/4 cup water (it should come up 3/4 of the way up the lentils in the blending container) and 1/2 tsp salt. Blend on high until smooth.

You’ll want to use a baking (cookie) sheet for this. The one I use is best size is 11.5 inches by 17 inches, or as close as possible. I’ve also made it on a large pizza round and that works well. It’s also best to have a lip around the sheet so the batter doesn’t come out. You can create a thin flatbread by spreading it thinly, and so the sheet size is very important.

Also, parchment paper is a must but what’s even better is a silicone Silpat sheet (like this one), or any silicone sheets you can find should be fine. I’ve found that the bread sticks to the parchment paper sometimes, but it comes clean off with the SIlpat.

Line the sheet with the parchment paper or the SIlpat, and pour out the lentil mixture in the pan. Make sure it’s all leveled (you may have to move the pan around to spread the batter) and relatively thin (about 1/4 inch).

IMG_3358.JPG
IMG_3361.JPG
IMG_3360.JPG

Sprinkle with the seasoning and bake at 350 degrees for about 30 minutes until done. If you’re doing Bright Line Eating, I personally weigh out 6 ounces of this finished bread for my protein. Enjoy!

Soothing Tamanu Skin Gel

I've absolutely been loving making my own DIY recipes.... mostly, it's calming to know that I'm using things on my body and in the home that are non-toxic and free from chemicals ~ that has so many positive impacts on pretty much everything in our lives, it's a no-brainer. But the best part is that it's fun, you get to play, relax, unwind, and make something that smells and feels absolutely incredible on the skin! This gel is exactly that. 

This gel is especially good for sun-kissed skin ~ it’s gently moisturizing and cooling, after all of your summer activities. It’s also a good gel to transition into fall with since it’s not too greasy, but gives you a really nice moisturizing effect for the in-between season of September.

Of course, I don't need to say that you really need to use the best oils possible, if you’re going to put them on your skin. A lot of store-bought oils say on the bottle that they’re not for topical use, so do your research and seek out the very best for this recipe.

Tamanu oil, if you ever get a chance to play with it, is this gorgeous green emerald color (which ends up giving this gel a greenish tint ~ I love it). If you don't have Tamanu, feel free to use any skin-safe oil, like sweet almond, jojoba, rosehip, etc. 


AND NOW FOR THE RECIPE.....

1/2 cup aloe gelly (I find mine here)

2 Tablespoons Helichrysum hydrosol (I find it here)

2 Tablespoons lavender or roman chamomile hydrosol (I find them here or here

2 tablespoons tamanu oil (I find mine here)

3 drops Roman or German chamomile essential oil, 7-10 drops lavender essential oil, 2 drops frankincense essential oil (found here)

Stir ingredients together with a spoon until the mixture turns cloudy and smooth ~ it's quite interesting to witness, so pay special attention! Use on your skin to create a nourishing, spa-like effect. It's so lovely, thick but light, and doesn't leave your skin sticky at all. For longest shelf life, store in the fridge.Enjoy! 

This recipe is inspired by my education at School for Aromatic Studies. If you are interested in any of their aromatherapy/essential oils programs, please check them out here!