Little Bites

Sour Cherry Berry Breakfast Bowl

Recently, I was gifted the most beautiful sour cherries by my friend Carolyn, who is also a chef herself (check out her site here!). She mentioned she turned around for a minute, and her kids ended up harvesting 13 pounds in no time, which makes me the lucky one...since she ended up sharing with me. 

Little did she know that sour cherries are very dear to my heart. They are very popular in Romania and I remember growing up eating them every summer...sometimes, picking them as a little girl, from my grandmother's cherry infused liquor (I ended up just fine, never got drunk, I promise), in glorious vanilla pound cakes, or straight from the tree (and everyone seemed to have one). But in all of these, I ended up isolating the cherries, dismissing anything that was around them, and just enjoying their pure taste.

I have to admit, I had to force myself to make something with them. My desire was two eat them straight out of the bag, but I had to come up with something more interesting than that. Also the whole low-glycemic thing came into play...if I made pound cake, well, there's not enough stevia to make pound cake palatable. But here's what eventually did happen:

1. I made a berry crumble for my boys, and they loved it (not pictured) with the crumble topping from Minimalist Baker found here. (I also cut the sugar in 1/2 and mixed cherries with peaches, gooseberries, blueberries and strawberries...a potentially weird combo, but it rocked!)

2. I froze some for my sister (since she has to taste them, but she's returning from a trip in July), and gave some to my mother (who was beside herself, since she obviously spent more time in Romania than I have and she remembers sour cherries fondly). 

3. I made a yummy raw hazelnut vanilla torte with sour cherries and chickory flowers, which I'll be using in my wild edibles book (out whenever I get my act together...currently working on two others now). 

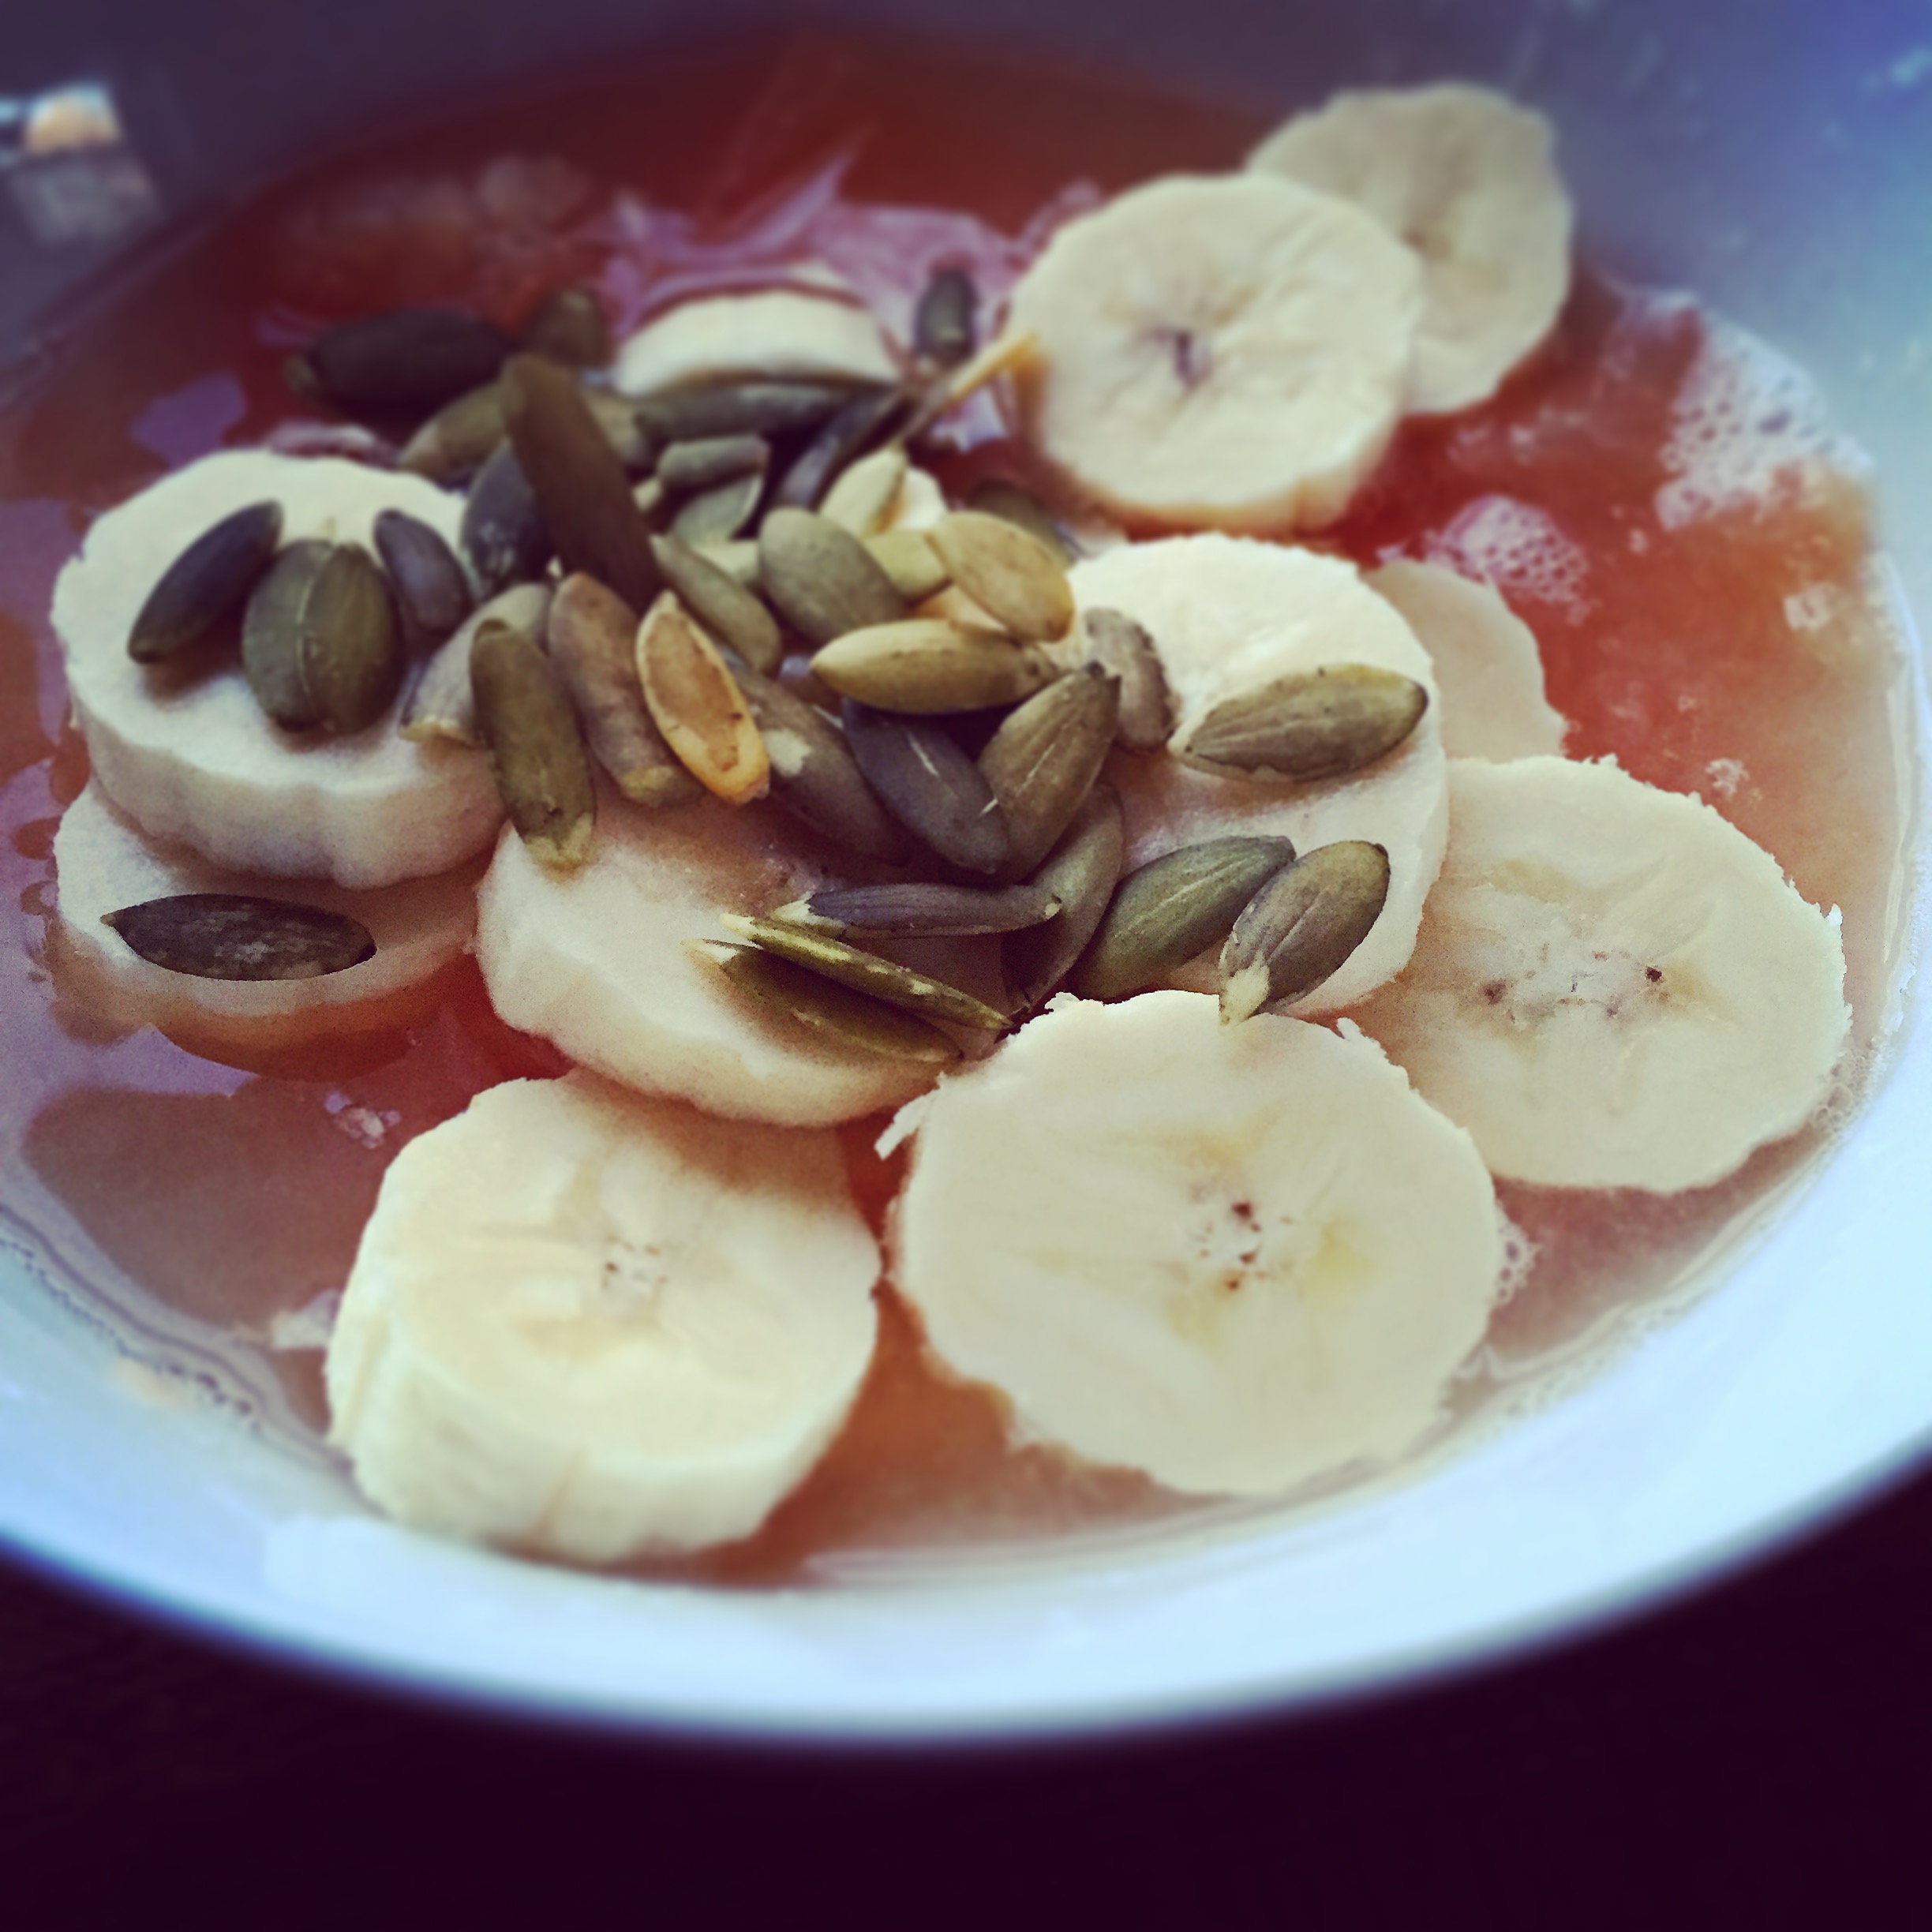
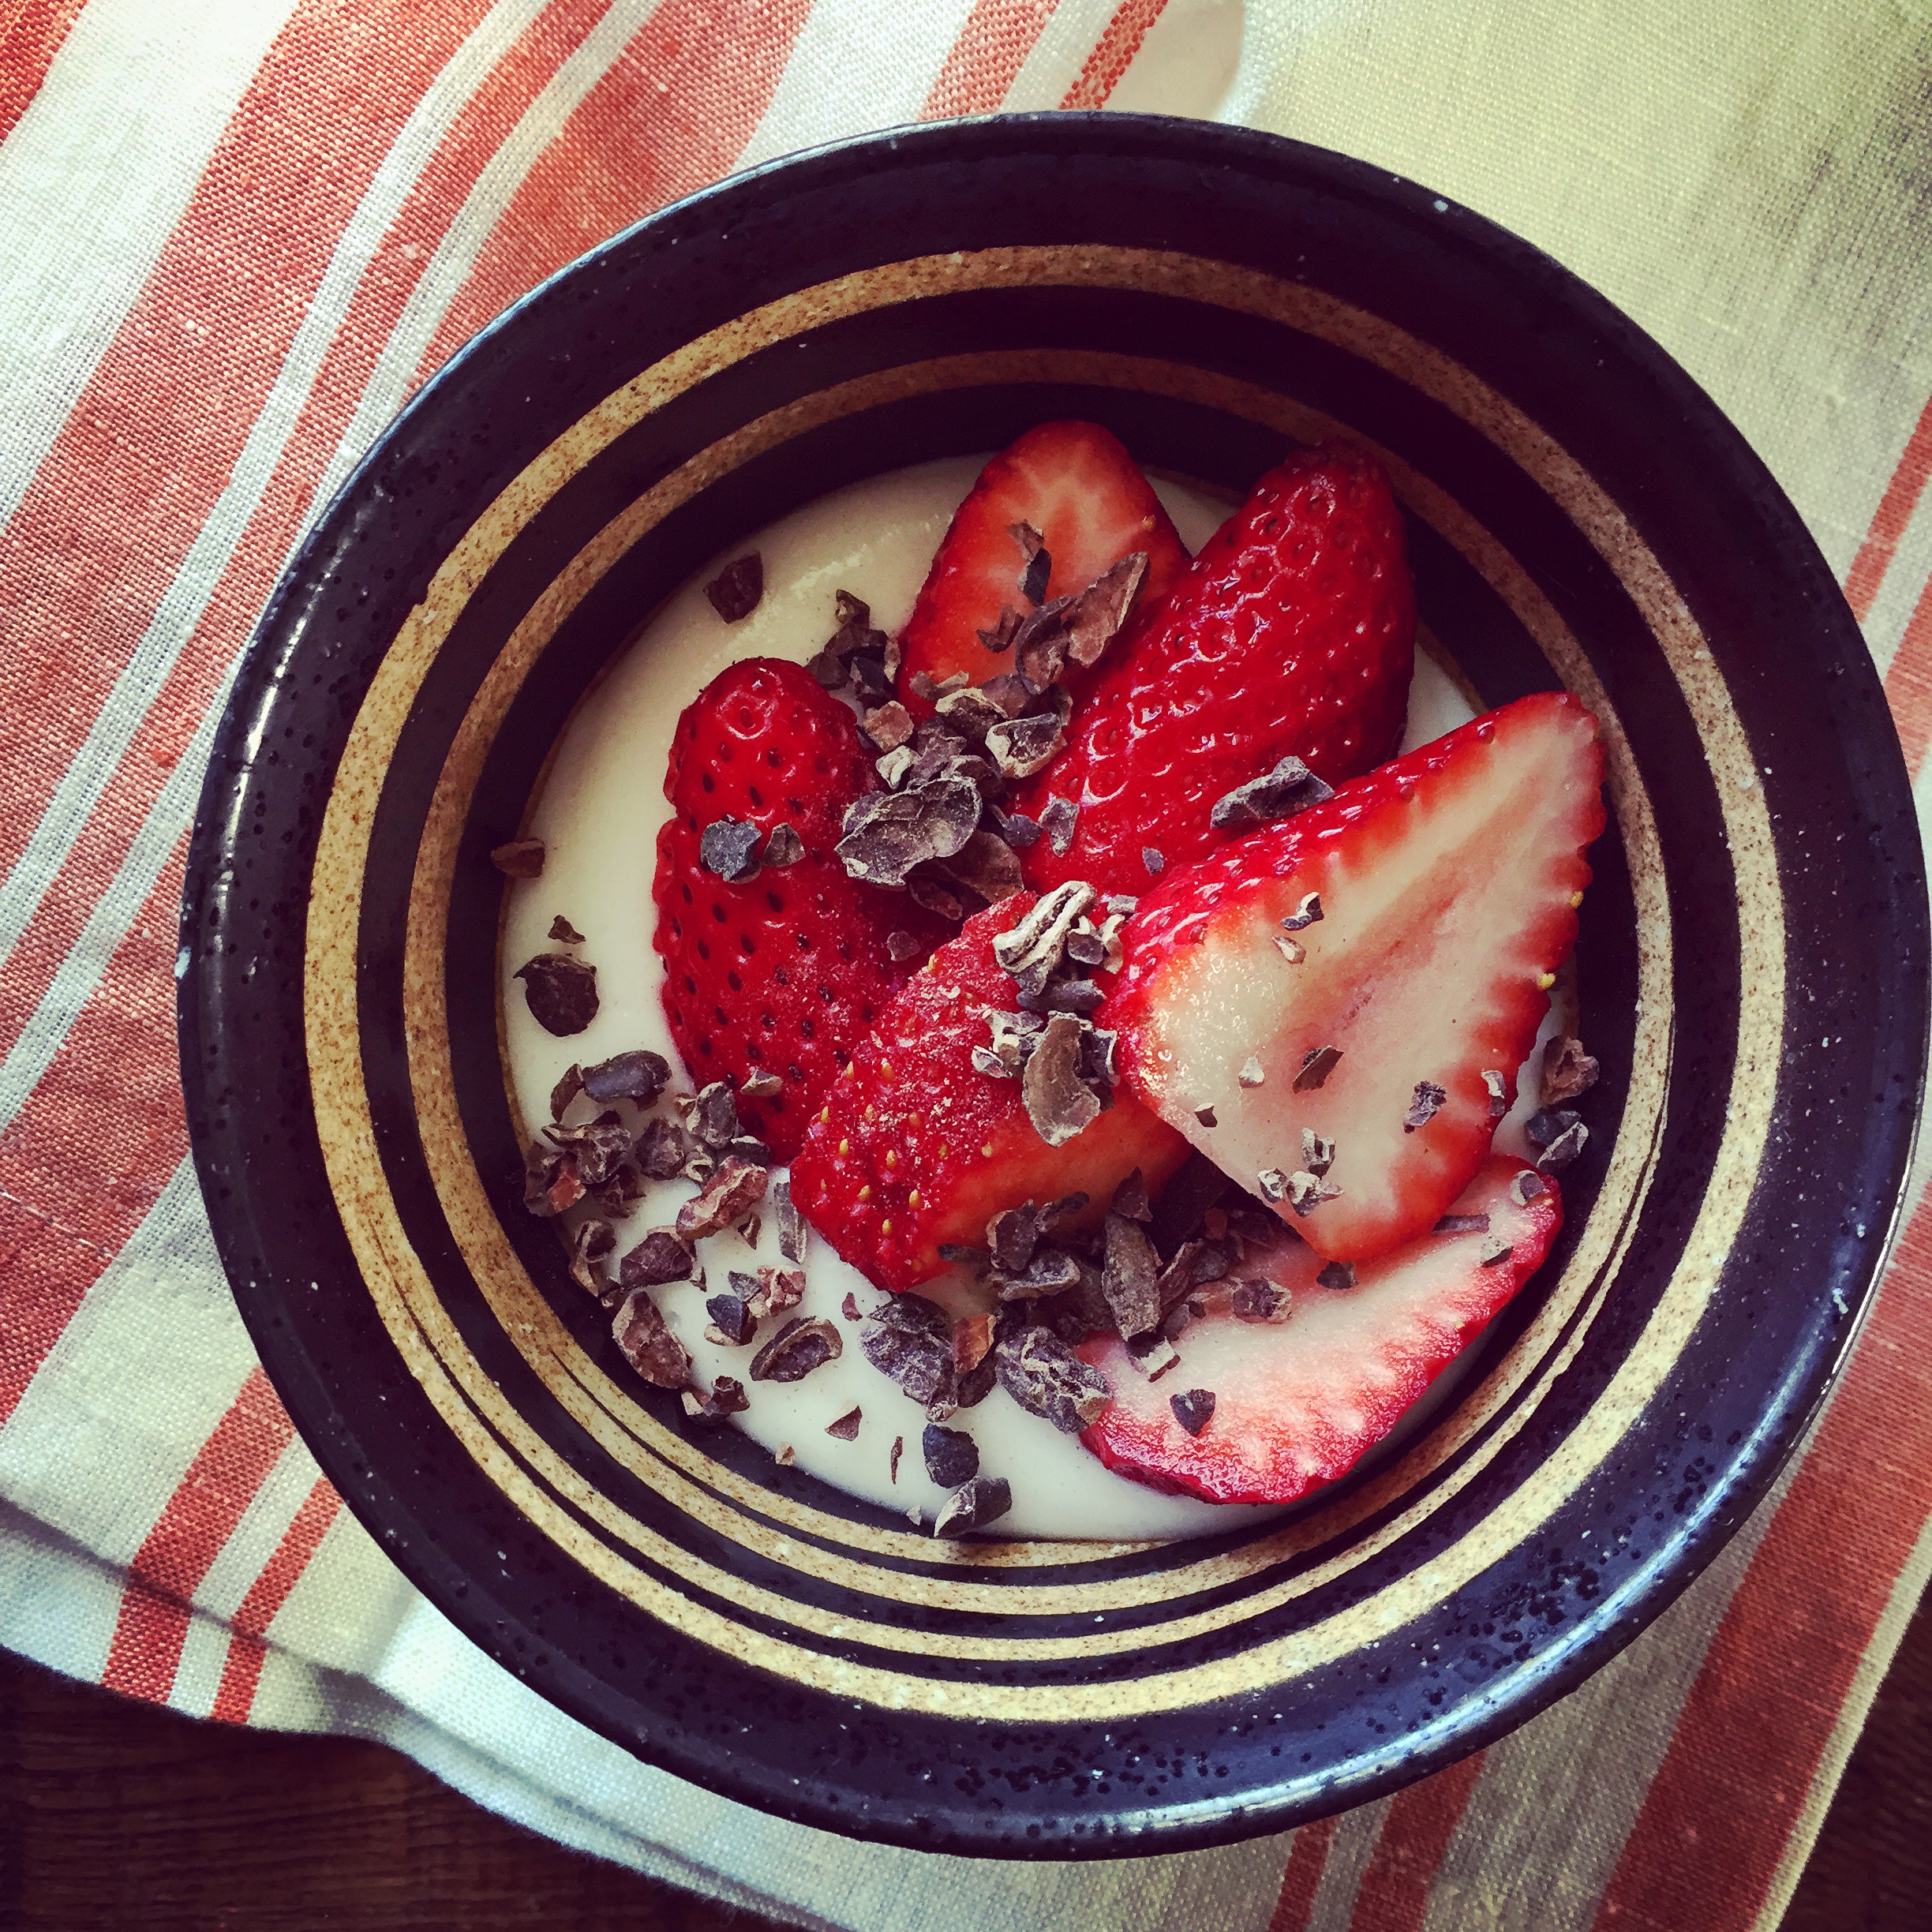
4. And last but not least, this sour cherry berry breakfast bowl. In love with the last sweet tart tastes of these beauties, and breakfast is complete. 

1/2 cup coconut yoghurt (plain or unsweetened vanilla)

1/2 cup almond milk, unsweetened

1/2 cup sour cherries, pitted

1/2 cup frozen strawberries

1 scoop chocolate classic protein powder (Sunwarrior, vegan, raw)

sprinkles of blueberries, unsweetened coconut flakes,  cacao nibs, and chia

Blend yoghurt, milk, berries and powder until smooth. Pour into your favorite bowl and decorate with blueberries, coconut, cacao and chia. Enjoy!

Fresh Spring Rolls with Parsley Dipping Sauce

Right before a frost a few weeks ago, my husband and I were able to harvest bowls and bowls of spring mix, kale, parsley, cilantro and herbs. We lived off of those greens and I was happy that I had FREE salad for about 10 days (somehow it kept much better than the greens bought in a store! Probably since it wasn't shipped!).

I easily harvested about 5 cups of parsley and had to get to work, creating something with these amazing rich-green leaves. I found this recipe (which is for a dressing) and adapted it a bit to create an amazingly emerald green dipping sauce that I dunk practically everything into! I'd imagine you can do the same thing with cilantro leaves as well for an extra special dressing. If you find wild edibles such as chickweed or nettles, or a mixture...even better...

Be sure to not over-blend: herbs get bitter the more they're processed. 

2 cups parsley leaves, tightly packed

1 generous clove of garlic

1/2 cup mixed oils (I used flax seed oil and unfiltered cold pressed olive oil)

juice from 1/2 lemon

1 tablespoon apple cider vinegar

sea salt and pepper (adjust to taste)

Blend all ingredients together in a high-speed blender. You can definitely use this as a dressing but I found it was pretty thick, like a dip....I served them with fresh spring rolls, which made the perfect lunch. I filled brown-rice wrappers with red peppers, spring mix (from our garden), and avocado, and dug right in! Hope you enjoy these as much as I did. 

Fresh Coconut Acai Love Bowl

During this quarantine, we may be doing more home cleaning than before…and if you’re up to your elbows in your fridge, scrubbing and discovering items you’ve forgotten about, you may by chance stumble upon your frozen Acai packets. If that’s the case, you just SCORED! We’re making a lovely Acai bowl today.

You've probably seen the glorious photos of Acai Bowls everywhere...on instagram, Facebook, even in some healthy restaurants, made at home by those of us who want to eat healthy. Why do we need ONE more, you ask? Well, this one is loaded with good healthy fats (that keep you satisfied, help your hormones, etc.), and it's also low-glycemic ~ that's the important part! Many of our common Acai Bowls contain sweeteners and are loaded with sweet fruit. While this works for some people, I'd like to make the sugar down a bit and increase the healthy fats. You'll enjoy this delicious bowl of superfood goodness, giving you energy while keeping you away from the blood sugar rollercoaster! 

Acai is a berry that's touted as a superfood, containing fiber, heart-healthy nutrients, Vitamin C, healthy fats, antioxidants and capacities to help us detox (Because the benefits are just SO HUGE and too long to list in this post, here are two super useful and fun articles to read to further your knowledge on Acai : HERE and HERE).  But the bottom line is: Acai berries are delicious, and that's reason enough for us to eat them! Eat more of the good and less of the bad. This fiber-rich antioxidant bowl works really well as a morning breakfast or a mid-afternoon pick me up. 

Also, I've recently ordered fresh frozen coconut meat from Exotic Superfoods in hopes of making low-sugar raw desserts, but I haven't even gotten to that part yet ~ I've just been eating it straight out of the bag and it's absolutely delicious! I did buy the case, which can get expensive, but cutting into regular young thai coconuts and not knowing if they're fresh or not, sprayed with formaldehyde to keep the outside white, or low-yielding, then you have to clean the meat....It's a lot of work! I figured this saves me time, hassle, it's all clean, and I can taste the purity. 

Ingredients:

One packet of unsweetened Acai Berry Puree, defrosted (I like the Sambazon brand)

a few drops liquid stevia 

slivered almonds

blueberries

1/2 cup fresh raw coconut meat, sliced

chia seeds

bee pollen

In a bowl, pour out the Acai puree and stir in a few drops of the stevia. Start with three and taste as you go, making it sweet enough for you. Add in the rest of the ingredients, and eat with a spoon :)

That’s it! Besides, this makes a really good superfood treat in-between fridge cleaning sessions. Hope you enjoy it! Now, back to work.


Sunflower Sprouts

I absolutely love growing my own sprouts. They're very cost effective, easy (they grow on their own with little supervision), they give you an indoor gardening when you don't have the outside space, and they provide unparalleled nutrition. They are the epitome of nutrition, in fact, loaded with fiber, antioxidants, chlorophyll, protein, and abilities to support the body through detoxification. In many instances, they are exponentially more nutritious than their grown counterparts (for example, broccoli sprouts contain more nutrition than broccoli itself!)

Some sprouts are grow in ball jars, need to be rinsed, and then they develop tails in about 3 days. More on those later, article coming.

These particular sprouts, along with wheatgrass, grow in dirt. The benefit of these is that there's very little chance of mold, at least in my experience. And they require minimal babysitting. 

1/2 cup sunflower seeds, organic, soaked overnight

2 cafeteria trays

enough organic soil to fill one cafeteria tray

something heavy, like a 1 pound weight or a plate

a sprayer with water, and extra water

First, take one of the trays, and pour the dirt inside. Brush it to the edges, leaving 1 inch of space before you hit the edge (this helps water pool). Sprinkle the sunflower seeds on top. Then using a slow stream of water, drizzle some water over top of the sunflower seeds in long lines. Turn the tray once and do it again (creating a criss cross pattern). If there's extra water in the 1 inch edge, then pour that out. Cover with the second cafeteria tray, and put a weight on top. Leave it away from sunlight, but indirect sunlight is ok. Wait about 3-4 days until the sprouts themselves push up the tray (and they will!) Next, spray the emerging sprouts with water daily until they reach about 3 inches, trim, and enjoy! 

Home-Made Ezekiel Bread (an experiment!)

IMG_0339.jpg

For a long time, my family has enjoyed Ezikiel bread, and I wanted to try to make it on my own. I devoted a lot of time researching recipes, as there are many, as well as equipment that was needed (grain mills, dry grain vitamix containers, etc.). I had a great deal of fun, and felt pretty proud to create a truly healthy loaf (or two) of bread for my family. I also learned some lessons along the way, I thought I’d share.

First, there are so many recipes online for home-made Ezikiel bread. One isn’t necessarily better than the other. But if the main goal is to create a sprouted bread, then we have to devote time to first sprout the beans/grains and then dehydrate them for grinding. This is the part of the recipe that takes the longest time, but it’s worth it. Otherwise, we would just be making regular bread, right? The whole point is to sprout. For instance, I found an easy recipe online , however it doesn’t sprout the grains so I decided to skip on this one.

For sprouted bread, you have to factor in the few days that are required for the grains and beans to grow tails (sprout) which is about 3 days total. You then have to allow another day or two to dehydrate them (they can only be ground into a flour when dry). The good news is that after sprouting and dehydrating, the bread comes together pretty quickly.

Additionally, it’s best if you have a grain mill OR as I did, get a dry grain vitamix container (different than the regular container ~ feel free to search on the vitamix site here ~ note this is an affiliate link), which will pulverize dry beans and grains needed for the recipe very quickly. Yes, you can buy already sprouted flour but you lose a lot of the vital nutrients as the flour is stored in a bag on a shelf for some time, and the oils in the grain are prone to oxidize. Best bet is to allow some time, do the process (sprout and grind) yourself, and you will get the most nutrition from the grains and beans.

IMG_0313.JPG

After looking and looking for recipes, ultimately, I found this one and I was happy with it. I did make some edits, however:

  1. Again, I sprouted the grains/beans first

  2. I didn’t include a dough enhancer

  3. I didn’t include an egg, but used a flax egg instead

  4. I didn’t add the last two ingredients (nuts/seeds/fruit)

  5. I also tried the original recipe with 1 cup honey, then 1/2 cup honey, then 1/4 honey. The 1 cup honey recipe was a bit sweet, but the second version was more crumbly but had a better sweetness, and the last version was the most crumbly but was the best tasting. When I make it again, I personally would still go with the 1/4 cup honey, and find a way to bind it better.

  6. One note: I found out the hard way that if you measure 1 cup of spelt, then soak, sprout, dehydrate, you will not be left with 1 cup of spelt. You will be left with more, because the grain was soaked in water and grew a bit. Basically, just use what the recipe calls for, and store any you have left over for a future recipe. This was fine for me, since I made another batch soon after this one, and all the grains/beans were used.

  7. It’s a very loose batter when you put it in the pans - that’s ok. Just test the middle when it comes out and make sure it’s completely done. The bread itself is VERY soft, almost the texture of banana bread, not dense like regular bread.

The bread loaves came out beautifully! The bread cuts best when cooled, and you could also cut and freeze to use for toast at a later date, since it does make two loaves.

IMG_0340.JPG

Two Harvest Tomato Recipes

It’s late August here, almost September, and we’re swimming in tomatoes (which is a lovely byproduct of treating your garden well). There’s nothing like planting your seed, tending to it, growing seedlings, moving them outside to acclimate, then planting, then nursing, watering, mulching, pinching, helping pollinate, and then finally harvesting. The summer garden is glorious, rewarding work, but the best part is making the recipes after harvesting super easy. I avoid elaborate recipes and just go for simple and delicious.

The first recipe is a “baked” tomato sauce ~ you can use whole tomatoes, cherry, plum, heirloom, whatever you have on hand. You can find the full recipe here, but I basically just roast tomatoes with herbs and garlic, then pulse in a food processor (or not, you can leave them as is and just mush with the back of a spoon if you like a heartier sauce), and serve over zucchini noodles, over some orzo, or anything else you think of.

IMG_8398.JPG

The second recipe is one of my favorite ways to eat tomatoes, by far.

Roasted Pepper & Tomato Salad

1/2 jar of roasted peppers, sliced thin (or you can roast your own peppers!)

1/4 red onion, sliced

about 1.5 cups sliced tomatoes

drizzle of olive oil

drizzle of apple cider vinegar (or balsamic)

pinch salt

Combine ingredients together and serve as a side with any of your summer bounty plates. Delicious with roasted eggplant and zucchini, along side some crispy baked chickpeas, or even with some just-harvested roasted purple potatoes….you get the idea.

IMG_8499.JPG

A quick September recipe (when you still have tomatoes, but the weather is cooling a bit) would include incorporating some polenta, a favorite food from my childhood. You’ll want to use really fine cornmeal here: the ratio is 1 cup cornmeal to 3 cups water. Bring to a boil, turn down to a simmer, add a little salt, and stir, stir, stir. It will spout and spit so maybe wear a cooking glove (I’ve been burned by polenta before!). The polenta should be done when it pulls away from the sides of the pot. For me, all it needs is salt to taste amazing, but you can also serve it with some vegan butter and/or cheese. And a generous helping of the tomato and roasted pepper salad, of course. Add in your favorite protein, and you’re all set!

IMG_8498.JPG

That’s it - enjoy your garden bounty, or head to your local farmers market to reap the rewards of summer tomatoes. They will not disappoint!

Crazy Good Sauerkraut

IMG_8091.JPG

I’ve made sauerkraut so many different ways - using a brine, just massaging it with salt, adding salt water, which are all similar, traditional methods for making raw probiotic-rich fermented cabbage. However, most recently I’ve found a favorite recipe that’s my preferred way of making kraut, mostly because the flavor is simply amazing. It has just the right amount of tang, it’s not overpowering, and sour just enough. I’ve been using the Caldwell Starter method, and haven’t looked back!

Caldwell Starter is a product you can purchase, which contains a blend of living active bacterial. Refrigeration is recommended, so be sure to refrigerate it as soon as you receive it. Instructions are found in the packet, but here’s a summary:

  1. Slice the cabbage thinly, about 4 pounds (white or purple, doesn’t matter ~ or try a mixture!)

  2. Dissolve 3 tablespoons salt in 2 cups of water and stir well

  3. Dissolve the contents of one pouch (starter comes with 6 pouches) in a cup of room temperature water and let the solution sit 8-10 minutes.

  4. Combine salt solutions, starter and cabbage and massage for 10 minutes. At this point, you can also add a tablespoon of juniper berries or 2 tablespoons or so of caraway seeds (my favorite). Once massaged, add the mixture to a large mason jar, make sure the cabbage is covered int he brine, place a lid on top (but don’t secure well), and let sit on the counter 7-10 days until the perfect tang.

  5. Refrigerate at this point and enjoy!

That’s it - the hardest part is massaging the kraut, since it’s definitely an aerobic activity! But nothing comes close to the joy you feel when you made your own supply of sauerkraut that will last for months to come. Enjoy!


Cherry Tomato Freezer Sauce

There are many ways to make tomato sauce, but this couldn't be more simple and more delicious. At the moment, we have so many tomatoes in our garden that it's hard to keep up, and I haven't yet entered the curious world of canning (soon, though, soon!) So for the time being, I freeze and it suits me just fine. 

But cherry tomatoes...who ever heard of using cherry tomatoes? Well, cherry tomato sauce is all over the internet, and here's my version (although all of ours are basically the same sauce). You can add in different herbs, even red peppers, mushrooms, make it your own. 

Simply gather enough cherry tomatoes so they lay in a single layer. I used 9x11 pan, and therefore had about 4-6 cups of tomatoes, although the size of them will dictate the amount. As I'm leaning, there are so many different types of cherry tomatoes, some small, some bigger, and I even threw in some regular tomatoes in the mix as well to fill in some gaps. Just get them all in one layer for the pan you're using. 

IMG_6196.JPG

Drizzle with a little olive oil, and throw in about 2-3 cloves of garlic, still in their skin. Roast at 350 degrees for about 45 minutes, until their skins have broken and released some juices. Let cool, and process in a food processor with some salt and pepper to taste, and freeze in individual bags, laying flat. Once frozen, you can stand them all upright in the freezer and they won't take up much room since they're flat. That's it - voila! And you were worried you wouldn't get to make tomato sauce this season! Get to it!

Blue Ocean Creamsicle Chia Pudding

31CE8183-B1BF-4E24-9403-F20D13BF4767.JPG

I’m going out on a limb to say that maybe you’re all pretty well versed with chia recipes, since there are thousands on the internet at this point. But maybe you’re not secure on the ratio of chia to water. Fret not, I’m here to help. You may also not be sure how to flavor it so it’s super delicious, and healthy for you. Fret not, I’ve got you covered there too. And on top of that, if you’d like to raise the superfood qualities of it adding in some seaweed power to make it pretty blue? I’ve got you there too. Read on.

FullSizeRender.jpg

Basic Recipe: My favorite ratio for chia pudding (one serving) is: 1 oz chia, 7 oz almond milk. You can use any kind of milk, actually, or even do 1/2 milk, 1/2 water, all of these are great choices.

Make it yummy: you can add in stevia (I choose not to since I buy unsweetened vanilla almond milk or make my own, and in both instances, I find it a little bit sweet). To make the creamsicle version of this, you’ll add 2 drops Young Living Vitality orange essential oil and a splash of vanilla extract of vanilla powder. Easy peasy! There, my friends, is my favorite way to make chia pudding.

Spruce it up: However, if you’re looking to make it over-the-top good for you, you can try adding in this gorgeous blue powdered spirulina. Trust me, you won’t taste it, but it will look like the ocean, and when you make your food pretty, it’s always a good thing. Spirulina (and all things green) are very good for you too, offering chlorophyl and protein. The brand I love the most is from Klamath Lake in Oregon, and you can learn more about it here (note it is an affiliate link, because I love them so much). You can also add in other powders that you like, such as maca, cinnamon, etc.

FullSizeRender_1.jpg
E8597DD6-2231-4BAE-8095-3C8C00527C00.JPG

So, without further ado, here’s a quick recipe that a 10 year old can do. But trust me, you will want to eat it all up yourself. It basically tastes like an orange creamsicle that’s blue :)

1 oz chia seeds

7 oz almond milk (or milk of choice)

pinch salt

1 tsp vanilla extract, or a sprinkle of vanilla powder

sprinkle of cinnamon

2 drops Young Living Orange Vitality Essential oil (optional)

1 capsule (or 1.5, go crazy) blue Majik powdered seaweed (here’s the link again)

Ball jar

Combine all ingredients together in a ball jar. Give it a good shake and leave it on the counter for about 3 minutes. Shake it again, making sure there aren’t any lumps at the bottom. Refrigerate overnight and enjoy in the morning with some nuts, fruit, or anything else you’d like for breakfast. Alternatively, you can eat this during the day, just make sure it sits overnight in the fridge to solidify.

Light Breakfast Bowls

Breakfast is a funny thing. Sometimes I wake up and don't have to eat until 11:00 am. Sometimes I'm ravenous at 6:30 am. Most of the time, I keep it simple and just have a satisfying protein smoothie, but there are some days when I want something light and refreshing.

These are two of my signature bowls that I've made over and over and they fit the bill perfectly. The first is tart, sweet, and just the right thing when I need something to hold me over, but I'm not starving. The second is a little more substantial and holds me over for longer...but it still follows the same formula. Some fruit and almonds. Love the both and hope you enjoy them as much as I do! Interestingly enough, they're sweet enough (but low-glycemic) to pass for a dessert. 

GRAPEFRUIT ALMOND BREAKFAST BOWL:

1 grapefruit, cut in half, flesh scooped out

1 banana, sliced

a handful of pumpkin seeds.

Combine ingredients and enjoy.


COCONUT YOGHURT BLUEBERRY BOWL

1/2 cup unsweetened coconut yoghurt

1/2 cup blueberries

a handful of slivered almonds

Combine ingredients and enjoy.


Enjoy! And let me know what you're having for breakfast! 

Vegan Coconut Bacon

Sooo...who doesn't like bacon? Everyone loves bacon.

Who loves heart disease? Nobody loves heart disease.

There are some foods, like coconut in this instance, that really take on the flavors they are paired with beautifully. When you mix coconut with coconut aminos, liquid smoke and stevia, you get this amazing layering effect of flavors...umami, sweet, savory....and you really get the bacon flavor coming through. 

I used this particular recipe as a template, but tweaked it a bit so it's lower glycemic. Also I chose to dehydrate it instead of baking so you retain the coconut enzymes and it's essentially a raw food, and also opted for coconut aminos over tamari (which means they're soy-free!) So my take on the recipe is as follows:

3 cups large flaked raw coconut

3 tablespoons coconut aminos

2 tablespoons liquid smoke

1 full dropper of liquid stevia

Combine ingredients together, layer on a Teflex sheet and dehydrate overnight at 110 degrees. No need to flip. Store in air-tight canister and enjoy! 


Sundried Tomato Powder

One of the highlights of my stay at Living Light Culinary Institute included early morning help in the kitchen before classes started. Weary eyed, sleepy headed, chilly morning walks to school....but I absolutely loved it and considered it an honor, working in a raw vegan commercial kitchen ~ how many are there of its kind, I don't know, but probably very few. It was too much fun working early morning under excellent great raw vegan chefs and instructors.

Despite a minor Blendtec lid *snafu*, I did eventually learn how to make proper sundried tomato powder {just imagine putting on the lid wrong, turning blender on high, powder everywhere. I only have a Vitamix, so who knew?}.

You'll love this powder....it's called "Sundried" but really, the dehydrating of tomatoes brings out their "cooked taste" without losing any of the nutrients {and without really cooking them}. Sweet, earthy, dark, hearty, and an amazing addition to soups, sauces, even guacamole and crackers! Flavor, flavor, flavor is where it's at. And right about now, we have bumper crops of tomatoes from the heat of summer, perhaps too much to know what to do with. If you're making salsa or sauce, you can just take the peels, seeds, innards, any part of the tomato, pulse it up in the blender and pour them over dehydrator trays. In a few days, you'll have a crumbly dry heap that you can process again in the vitamix into a powder. Keep it in an airtight container, and you're good to go for quite a while! 

One note: size really matters when dehydrating tomatoes. I learned this the hard way, but you can't simply cut a plum tomato in half {even the little cherry guys} and dehydrate them. The outside might be dry, but the underside is often wet and warm which means you can harbor mold. Plus it just takes too long to dehydrate which further exacerbates the mold issue. A quick chop in the blender or food processor {so it looks more like chunky sauce} should do the trick. 

3 cups chopped tomatoes, skins, innards, seeds, etc. Pulse these in a food processor or blender so they don't have any big chunks.

Lay the contents over two dehydrator sheets lined with teflex sheets. Dehydrate at least 24 hours (or more) at 110 degrees. I often keep these in for two days ~ you just want them to be completely dry. Let them rest and cool for 15 minutes, then crumble off into a vitamix vessel. Pulverize and store in an airtight container! Enjoy. 

Organic tomatoes from our garden.

Organic tomatoes from our garden.

Dehydrated chunks of tomatoes, before processing into powder.

Dehydrated chunks of tomatoes, before processing into powder.

Sundried tomato powder.

Sundried tomato powder.

Coconut Blueberry Love Bowl

There is just SOMETHING about bowls. It might be linked to my "mild" obsession with wooden boxes, shoes, bags, other things that hold other things...I think it's their nurturing aspect, of holding something, taking care of something, taking that something special with you... that I really just love. But bowls are in a field of their own ~ they are regal, majestic, beautiful, and so the food we put inside of them should also be majestic and beautiful.  And most of all, nurturing. 

"Love Bowls" are also something that we can all make that just look beautiful ~ and as long as you layer different colors of nutritive foods and play with your "art", play with your food, they pretty much create themselves and the delivery system is just two hands, holding a bowl, and noshing. I've even just thrown stuff together and didn't necessarily care how the food landed, and it's always beautiful. It doesn’t get better than that! I love it. 

For me, I really need to chew something in the morning, and it has to be high in protein and fiber and low-glycemic. Smoothies are great, but I bore easily with them ~ not so much the flavors {since those are endless} but more so for the texture - it's predominantly smooth and I wanted something that was more gritty, something that would make my jaw work and "wake me up". That's why bowls are just perfect....

This pretty much is my new favorite thing ~ blueberries are just the bomb, every which way, the coconut yoghurt and the protein power are both very filling, lightly sweet, and taste indulgent in the morning, and the crunch from chia, flax, coconut can't be beat! Mix it up any way you want, grab a big spoon and dig in!


The basic template for this love bowl is:

Bottom: could be coconut yoghurt, granola, etc.

Fruit: berries are my faves but you can add kiwi, oranges, etc.

A good fat/crunch: coconut, chia, flax, walnuts, etc


INGREDIENTS:

1/2 cup probiotic coconut yoghurt

1 tablespoon protein powder (I love Sunwarrior Classic Chocolate)

1/2 cup blueberries

1 tablespoon each: ground flax, chia, unsweetened shredded coconut

Sprinkle of walnuts, optional

Combine the coconut and powder together until it's mixed well. Just know, different protein powders differ in sweetness ~ I tried this with a whole scoop of protein powder (one whole serving) and it was just too sweet, so I added only 1 tablespoon powder instead, but you be the judge on how much you like. Place the yoghurt mixture in the bottom of the bowl and layer with the blueberries, flax, chia and coconut (and walnuts, if you're adding them). Enjoy! 


Probiotic Raw Vanilla Coconut Yoghurt

I love playing in the kitchen and infusing my food with natural, good for you probiotics, the way they happen in nature....like making sauerkraut and kim chi from scratch, and new favorite, this vanilla coconut yoghurt. In fact, research shows that probiotics found in kim chi and sauerkraut and other ferments create much more diverse colonies and symbiotic relationship between probiotics than those found in a capsule (which are fabricated in a lab). So much so that you end up saving money if you make your own, vs. buying a probiotic bottle of pills.  

I'm in love with these frozen packs of fresh raw coconut (see below), and I bought a whole case just for this purpose: making my own yoghurt. While it's expensive, I've experienced breaking open expensive coconuts from a store and finding out that they're either purple inside, don't have enough meat, aren't fresh, or the outside is sprayed with fermaldehyde. Gross! You've ended up wasting a lot of time and having to return the coconuts anyway. This one is a no brainer: you save so much time and hassle! Plus they're frozen so they last a long time, ready to use when you need them. 

Also, here's a really good reason for making your own yoghurt: When you buy store-bought yoghurt, many times it has stabilizers and preservatives, even the good kinds. This recipe has 4 ingredients, all of which you can pronounce, and it's oh so easy & fast to make:

1 package raw coconut meat, defrosted (I love this brand)

1 cup coconut water (I prefer this one, as it's in a glass; you can also buy them individually at any health food store)

2 tablespoons pure vanilla extract

1 teaspoon probiotic powder (I use this one, but you can also break open a few probiotic capsules and give it a go)

Blend all ingredients together in a high speed blender until smooth, using the tamper to move all everything in towards the vortex. It's best to leave this overnight on a counter (if your kitchen is cool, otherwise, it will turn sour fast), or in the fridge. This helps the bacteria to proliferate (multiply) and create a probiotic-rich food that's not only creamy, sweet and delicious, but so very good for your micro biome. I love adding organic strawberries and cacao nibs to it and make it a morning breakfast. Enjoy! 

Herbed Raw Boursin


This probiotic-rich fermented cheese tastes very much like Boursin cheese, although it's completely dairy free and actually good for you! It goes really well with flax crackers and crudites, and although it is a 3-step process, it's actually very easy to make. 

2 cups soaked cashews (at least 4 hours), drained

1/3 cup hemp seeds

1 cup warm water with 1-2 teaspoons probiotic powder

Chopped dill, chives, peppercorns


Step 1: In a vitamix or high-speed blender (with tamper preferably), blend soaked cashews, hemp seeds, and the water with probiotic powder until smooth*.  Remove the mixture into a nut milk bag and let ripen over a colander in a bowl, covered and with a small weight, for about 15-24 hours, or per your taste.  To speed the process, you can also place it for 1 or 2 hours on top of a dehydrator to absorb some of the heat. 

Step 2: Scoop out the mixture into a bowl, and add 1-2 tablespoons chopped dill and 3 good sized chives, minced small.   Season with a little salt and taste, and adjust the seasoning if you need to.  

Step 3: Line a mold of your choice (ramekin, a 4 inch mold with a pop-out bottom, etc.) with wax paper or plastic wrap and pour the cheese mixture in.  This recipe should be enough for 3 or 4 ramekins or two 4-inch molds. Cover with more wax paper or plastic wrap and refrigerate at least overnight to set well.  

Step 4: Flip over, remove the wrapping and decorate with crushed herbs/pink peppercorns. Keep refrigerated and enjoy!  

I love this cheese best sprinkled with herbes de provence, at the very end. It takes it to a whole new level! 

NOTE: I tend to like my cheese tart and a little more ripe, so I add about 1.5 teaspoons. Also, the longer you let it sit (or if you put it on the top of your dehydrator to absorb some of the heat that comes out) it will ripen faster.

Raw Apple Cinnamon Crisps

This recipe came by mistake, actually. I was intending to make apple leather and, well, I sort of forgot about it as it was "cooking" in the dehydrator. When it came time to peel it off the dehydrator sheet, it came out in one large, very firm cracker which I then tasted and fell in love with. And ironically, I left it out (of the dehydrator) for a few hours and it became soft like fruit leather. So yes, you can have it both ways.

This recipe is best with tart green apples, but if tart isn't your thing, feel free to experiment with red apples, pears, or a combo of both. 

2 green apples, chopped, with peel

juice of one lemon

1 tsp cinnamon

Blend the three ingredients together and pour onto a dehydrator sheet fitted with a teflex sheet. Dehydrate overnight at 110 degrees. Break into little crisps and enjoy! Best if kept in an airtight container, although in a few days it will begin to soften naturally. If so, just pop them back in the dehydrator for a nice crispy treat!